| 
| 
|
|
Compact Mobile Loading Bench
| ||
|
|
|
|
|
Compact Mobile Loading Bench
| ||
I started out loading using my woodworking bench and "borrowed" drawers from other machine benches to store powder measure and scale etc., but decided to build a dedicated bench using the same technique as my machine benches (for pics please see my machine benches page). My house and shop are tiny so I needed something I could move around, even in the house if Betty didn't mind.
First, I needed stablility when using the press and also be moved around. I did not want something attached to a wall or anchored to the floor but it must stay put while I'm loading. I realized that by mounting the press on the end of an elongated table with moderate mass (and did a few leverage vs weight calculations) it should be stable during a resizing operation. The weight of tools and a possible additional press stored in a bench would help with stability. Considering, you should only have stuff out for a single caliber during loading, the amount of space I needed was 36" X 18" X 36" high. I know it seems small at first glance, but the bench top, the loading shelf and the tool drawers provide more space than is apparent. The bench holds all the tools I use while reloading a single caliber. I have other cabinets for bullet and brass storage, shell plates/dies, and turrets. I always feel you should focus on the loading at hand so I gather all the components, for one caliber being loaded, on the bench top. I considered a drop shelf on the back beside the press or another shelf on the right but so far I haven't needed it.
I have used it to load thousands of rounds and it works great, and caliber conversion is quick since the tools and parts are at hand (adjusting the powder measure takes most of the time). Once I started using the Pro-2K, and it's priming, I had to lock the casters so the bench wouldn't slowly move away from me when I seated a primer.
Anyone interested in building it yourself please see Bench Diagrams, Bench ConstructionBench Construction, or John's Bench, or Kyle's Bench, or purchasing one of these email me at  .
The bench dimensions can be customized easily so if its close to what you need, let me know and we can work it out.
.
The bench dimensions can be customized easily so if its close to what you need, let me know and we can work it out.
I sit on a 24" high step stool while loading, I tried standing in a ealier version but I load for 2 or 3 hours so that wasn't a good idea.
This doesn't seem very large but I looked at only the space I needed for loading a single caliber and all the tools are conveniently in the top drawer.
Moving the loading area to the end also allows me to access the drawers while seting up or during loading.
The top can be used for other things like tumbling which I don't usually do while I'm loading cartridges.
I had thought of reloading in the den from time to time but Betty wasn't real keen on that idea.
Propellant and primers are kept in a locked closet in the house (where its cooler) and separate from each other as a safety measure.
I added locks on the drawers in case I wanted to store loaded ammo here or just secure the loading tools.
The loading press is normally attached at the end (see pics) which provides maximum stability during sizing etc. I only have to lock the casters when seating primers using a press, primer seating force is horizontal.
I can use a second press on the left end for things like the bullet puller or depriming.
Currently, I use two presses, the Pro2K on one end and a turret (for resizing/depriming) on the other end.
I thought about adding a small drop leaf at the rear (right side of loading press area), but so far I haven't needed it.
The locking swivel casters I chose were the cheapest double locks I could find (Shepherd 3" at Home Depot) and rated at 130# each for a bench total capacity of 520# (this could be increased using more expensive casters, the bench frame should support well over 1000 lbs.).
The bench has two openings, the front with two large drawers plus a storage bay underneath for presses and sorting bowls, and an opening at the right end under the loading area for tumbler storage and the pull out loading shelf.
I added two tee tracks to allow attaching and repositioning presses, tumblers, and powder measure (see pics).
The loading bench structure is based on my machine bench design. Even though cabinet making techniques are used for strength in it's construction, it is still a work bench made of 2x4s, 2x6s, and 1/2" plywood. Several things are unique about this design: placement of the presses on the end to achieve stability, mounting the presses on a base held down with tee bolts, and the loading shelf to improve hand movement effeciency. The placement of the presses on the ends allows me to access the drawers while the press is mounted.
Loading Shelf
I came up with the loading shelf after doing a little time motion study for depriming and loading.
This shelf saves me quite a bit of hand motion thus time during both operations.
During depriming, the shelf holds a large plastic bucket (1/2 gal ice cream bucket) for catching the resized/deprimed cases.
When loadig the shelf holds a plastic cup of clean sized cases and the hand priming tool holder.
Loading shelf construction page.
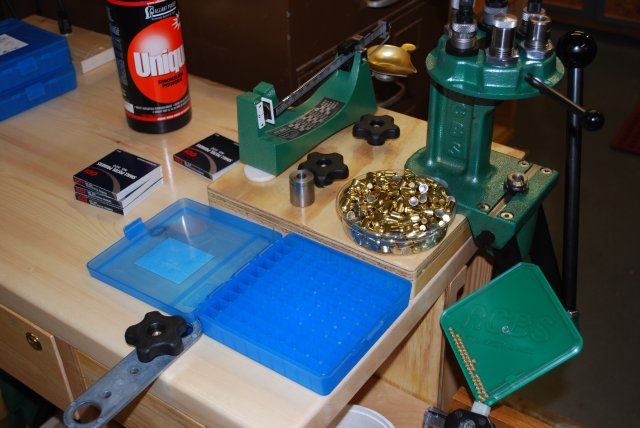
Powder Measure Holder
I drilled an extra hole in the flat powder measure mounting plate that came with the RockChucker Kit for a tee bolt.
This allows me some place to set the Uniflow while I'm changing turrets.
Some time ago I had hit on the idea of mounting loading presses on a small base which was held down by tee bolts, allowing quick change from one press to another, or total removal so the bench could be used for other jobs. For more info on the press base please look at the press base page.
Note: In the past I mainly used the RCBS Turret press, here is the turret storage rack and here is the sequence of use. The 9 hole turret rack is the same width as the bench is deep (18") and could be attached to the left end of the bench, but I had a convenient place to place it at eye level and now I use the left end for the PRO-2K. The WoodTools section has an explanation of the press bases I built to attach the presses.
The turret, and semi-progressive loading eliminates the need for loading blocks and individual die storage, but I do have to store the turrets.
About 5 months ago, I purchased an RCBS Pro 2000 progressive press. I mounted it on the left end tee track and keep the turret on the right end for depriming and ocassional bullet pulling. I disabled the auto indexing for the Pro2K to prevent sloshing power out of the cases. The most critical part of using the Pro2K is making sure the shell plate is exactly positioned on it's indent when priming a case and making sure the spring fingers are pushing the case snug against the shell plate at each position.
When I originally made the bench and these pics, I was using the RCBS Turret Press, now I am using an RCBS Pro2K. The bench works very well with the Pro2K, I put it on the left end and leave the turret on the right end.
In the background of the following pics, you will note other benches made with the same design and construction technique. I also make caster bases for for machines that already have a base, like the bandsaw, jointer, and planer. My Machine Bench Page
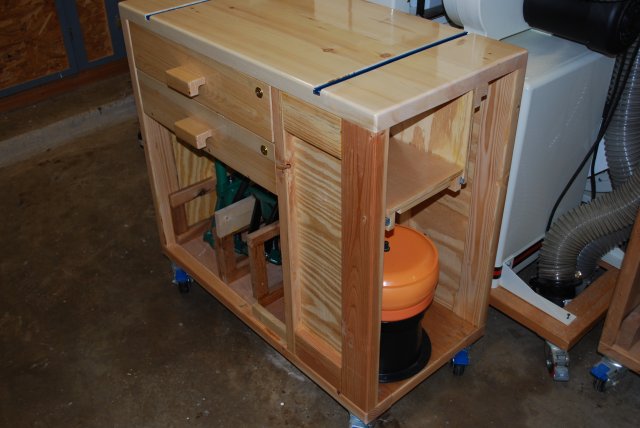
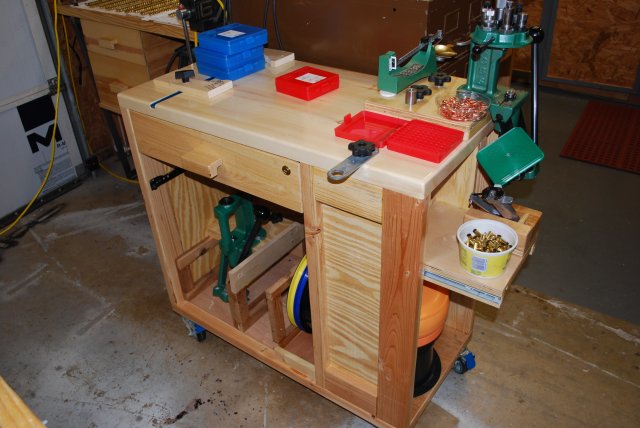
| Entire bench with all equipment stored. |
|
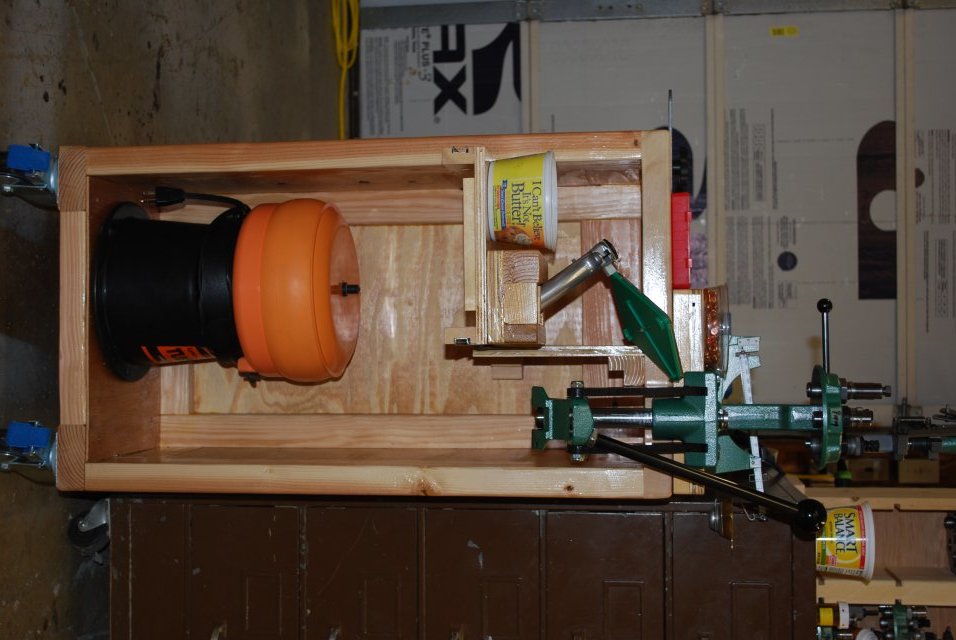
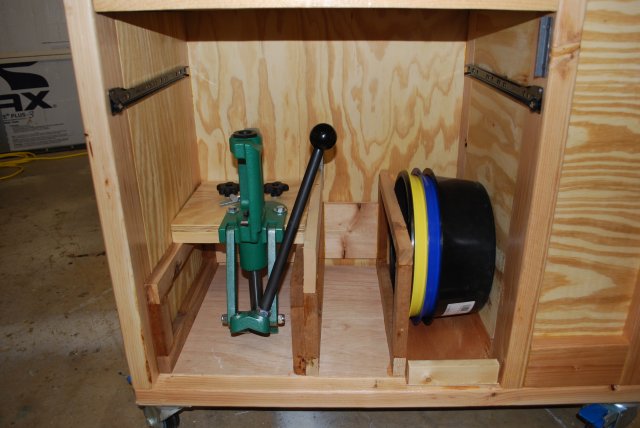
Loading bay view showing turret press, tumbler storage area, and loading shelf.
The loading shelf holds a large catch bucket when depriming and the clean brass and the hand primer tool holder when loading (shown here). There is room in the loading bay for a container of Lyman tumbling media. |
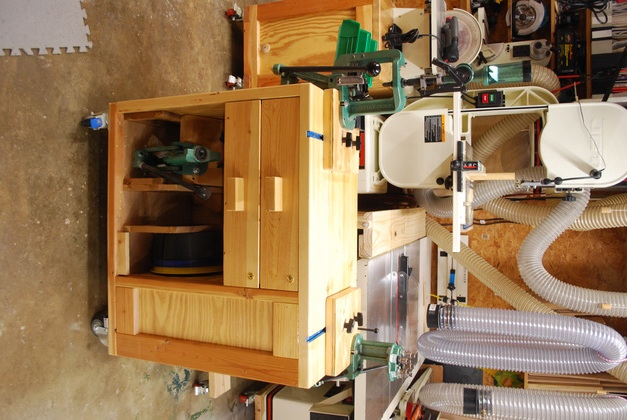
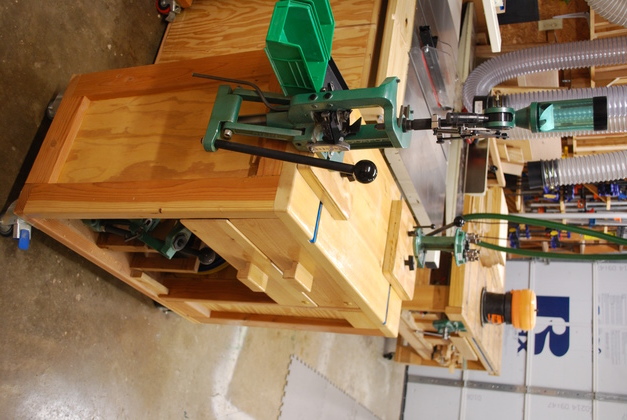
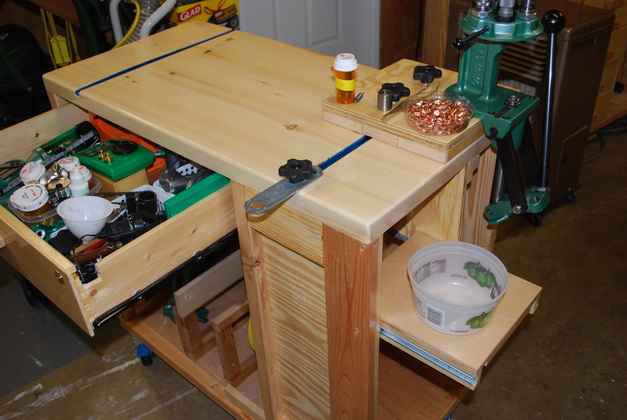
| Bench with Pro 2K on left and turret press on right (over loading bay). I load from either end. Also note the Rock Chucker, and shell separator pans stored in the storage bay. |
|
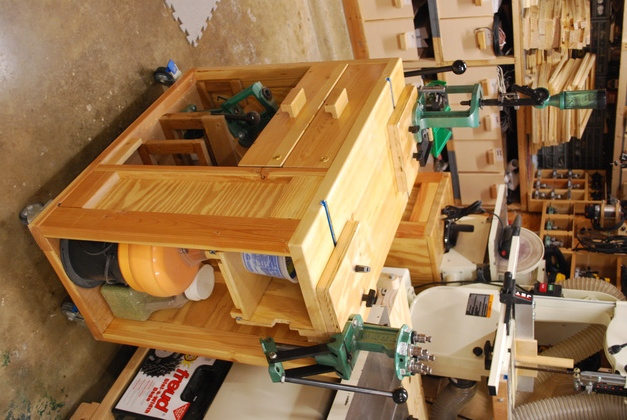
| Showing turret press, loading bay, with tumbler and tumbler media storage. |
|
| View from left end showing Pro 2k mount. |
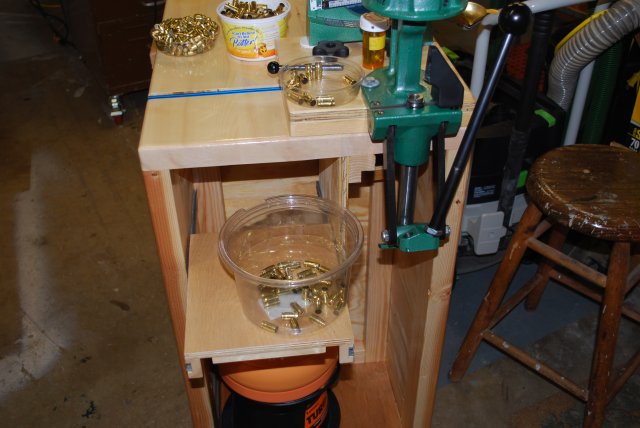
| Close up when set up for Depriming. The primed cases from the tumbler are in the clear pan on the left of the press and the deprimed cases are in the large "catch" bowl on the loading shelf. Also note the 24" high wooden stool on the right, I sit on it when I load. Here is a link to the deprime/resize page. |
|
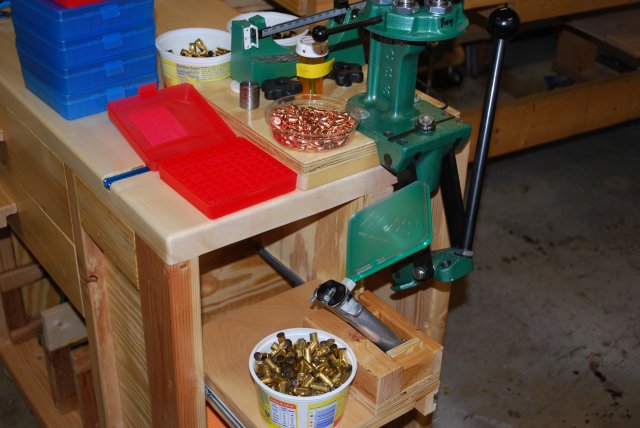
Close up when set up for loading 9mm.
Note loading shelf with clean brass and hand primer unit with it's holder. |
|
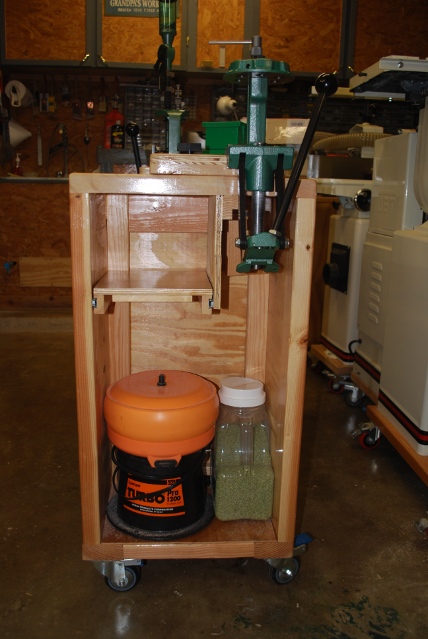
Entire bench when ready to load 9mm.
Note: three things using the tee tracks, tumbler clamps, press mount, and powder measure bracket. The powder measure bracket holds the powder measure while I'm changing turrets. |

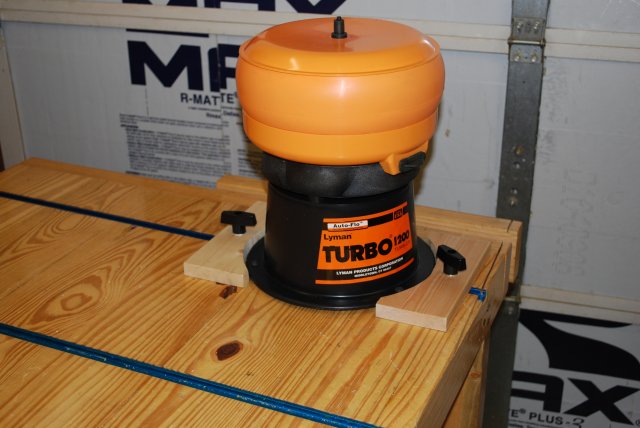
| Tumbler in use on top of the loading bench, note the tumbler clamps using tee tracks. |
| The other tumbler in use on my woodworking bench. Since we usually shoot two calibers on a range visit, its much faster to tumble in two tumblers. Note the tumbler clamps. |
| Front bay (bottom drawer removed), showing the press rack with a Rockchuker in the low position and the shell sorter pans on the right. The smaller black pan inside the yellow pan came with the tumbler and is used as the bottom of the Shellsorter stack, and to catch the media as it comes out of Lyman's Auto-Flo tumbler. |
| Note tumbler storage will also hold the large Lyman cob bottle. |

| Top drawer with loading operation tools, balance scale, powder measure, small wooden box of case guages. The Rx bottles contain small parts for the press, collets for bullet puller, etc. |
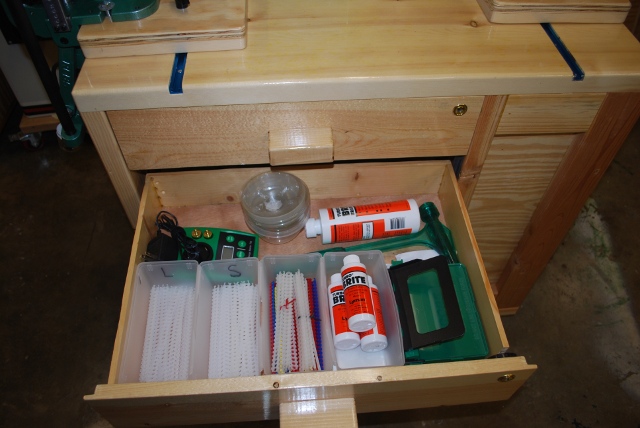
| Bottom drawer with some tools, primer strips, APS loader, digital scale, tumbler clamps. Note: Originally, I had this drawer loaded with some of my bullets, now I have an entire cabinet of drawers to store bullets and brass. |

| Both drawers open and all equipment stored. You may notice this pic was taken earlier when the bottom drawer contained bullets. Also note, I used a Euro-Slide on the top drawer and a full extension ball bearing slide on the bottom drawer, I won't use the Euro-Slide on another loading bench, I like the full extension. |
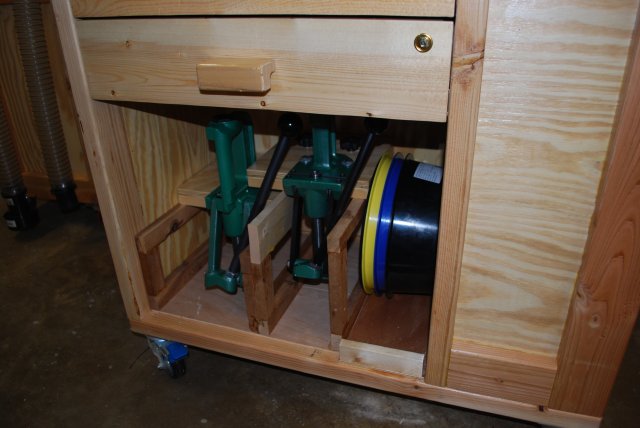
| Storage bay, all presses stored and bottom drawer in place. |
| Set up to resize. |