Getting Started
From: https://zoneminder.readthedocs.io/en/stable/userguide/gettingstarted.html
Getting Started
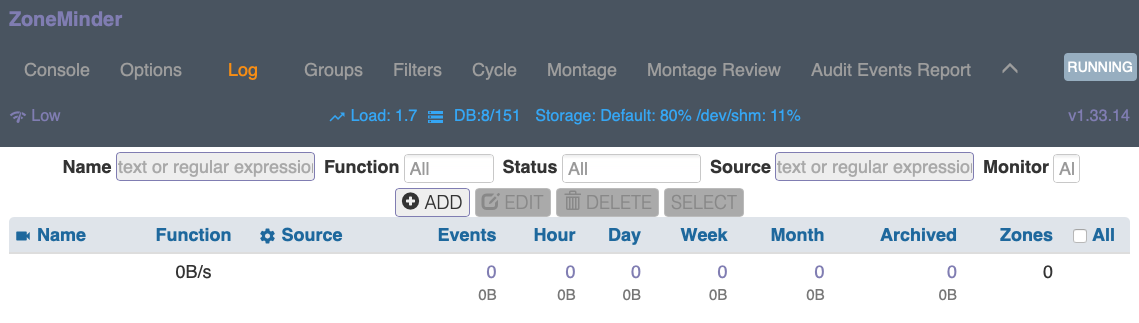
Having followed the Installation Guide for your distribution you should now
be able to load the ZoneMinder web frontend. By default this will be with
the Classic skin, below is an example of the page you should now see.
Setting Timezone
Previous versions of ZoneMinder required the user to set up Timezone
correctly in php.ini. This is no longer the case. Starting 1.34, ZoneMinder
allows you to specify the TimeZone in the UI. Please make sure it is set up
correctly. The Timezone can be changed by selecting:
Options->System->Timezone

Enabling Authentication
We strongly recommend enabling authentication right away. There are some
situations where certain users don’t enable authentication, such as
instances where the server is in a LAN not directly exposed to the Internet,
and is only accessible via VPN etc., but in most cases, authentication
should be enabled. So let’s do that right away.
- Click on the Options link on the top bar of the web interface
- You will now be presented with a sidebar full of options. Click on the
“System” link
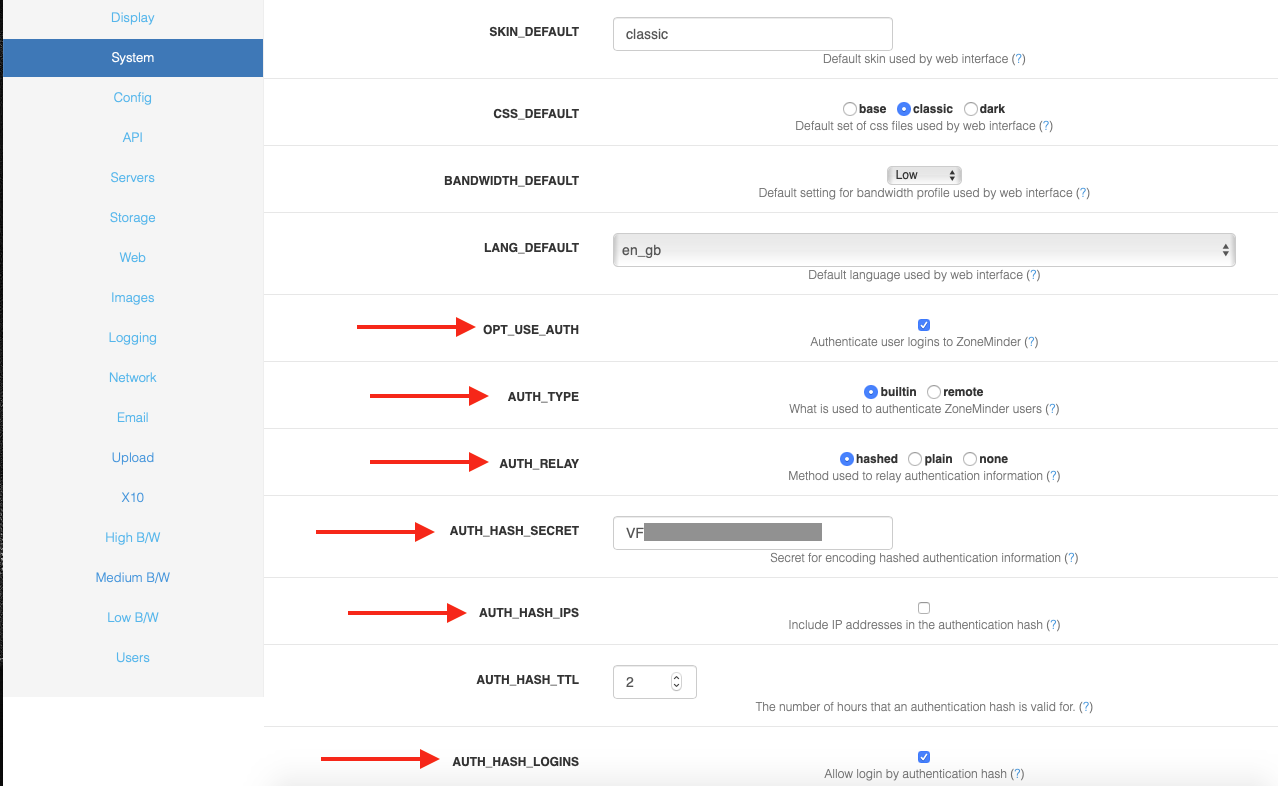
- The relevant portions to change are marked in red above
- Enable OPT_USE_AUTH - this automatically switches to authentication mode
with a default user (more on that later)
- Select a random string for AUTH_HASH_SECRET - this is used to make the
authentication logic more secure, so please generate your own string and
make sure it is sufficiently randomized and long. Note that if you plan to
use APIs with ZoneMinder (needed by zmNinja/other apps), it is mandatory
that you have this field populated
- The other options highlighed above should already be set, but if not,
please make sure they are
- Note that if you are planning to use zmNinja and plan to use ZM
authentication, you must also:
- set AUTH_RELAY to hashed
- Enable AUTH_HASH_LOGINS
- Click on Save at the bottom and that’s it! The next time you refresh that
page, you will now be presented with a login screen. Job well done!
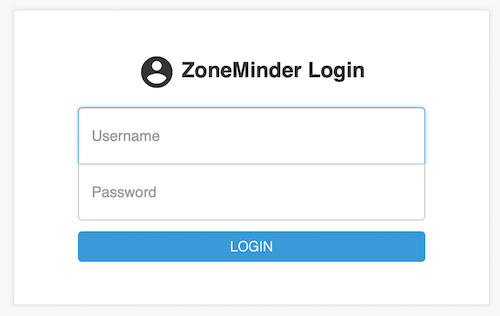 Note
The default login/password is “admin/admin”
Note
The default login/password is “admin/admin”
Understanding the Web Console
Before we proceed, lets spend a few minutes understanding the key functions
of the web console. For the sake of illustration, we are going to use a
populated zoneminder configuration with several monitors and events.
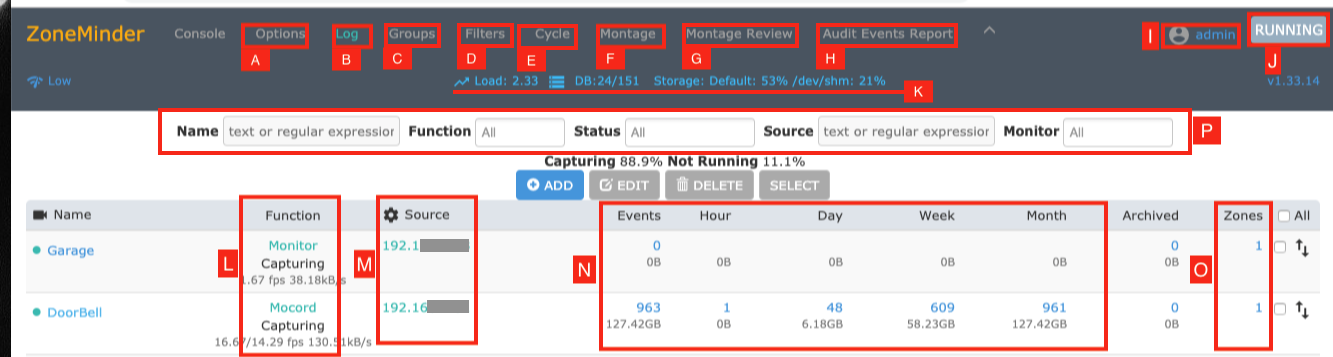 This screen is called the “console” screen in ZoneMinder and shows a
summary of your monitors, associated events and more information.
This screen is called the “console” screen in ZoneMinder and shows a
summary of your monitors, associated events and more information.
- A The options menu lets you configure many aspects of ZoneMinder. Refer to
Options.
- B This brings up a color coded log window that shows various system and
component level logs. This window is useful if you are trying to diagnose
issues. Refer to Logging.
- C ZoneMinder allows you to group monitors gor logical separation. This
option lets you create new groups, associate monitors to them and
edit/delete existing groups.
- D Filters are a powerful mechanism to perform actions when certain
conditions are met. ZoneMinder comes with some preset filters that keep a
tab of disk space and others. Many users create their own filters for more
advanced actions like sending emails when certain events occur and more.
Refer to Filtering Events.
- E The Cycle option allows you to rotate between live views of each
cofigured monitor.
- F The Montage option shows a collage of your monitors. You can customize
them including moving them around.
- G Montage Review allows you to simultaneously view past events for
different monitors. Note that this is a very resource intensive page and its
performance will vary based on your system capabilities.
- H Audit Events Report is more of a power user feature. This option looks
for recording gaps in events and recording issues in mp4 files.
- I This is the user you are currently logged in as.
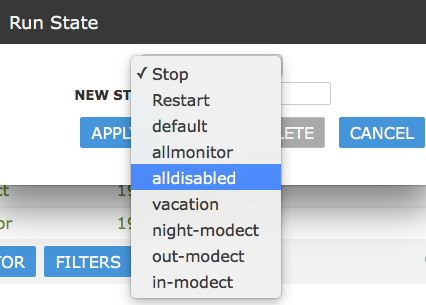
- J ZoneMinder allows you to maintain “run states”. If you click on the
“Running” text, ZoneMinder brings up a popup that allows you to define
additional “states” (referred to as runstates). A runstate is
essentially a snapshot that records the state of each monitor and you can
switch between states easily. For example, you might have a run state
defined that switches all monitors to “monitor” mode in which they are
not recording anything while another state that sets some of the monitors to
“modect”. Why would you want this? A great example is to disable
recording when you are at home and enable when you are away, based on time
of day or other triggers. You can switch states by selecting an appropriate
state manually, or do it automatically via cron jobs, for example. An
example of using cron to automatically switch is provided in the FAQ. More
esoteric examples of switching run states based on phone location can be
found here.
Here is an example of multiple run states that I’ve defined. Each one of these
runstates changes the mode of specific monitors depending on time of day and
other conditions. Use your imagination to decide which conditions require state
changes.
 K: This line shows you system health information
L: This defines how Zoneminder will record events. There are various modes.
In brief Modect == record if a motion is detected,Record = always record
24x7, Mocord = always record PLUS detect motion, Monitor = just provide a
live view but don’t record anytime, Nodect = Don’t record till an
external entity via zmtrigger tells Zoneminder to (this is advanced usage).
M: This is the “source” column that tells you the type of the camera -
if its an IP camera, a USB camera or more. In this example, they are all IP
cameras. Green means the monitor is running. Red means there is something
wrong with that camera.
N: This is the core of ZoneMinder - recording events. It gives you a count
of how many events were recorded over the hour, day, week, month.
O: These are the “Zones”. Zones are areas within the camera that you
mark as ‘hotspots’ for motion detection. Simply put, when you first
configure your monitors (cameras), by default Zoneminder uses the entire
field of view of the camera to detect motion. You may not want this. You may
want to create “zones” specifically for detecting motion and ignore
others. For example, lets consider a room with a fan that spins. You surely
don’t want to consider the fan moving continuously a reason for triggering
a record? Probably not - in that case, you’d leave the fan out while
making your zones.
P: This is a “visual filter” which lets you ‘filter’ the console
display based on text you enter. While this may not be particularly useful
for small systems, ZoneMinder is also used in mega-installations will well
over 200+ cameras and this visual filter helps reduce the monitors you are
seeing at one time.
K: This line shows you system health information
L: This defines how Zoneminder will record events. There are various modes.
In brief Modect == record if a motion is detected,Record = always record
24x7, Mocord = always record PLUS detect motion, Monitor = just provide a
live view but don’t record anytime, Nodect = Don’t record till an
external entity via zmtrigger tells Zoneminder to (this is advanced usage).
M: This is the “source” column that tells you the type of the camera -
if its an IP camera, a USB camera or more. In this example, they are all IP
cameras. Green means the monitor is running. Red means there is something
wrong with that camera.
N: This is the core of ZoneMinder - recording events. It gives you a count
of how many events were recorded over the hour, day, week, month.
O: These are the “Zones”. Zones are areas within the camera that you
mark as ‘hotspots’ for motion detection. Simply put, when you first
configure your monitors (cameras), by default Zoneminder uses the entire
field of view of the camera to detect motion. You may not want this. You may
want to create “zones” specifically for detecting motion and ignore
others. For example, lets consider a room with a fan that spins. You surely
don’t want to consider the fan moving continuously a reason for triggering
a record? Probably not - in that case, you’d leave the fan out while
making your zones.
P: This is a “visual filter” which lets you ‘filter’ the console
display based on text you enter. While this may not be particularly useful
for small systems, ZoneMinder is also used in mega-installations will well
over 200+ cameras and this visual filter helps reduce the monitors you are
seeing at one time.
Adding Monitors
Now that we have a basic understanding of the web console, lets go about adding
a new camera (monitor). For this example, lets assume we have an IP camera that
streams RTSP at LAN IP address 192.168.1.33.
| |
|
|
The first thing we will need to know is how to access that camera’s video
feed. You will need to consult your camera’s manual or check their forum.
Zoneminder community users also have a frequently updated list right here
that lists information about many cameras. If you don’t find your list
there and can’t seem to find it elsewhere, feel free to register and ask
in the user forums.
|
Note
This is meant to be a simple example. For a more
detailed explanation of other options available
when creating a monitor, please see Defining Monitors
|
The camera we are using as an example here is a Foscam 9831W which is a
1280x960 RTSP camera, and the URL to access it’s feed is
username:password@IPADDRESS:PORT/videoMain
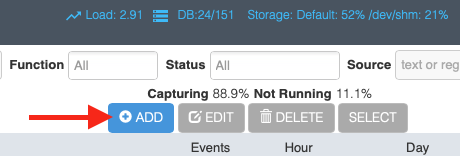
Let’s get started:
Click on the “Add” button below:
 This brings up the new monitor window:
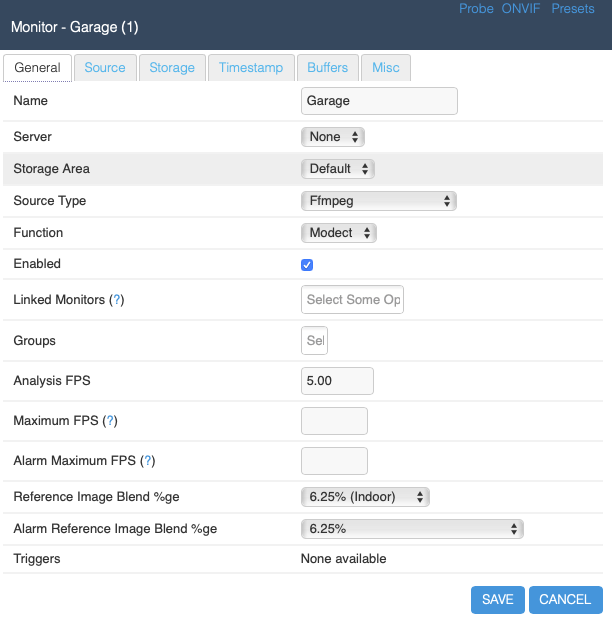
- We’ve given it a name of ‘Garage’, because, well, its better than
Monitor-1 and this is my Garage camera.
- There are various source types. As a brief introduction you’d want to use
‘Local’ if your camera is physically attached to your ZM server (like a
USB camera, for example), and one of ‘Remote’, ‘FFMpeg’,
‘Libvlc’ or ‘cURL’ for a remote camera (not necessarily, but
usually). For this example, let’s go with ‘FFMpeg’.
Note
As a thumb rule, if you have a camera accessible via IP and it does HTTP or
RTSP, start with FFMpeg first and libvlc if it doesn’t work (Defining
Monitors covers other modes in more details). If you are wondering what
‘File’ does, well, ZoneMinder was built with compatibility in mind. Take
a look at this post to see how file can be used for leisure reading.
- In this example, the Function is ‘Modect’, which means it will start
recording if motion is detected on that camera feed. The parameters for what
constitutes motion detected is specific in Defining Zones
- In Analysis FPS, we’ve put in 5FPS here. Note that you should not put an
FPS that is greater than the camera FPS. In my case, 5FPS is sufficient for
my needs
Note
Leave Maximum FPS and Alarm Maximum FPS empty if you are configuring an IP
camera. In older versions of ZoneMinder, you were encouraged to put a value
here, but that is no longer recommended. Infact, if you see your feed going
much slower than the feed is supposed to go, or you get a lot of
buffering/display issues, make sure this is empty. If you need to control
camera FPS, please do it directly on the camera (via its own web interface,
for example)
- We are done for the General tab. Let’s move to the Source tab
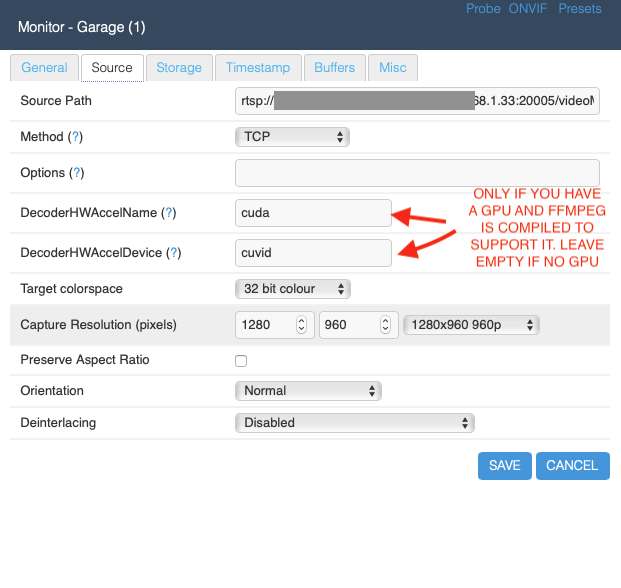
- Let’s select a protocol of RTSP and a remote method of RTP/RTSP (this is
an RTSP camera)
- Note that starting ZM 1.34, GPUs are supported. In my case, I have an
NVIDIA GeForce GTX1050i. These cuda and cuvid parameters are what my system
supports to use the NVIDIA hardware decoder and GPU resources. If you
don’t have a GPU, or don’t know how to configure your ffmpeg to support
it, leave it empty for now. In future, we will add a section on how to set
up a GPU
NOTE: It is entirely possible that cuda and cuvid don’t work for you and
you need different values. Isaac uses cuda in DecoderHWAccelName and leaves
DecoderHWAccelDevice empty. Try that too.
Todo
add GPU docs
That’s pretty much it. Click on Save. We are not going to explore the
other tabs in this simple guide.
You now have a configured monitor:
 And then, finally, to see if everything works, if you click on the garage
monitor you just added, you should be able to see its live feed. If you
don’t, inspect your webserver logs and your ZoneMinder logs to see what is
going on.
And then, finally, to see if everything works, if you click on the garage
monitor you just added, you should be able to see its live feed. If you
don’t, inspect your webserver logs and your ZoneMinder logs to see what is
going on.
Switching to another theme
Todo
Fix theme text after I clearly understand what System->CSS is doing
When you first install ZoneMinder, you see is what is called a “classic”
skin. Zoneminder has a host of configuration options that you can customize
over time. This guide is meant to get you started the easiest possible way,
so we will not go into all the details. However, it is worthwhile to note
that Zoneminder also has a ‘flat’ theme that depending on your
preferences may look more modern. So let’s use that as an example of
introducing you to the Options menu
- Click on the Options link on the top right of the web interface in the
image above
- This will bring you to the options window as shown below. Click on the
“System” tab and then select the “flat” option for CSS_DEFAULT as
shown below

- Click Save at the bottom
Now, switch to the “Display” tab and also select “Flat” there like so:
 Your screen will now look like this:
Congratulations! You now have a modern looking interface.
Your screen will now look like this:
Congratulations! You now have a modern looking interface.
Conclusion
This was a quick ‘Getting Started’ guide where you were introduced to
the very basics of how to add a monitor (camera). We’ve skipped many
details to keep this concise. Please refer to Defining Monitors for many
other customization details.