How To Update Gigabyte BIOS
From: https://www.corsair.com/us/en/explorer/diy-builder/how-tos/how-to-update-bios-on-a-gigabyte-motherboard/
You'll need an older CPU chip compatable with your motherboard
before it's flashed.
After flashing with the new BIOS, install your new Ryzen 5000.
HOW TO UPDATE THE BIOS ON A GIGABYTE MOTHERBOARD
Updating the BIOS (Basic Input/Output System) on a GIGABYTE motherboard is a
critical task that may be easily performed, even if it is your first time doing
so. An outdated BIOS can cause compatibility and performance issues. For this
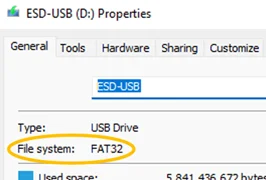
process, you’ll require a USB flash drive that is formatted as FAT32. To check
if your USB flash drive is formatted to FAT32, you may connect it to a system
and check its properties via Windows Explorer.
 Picture1
After verifying you have a USB flash drive ready, follow the instructions below
to update the BIOS on your GIGABYTE motherboard:
Picture1
After verifying you have a USB flash drive ready, follow the instructions below
to update the BIOS on your GIGABYTE motherboard:
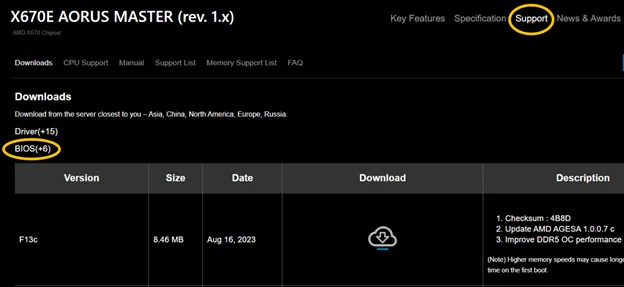
- Visit the official GIGABYTE website and navigate to your exact motherboard
model’s product page – be mindful that there often “Wi-Fi” and non-Wi-Fi
motherboard models. From there, you’ll navigate to the “Support” page.
 Picture2
- Click on the “BIOS” tab, where you’ll find a library of BIOS
versions. Download the latest BIOS available for your motherboard – preferably
not one that states “Beta”. If you are looking to downgrade the BIOS version in
case of troubleshooting, you would opt to download a version prior to your
current BIOS.
- Open the downloaded zip folder and extract the BIOS file, typically the
largest file in the folder and named after your motherboard model (ex.
“X670EAORUSMASTER.F13c”), to your USB flash drive. Any other files are not
necessary for our method of updating through BIOS.
- With the USB flash drive still inserted, restart your system and enter BIOS
by quickly pressing the appropriate key (usually “Delete”, “F2”, “F10”) at the
GIGABYTE/AORUS logo screen to enter the BIOS setup. Refer to your motherboard's
manual or the initial boot screen for the correct key.
- Inside the BIOS setup, enter “Q-FLASH” – typically via your keyboard’s F8
button. Select the BIOS file on the USB drive and follow the on-screen prompts
to confirm and start the BIOS update.
 Picture3
This process may take a few minutes which starts with verification, system
restart, and then installation. Do not interrupt it under any circumstances, as
doing so may brick the motherboard’s functionality. Once the BIOS update is
complete, your system will automatically restart.
Picture3
This process may take a few minutes which starts with verification, system
restart, and then installation. Do not interrupt it under any circumstances, as
doing so may brick the motherboard’s functionality. Once the BIOS update is
complete, your system will automatically restart.
- You may enter the BIOS setup again and check the BIOS version to ensure it
has been updated. It would also be ideal to re-enable XMP/EXPO to ensure you’re
fully utilizing your RAM’s speed capabilities. If you had custom BIOS settings,
reconfigure them as needed.
- Make sure to save any changes and exit – this is typically done via “F10”.
If there are no issues – voila! You’ve successfully updated your BIOS.