Flatten a Workbench with a Router
From highlandwoodworking.com:
The reason I copied this, some sites phase out old articles and I wanted to always have this.
Also, I wanted the print to be a little more readable.
Making It Plane:
Committed hand tool enthusiasts can flatten a workbench by hand with a jointer plane,
but after doing two of three large benchtops that way myself, I
developed a distinct urge to find a less laborious method. It was Tage
Frid (it's pronounced "Tay") who showed me a router jig that could be
scaled up to mill even the largest benchtop rapidly and accurately.
 A couple of versions of the idea appear inTage Frid Teaches Woodworking, Book 3: Furnituremaking
(pages 158 & 164). The design is typical of Tage's approach to
woodworking: the concept is simple and the work itself quite
straightforward. All you have to do is arrange for a router to
move in a flat plane just above your workbench; set your depth of cut
to skim the entire surface, and at the end of the exercise the benchtop
will be flat. Nothing to it.
A couple of versions of the idea appear inTage Frid Teaches Woodworking, Book 3: Furnituremaking
(pages 158 & 164). The design is typical of Tage's approach to
woodworking: the concept is simple and the work itself quite
straightforward. All you have to do is arrange for a router to
move in a flat plane just above your workbench; set your depth of cut
to skim the entire surface, and at the end of the exercise the benchtop
will be flat. Nothing to it.
The flattening jig is readily fabricated from solid wood or
plywood. You'll make two side rails roughly 18" longer than your
workbench, and you'll make a sled that can ride lengthwise along the
rails while your router slides back and forth within. Make the rails of
3/4" lumber 6" to 8" wide. Joint one edge of each piece as carefully as
you can, then butt the edges against each other for a critical look at
how close you've gotten them to straight. I finished mine with my 07
jointer plane to get them even straighter than my 5-ft. jointer could
do. When you're satisfied, rip the opposite edge of each piece parallel.
Make the side walls and bottom rails of the sled in the same way,
taking care to get each component as straight as reasonably possible.
Don't waste your time worrying about thousandths of an inch, but just do
good work.
The router sled
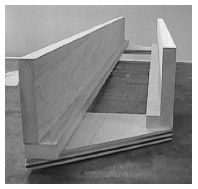 Make
the sled with high side walls to resist sagging under load, and attach
strips along the bottom edges to support your router and stiffen the
walls as well. Make a square sub-base for your router so it will sit
stably and securely in the sled. Attach cleats beneath the ends of the
side walls to separate them by the width of your sub-base; they should
hold the sled snugly across the rails on your bench. Nail stop blocks
into each end of the sled to limit the router's travel, so the bit you
use just barely cuts into the side rails. Unlike those pictured, make
the cleats that join the sled walls several inches wider than the sled
(I ran short of scrap plywood) so they'll slide along the rails without
racking and binding. Wax the top of the rails, the inside of the sled
and the face of each cleat to make all moving parts smooth and slippery.
Make
the sled with high side walls to resist sagging under load, and attach
strips along the bottom edges to support your router and stiffen the
walls as well. Make a square sub-base for your router so it will sit
stably and securely in the sled. Attach cleats beneath the ends of the
side walls to separate them by the width of your sub-base; they should
hold the sled snugly across the rails on your bench. Nail stop blocks
into each end of the sled to limit the router's travel, so the bit you
use just barely cuts into the side rails. Unlike those pictured, make
the cleats that join the sled walls several inches wider than the sled
(I ran short of scrap plywood) so they'll slide along the rails without
racking and binding. Wax the top of the rails, the inside of the sled
and the face of each cleat to make all moving parts smooth and slippery.
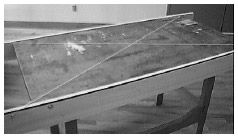
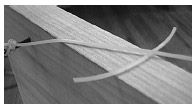
Checking for twist
 Before
you start work, get a clear picture of what needs to be done. The side
rails make good straightedges for checking the benchtop's length and
width, and together they can be used as oversize winding sticks to check
for twist. Note the edge of the far rail has been blackened with a
magic marker for good contrast, so even the slightest twist will show
clearly. If there is twist present, note the high and low corners, and
plan to set up your side rails accordingly: a little higher above the
low corners of the bench, and a little lower at the high corners. This
lets you remove as little material as possible while getting the top
completely flat.
Before
you start work, get a clear picture of what needs to be done. The side
rails make good straightedges for checking the benchtop's length and
width, and together they can be used as oversize winding sticks to check
for twist. Note the edge of the far rail has been blackened with a
magic marker for good contrast, so even the slightest twist will show
clearly. If there is twist present, note the high and low corners, and
plan to set up your side rails accordingly: a little higher above the
low corners of the bench, and a little lower at the high corners. This
lets you remove as little material as possible while getting the top
completely flat.
Leveling the rails
 Mount
the side rails on the edges of the bench with screws at each corner
(plus one in the center on a long bench). Drill 3/8" holes through the
rails to allow for height adjustment, and drive #10 or #12 screws with
washers into the bench. Getting the top edges of the rails into the same
plane is unbelievably easy. Drive a nail into the outside face of each
end of each rail. Tie a piece of strong string to one nail and pull it
tight diagonally across the bench, tying it off to the nail in the far
corner. Do the same on the other diagonal. Since the second string
crosses above the first, it must be shimmed up exactly one string
diameter where it rests on the rails.
Mount
the side rails on the edges of the bench with screws at each corner
(plus one in the center on a long bench). Drill 3/8" holes through the
rails to allow for height adjustment, and drive #10 or #12 screws with
washers into the bench. Getting the top edges of the rails into the same
plane is unbelievably easy. Drive a nail into the outside face of each
end of each rail. Tie a piece of strong string to one nail and pull it
tight diagonally across the bench, tying it off to the nail in the far
corner. Do the same on the other diagonal. Since the second string
crosses above the first, it must be shimmed up exactly one string
diameter where it rests on the rails.
 Adjust
the rails until the two strings just kiss where they cross in the
center of the bench. If you can't touch the upper string without moving
the lower one, but the lower one doesn't rise at all when you lift the
upper, then you have established nearly perfect contact — and the edges
of your two rails now lie in a perfectly flat plane. When one of my
students taught me that trick I couldn't understand why it worked; it's
just too idiotically simple and far too cheap. It works, though, with an
utterly fabulous degree of precision. If like me, you're conceptually
challenged, just do it without waiting on understanding — results will
explain it all more clearly than words.
Adjust
the rails until the two strings just kiss where they cross in the
center of the bench. If you can't touch the upper string without moving
the lower one, but the lower one doesn't rise at all when you lift the
upper, then you have established nearly perfect contact — and the edges
of your two rails now lie in a perfectly flat plane. When one of my
students taught me that trick I couldn't understand why it worked; it's
just too idiotically simple and far too cheap. It works, though, with an
utterly fabulous degree of precision. If like me, you're conceptually
challenged, just do it without waiting on understanding — results will
explain it all more clearly than words.
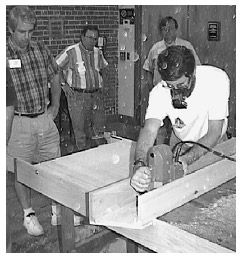
Getting it done
Put the biggest straight bit you own in your router (mine's 1-3/4"
diameter) and set its depth to just touch the benchtop at its lowest
corner (which you determined with the winding sticks way back when).
Start at the far corner of the right end of the bench. Pull the router
all the way across, and push it back along the same path; then move the
sled to the left slightly less than the bit diameter and repeat the
process. Routers go left [the subject of another free handout, Routers Go Left! ],
so make sure there's no uncut surface to the router's left (not your
left) as it travels — thus if your control isn't perfect as you pull the
router along, the worst thing that can happen is that the bit will push
itself out of contact with the wood and the router will simply stop
moving. Sure beats having it try to rip itself out of your hands and run
off across the bench.
 Incidentally,
this technique also directs almost all the waste straight away from
you, so you can rig up a dust port at the far end of the sled and
capture most of the enormous amount of debris you're going to generate.
We'll not let it go without saying that you are going to wear eye and hearing protection along with a good dust mask, right?
Incidentally,
this technique also directs almost all the waste straight away from
you, so you can rig up a dust port at the far end of the sled and
capture most of the enormous amount of debris you're going to generate.
We'll not let it go without saying that you are going to wear eye and hearing protection along with a good dust mask, right?
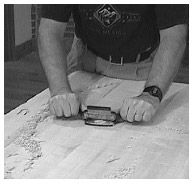
Finishing
A No. 80 handled scraper makes very quick work of smoothing bit
marks on the flattened surface to prepare it for finishing. Sand the
edges lightly, wipe off all the dust, and apply several coats of
Waterlox or your favorite oil. Now re-mount you vise or vises, trim
their jaws flush with the new surface, and get back to work!
Copyright © 1998 Highland Hardware