Hinges - Measuring and Fitting Instructions for Our Kitchen Hinges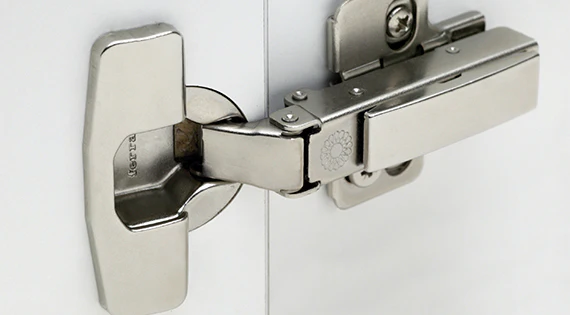 If you're looking to replace one of your hinges, our Hinge Helpdesk is a fantastic resource that will automatically select the closest hinge match from our range based on the information you provide, just click here to try it! Here we'll cover some general measurements for our hinges and how you can fit them. This is only an example piece and if you have purchased a hinge from us we suggest that you look on the specific hinge product page to find detailed drawings that can help you with specific measurements. You can also find a handy video guide to help illustrate at the bottom of this article.
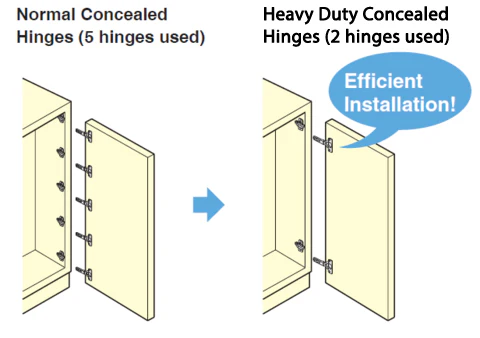
Number of HingesThe first thing you should consider is the number of hinges that you'll need for your door, some larger doors may require up to 5 hinges to open properly, the diagram featured here shows you the recommended number of hinges based on the size and weight of your door.When using Heavy Duty Hinges....
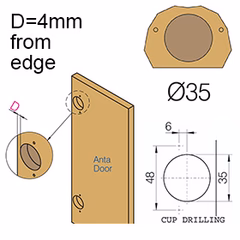
Drilling the Hinge Hole on the DoorYou should then check the diameter of the hole in the door that your current hinge sits in, these are usually 26mm, 35mm or 40mm, if you're installing a new hinge you'll need one of our hinge hole cutters(also available in 26mm and 40mm varieties). If you're installing a new hinge you should drill a correctly sized hole on the door using one of our hole cutter attachments, you'll need to measure 21.5mm inwards from the edge of the door - this leaves the hole 4mm from the edge of the door - then the hole will need to be 12mm deep for the hinge cup to sit flush. When you place the hinge into the cup hole, insert the screws to attach it fully. Please note, measurements for our 26mm and 40mm cup hole hinges may vary.
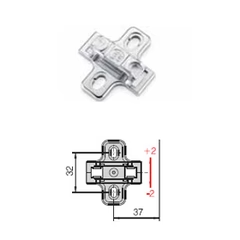
Fitting The Mounting PlateFor Full & Half Overlay hinge applications the mounting plate hole positions should be 37mm in from the front edge of the cabinet side, the vertical centres between the 2 plate holes should be 32mm apart. For Inset hinge applications the mounting plate hole positions should be 37mm + door thickness + 1mm for the door to be flush with the front edge of the cabinet side, the vertical centres between the 2 plates holes should be 32mm apart. If using the pre-mounted euro screws you will need a 5mm diameter 10mm deep hole and using wood screws a 1.5mm (1/16”) pilot hole or bradawl to mark position.
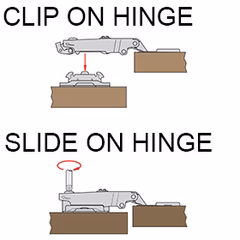
Attaching the Hinge to the Mounting PlateFor Clip-On hinges you will simply need to line the hinge up with the mounting plate and push it on, it should 'clip' when it's connected. You'll need to do this with all of the hinges on the door, bear in mind the position of the other hinges further down the door, it is often a good idea to line them all up in one go before clipping the first one on. For Slide-On hinges you will have to position the hinge on top of the mounting plate and then secure it with the screw on top, again make sure that you do this with all the hinges and ensure that they all line up before securing the first one.
Vertical, Lateral and Horizontal AdjustmentShould the door not line up with the carcass or other doors perfectly, your hinge has a Vertical Adjustment which enables you to move the door up and down by +/- 2mm in order to line it up at the top, you will find a screw to do this on the hinge. Your hinge will also have a Lateral adjustment which allows you to angle the door slightly by +/- 2mm in order to line it up with any other doors on the cabinet - you will find a screw to do this on the hinge. For Horizontal adjustment on our Tutti concealed hinges you can again adjust the hinge to move the door in and out in order to ensure that the door will align with any other doors on the cupboard - you will find a screw to do this on the hinge.Hinge Adjustment Diagram For more information on how to fit or replace a kitchen/cabinet hinge, follow the link below for our guided YouTube video: https://www.youtube.com/watch?v=yzJWAPsTFvM