Zm Zones
From: https://wiki.zoneminder.com/Understanding_ZoneMinder%27s_Zoning_system_for_Dummies
Understanding ZoneMinder's Zoning system for Dummies


Draw A Zone
Re: Ubuntu - How to draw the zone box???

Post by GivingItMyBest » Tue Jun 23, 2020 3:57 pm
When you click add new zone, it should have the entire box highlighted in RED,
with a green dot in each corner. You can move these dots to reshape the box;
and at the bottom of the page you will see where each dot has it's x and y
coordinates, and next to each co-ordinate is a plus and a minus sign. If you
need a shape other than square, you can add points in between existing points
and then move those. If you hover over the green dots, they will tell you what
point/vertex number they are so you can see which two points you need to add
between.


Contents
Background
ZoneMinder has a flexible (albeit hard to easily configure) zone detection
system using which you can modify how sensitive, precise, accurate your motion
alarms are. The official ZM documentation does a good job of describing all the
concepts here. However, you will see gobs of posts in the forum about people
complaining that ZM logs all sorts of events (ahem, as did I), ZM's detection is
rubbish and in-camera is better (ahem, as did I) and what not. But once you get
the concept, its incredibly powerful.
So instead of giving you a theoretical explanation, lets walk through a live
use-case. (Credit: user kkrofft helped a lot in me getting a hang of things
here. You should also read his earlier explanation here)
Real object detection
People often ask if ZM supports "object detection". The core ZM engine only
detects change in pixels (motion), which is what this article is about. That
being said, incase you did not know, ZoneMinder now has support for person,
object, face recognition. So while you can and should optimize your zones,
if your real interest is person detection, you can do that using my event
server. Note that object detection works after ZM detects motion change, so
this article applies either way.
Some concepts
Let's take a look at this area below. Lets suppose you want to trigger
motion if someone tries to break into your basement. Does it make sense you
monitor the full area (pillars/walls/floor)? Probably not. If someone were
to break in, they'd break in from some door, some window, or maybe break in
from upstairs and climb down the stairs. So doesn't it make more sense to
monitor these areas specifically? I think so. So the first 'common sense'
logic is delete the default zone that ZM creates for each monitor (which is
called All). Monitoring every part of your image may make sense if you are
monitoring and outdoor lawn, for example. Not here.
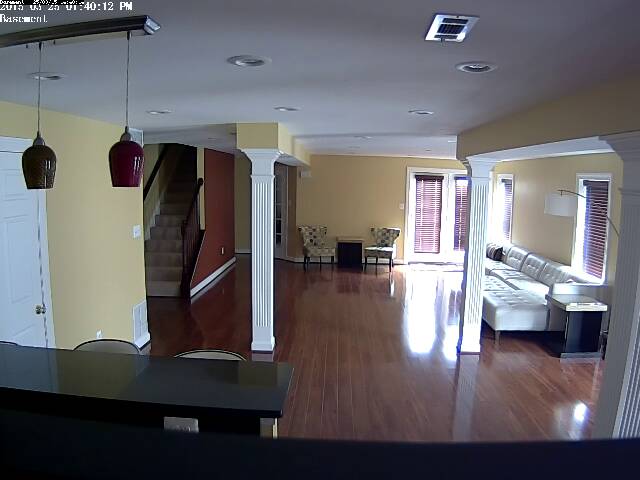 Nph-zms.jpeg
Defining the zone areas
So given the explanation above, how about we define zones where motion
matters? Any zone you define as "active" is what ZoneMinder will analyze for
motion. Ignore the 'preclusive for now'. So let's look at the image below.
I've defined polygons around places that are the "entry points"
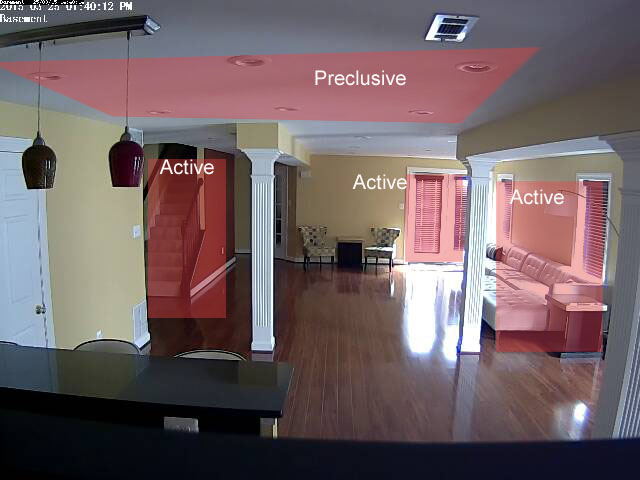 With zones.jpg
Okay, now how do I specify the sensitivity
of the zones?
ZoneMinder has pre-sets. We live in a world of pre-sets. I bet you want to
select "Best and highly sensitive" don't you? DON'T. Not because that
setting is nonsense, but because you should understand some concepts first.
Core Concepts
The ZM documentation I pointed to earlier does a great job of explaining
different methods. At the cost of repeating what has already been said, it's
important to note:
- ZM does NOT understand objects. It only understands pixel colors. So if
you are monitoring a camera that is producing a 1280x960 32bit color depth
image, as far as ZM is concerned, it is getting an array of 1280*960*32 bits
of data to analyze and compare a previous frame and based on 'color
differences' between frame X-1 and X along with some algorithms it applies
in addition to color differences, it tries and guesses if objects (in ZM
speak, a specific pattern of pixels) have come up that were not there
previously.
- ZM has 3 methods of detection: Alarmed Pixels, Filtered Pixels and
Blobs. Here is a visual explanation of their differences
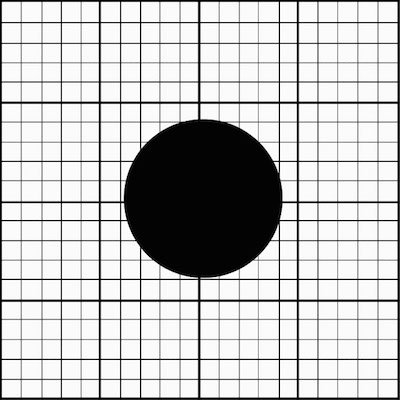
The first image is a 20x20 grid. Let's assume this is a zone. And the black
circle is some object in this grid. The second image shows the next frame of
that image, where new 'objects' have appeared, or in ZM's view 'new sets of
pixel patterns'
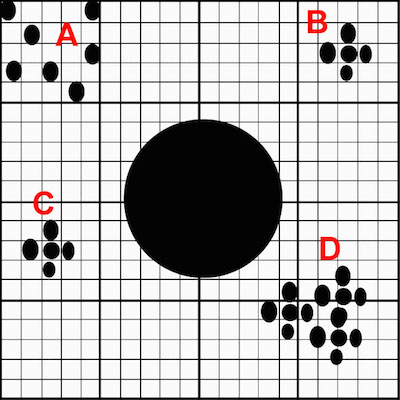
Now let's talk about Alarmed Pixels, Filtered Pixels and Blobs
Reference.jpg Reference next frame.jpg
Alarmed Pixels
Alarmed pixels only deals with pixels changes. If we use the alarmed pixel
method and specify a minimum of "5 pixel" changes (lets forget max for now),
then all the new pixels of set A + B + C + D will count as alarmed pixels
and the total alarmed pixel count will be A+B+C+D
Filtered Pixels
Now let's assume we used Filtered pixels and set it to 2x2 pixels. Then in
addition to computing the alarmed pixels (A+B+C+D), it will also count how
many of these sets have at least 2 pixels around them that are also alarmed
pixels. This will result in B+C+D (set A will be discarded as they don't
have any pixels surrounded by at least 2 pixels that have changed color from
the prev. frame)
Blob Pixels
Now let's assume we used Blob and said a blob needs to be at least 10
pixels. Then what it will do is based on the set computed by Filtered
pixels, which is B+C+D it will look for contiguous blobs of 10 pixels and
that only means D
So, in Alarmed pixels any of A, B, C or D would raise an alarm In filtered
pixel mode, only B, C or D would raise an alarm In blob mode only D would
raise an alarm
Okay, that was a simple explanation. And I did not cover more details on
min/max. But I hope you get the core idea.
Got the theory. Let's get back to your
basement image
Okay, back to my basement and my 3 zones.
Which detection type should I use?
I personally feel to detect "humans", blob is the best. As I described
above, it combines Alarm + Filtered + ensures that the pixel differences are
contiguous and then does an algorithmic analysis to see if it forms 'blobs'
Pixels or percents?
What makes more sense to you? "Raise an alarm if 178 pixels are changed" or
"Raise an alarm if more than 20% of my zone has changed?". To some, the
latter makes much more sense. However, if you really want more fine grained
control, you should use pixels. I used percent when I first started off, but
then realized that pixels was more powerful when you are trying to eliminate
false alarms.
(Pixels are especially useful if the difference in sizes is small. Example:
its not possible to visualize the difference between 10% and 15%)
Selecting the right values
Using percents
(As of 2019, I recommend pixels, but I've kept this here for those who
prefer percentages)
It helps to think visually here. Let's go back to the zones I drew of my
basement and try and visually place how a person and a pet would look in
each zone. Here is a take: Of men and animals.jpg

- Zones and Depths:
One of the lessons for me was don't make zones cover a
lot of depth as far as the camera lens goes. Why? Well take a look at the
image above. As a person or a pet walks away or towards the camera, it gets
significantly bigger or smaller (right, that was not rocket science, but
sometimes commonsense 101 helps)
- One of the advantages of using percentages is that if you were to change
your zone size, the percent settings will likely remain consistent (as they
will be percentages of your zone area). In pixel mode, any change to the
zone polygon will require updating the other values
- This is what my zone definition for the "stairs area" looks like, using percents:
 Stairs foyer.png
Using pixels
(This is what I ended up using once I got comfortable with zones)
- This was updated Jun 2019, I don't have that basement camera any more,
so I am going to use a different image
- I usually start with a Min/Max pixel threshold of 35 (that is, consider
pixels alarmed only if the color different between the old pixel and the new
one is 35 or more)
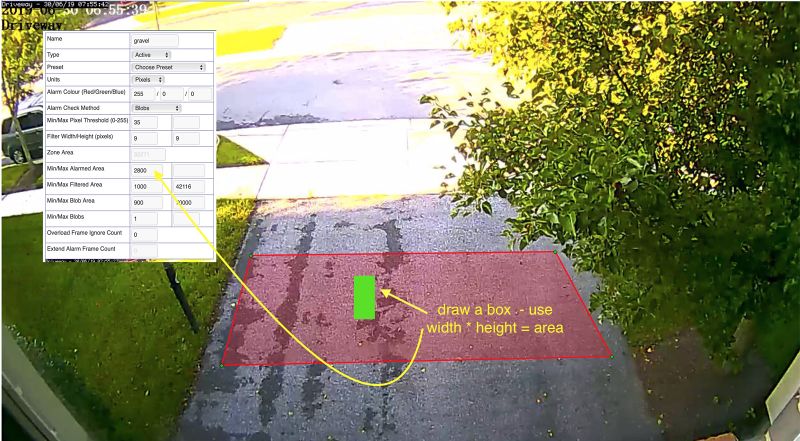
- For the min/max alarmed area, I draw a box inside my zone that
represents an object size I think is appropriate. In the image below, I am
trying to estimate what the size of a person would be in the zone. I use a
mac - I simply hit Cmd+Shift+4 - that brings up a screen capture cross hair
and as I draw the box, I see its width and height. Once I have a box with
the dimension that I think is appropriate, I hit escape and simply fill in
Min/Max Area = W*H of that box I used as a visual tool (the image shows a
green box, just as a representation). In this case, my box was 42X67 pixels,
so I fill in a min area of 2800
- You should also look at filling in a "max" area - this is to avoid
sudden "blast of light changes" that raise an alarm. For example, if most of
my zone pixels changed, it is unlikely its an object of interest. It is more
likely the sun just blasted light on my driveway or a big shadow situation
occurred. ZM helpfully tells you your zone area- in this case 92271. You
could choose to put in a pixel value that is some large fraction of this
value (maybe 90% of it = 83,000 or simply draw another rectangle to
represent the largest object that is of interest to you and use that area
value)
Tip: Don't try to get super precise in your first round: Use less aggressive
values to begin with - that is, lesser area values. Keep increasing and testing
till you reach a good threshold between bogus detections and real detections.
Pixel based detections have a limit. You'll never get it perfect. For real
object detection as an 'add-on' to motion, look at zmeventnotification, the
machine learning based alarm detection extension to ZM
 Pixel area.jpg
- (Note 1: the image is not to scale, so measurements will not tally if
you are trying to draw boxes around the example image above)
- (Note 2: when you are measuring sizes, make sure you have not reduced
browser scale. If you did, obviously, your pixel markings will be wrong
because the image will be scaled)
- I then think about what might be the area inside that rectangle I drew
that will have a continuous change in pixels. My guess here was 9x9 which is
what I put into the Filter Pixels
- Finally, since I put a value of 2800 in the alarmed pixel area,
obviously Min Alarmed Area > Min Filtered Area > Min Blob Area. So I set Min
Filtered Area to around
35% of 2800 = 1000 and blob area to around 90% of filtered area (approx
900), the reason being in my estimate blob area should closely match
filtered area of contiguous pixels for humans. This is my guess *shrug*
Lets see how ZM will use these values: (While the example below refers to
percents, the same logic applies to pixels)
- Use the "blob" method to detect movement (which means first use Alarmed
pixels, then use Filtered Pixels, then use Blob)
ZM's motion detection algorithm for this zone:
- Set A = full zone pixels
- (Min/Max Pixel Thres) In the *Full* area defined by the zone, check if there
are any pixels that have have a 40 count difference in pixel color from a
previous. Assign to Set B. If Set B = null, don't raise alarm, don't proceed
with rest.
- (Min/Max Alarmed Area) check if Set B is at least 6% of Set A and not more
than 75% of Set A. If Set B does not fall in this range, don't raise alarm,
don't proceed with rest.
- (Filter Width/Height) In the set of pixels (Set B) that are different in
color value of 40, check if there are pixels that are surrounded by 5 more
pixels around them that are also different in color value of 40. Assign to Set
C. If Set C = null, don't raise alarm, don't proceed with rest
- (Min/Max Filtered Area) check if Set C forms at least 4% of Set A butno
more than 75% of Set A. If Set C does not fall in this range, don't raise alarm,
don't proceed with rest
- (Min/Max Blob Area) use Blob logic on Set C to figure out how many Blobs
are there. A blob that is at least 4% in size of Set A (full pixels) is
considered a blob. Assign this to Set D.
- (Min/Max Blobs) - If the # of blobs in Set D is less than 1, don't raise an
alarm, don't proceed with rest
- Raise Alarm!
Some other optimizations
There are other optimizations you can do:
- Another setting I found useful is to use "Alarm Frame Count". This is not
part of Zones, but part of your monitor definition (Buffers tab). It specifies
the minimum amount of alarm frames to trigger an alarm. Most of my cameras are
on Wifi and my basement is farthest away from my AP, so I occasionally get
smearing. Setting this to 3 reduces almost all smears raising an alarm
- As I wrote earlier, use maximum values in the zone definition to reduce
'change bursts' (significant pixel coloration changes due to spikes of
light/shadows)