- [A] Options
The Options menu lets you configure many aspects of ZoneMinder. Refer to
Options.
- [B] Log
This brings up a color coded log window that shows various system and
component level logs. This window is useful if you are trying to diagnose
issues. Refer to Logging.
- [C] Groups
ZoneMinder allows you to group Monitors for logical separation. This
option lets you create new groups, associate Monitors to them and
edit/delete existing groups.
- [D] Filters
Filters are a powerful mechanism to perform actions when certain
conditions are met. ZoneMinder comes with some preset filters that keep a
tab of disk space and others. Many users create their own filters for more
advanced actions like sending emails when certain events occur and more.
Refer to Filtering Events.
- [E] Cycle
The Cycle option allows you to rotate between live views of each
configured Monitor.
- [F] Montage
The Montage option shows a collage of your Monitors. You can customize the
placement size and location on the web interface.
- [G] Montage Review
Allows you to simultaneously view past events for different Monitors. Note
that this is a very resource intensive page and its performance will vary
based on your system capabilities.
- [H] Audit Events Report
This is more of a power user feature. This option looks for recording gaps
in events and recording issues in mp4 files.
- [I] Current User
This shows the currently logged in user.
- [J] Run State
ZoneMinder allows you to maintain ‘Run States’. A Run State is
essentially a snapshot that records the state of each Monitor and you can
switch between states easily. For example, you might have a Run State
defined that switches all monitors the ‘None’ Record mode while
another state that sets some of the monitors to the ‘On Motion’ Record
mode. Why would you want this? A great example is to disable recording
when you are at home and enable when you are away, based on time of day or
other triggers. You can switch states by selecting an appropriate state
manually, or do it automatically via cron jobs, for example. An example of
using a cron job to automatically switch is provided in the FAQ. If you
click on the RUNNING link, ZoneMinder displays a popup that allows you to
select or define additional Run States. ZoneMinder provides a few
pre-defined Run States and you can also add your own Run States here.
|
|
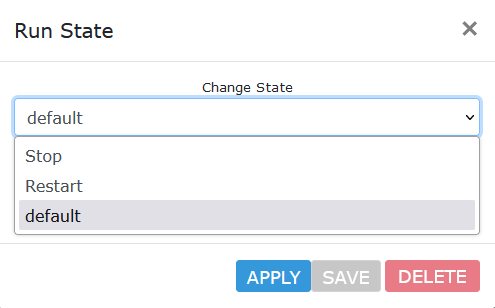
| Run States
ZoneMinder Run States window allows selection of pre-defined Run States or
entry of new Run States. ZoneMinder comes with pre-defined Run States of
default, Stop and Restart.
|
- [K] System Info
This section shows information about the ZoneMinder server hardware.
- [L] Function
This shows how ZoneMinder deals with Monitor stream capture, analysis and
recording. The current state of each Monitor capture, analysis and
recording settings is summarized here.
- [M] Source
This is the Source column that tells you the type of the camera - if its
an IP camera, a USB camera or more. In this example, they are all IP
cameras. Green means the monitor is running. Red means there is something
wrong with that camera.
- [N] Events
This is the core of ZoneMinder - recording events. It gives you a count of
how many events were recorded over the hour, day, week, month.
- [O] Zones
This indicates number of Zones defined. Click in this link to define Zones
for your monitor. Zones are areas within the camera that you mark as
‘hotspots’ for motion detection. Simply put, when you first configure
your Monitors (cameras), by default ZoneMinder uses the entire field of
view of the camera to detect motion. You may not want this. You may want
to create Zones specifically for detecting motion and ignore others. For
example, lets consider a room with a fan that spins. You surely don’t
want to consider the fan moving continuously a reason for triggering a
record? Probably not - in that case, you’d leave the fan out while
making your zones. Refer to Defining Zones.
- [P] Console Filter
This is a visual filter which lets you filter the console display based on
text you enter. While this may not be particularly useful for small
systems, ZoneMinder is also used in larger installations with well over
200+ cameras and this visual filter helps reduce the monitors you are
viewing at one time.
 ../_images/getting-started-first-screen.png
ZoneMinder Console.
Note
Please note that in this guide the notation of Link means that you click on
the specified link on the web interface to perform the specified action.
../_images/getting-started-first-screen.png
ZoneMinder Console.
Note
Please note that in this guide the notation of Link means that you click on
the specified link on the web interface to perform the specified action.

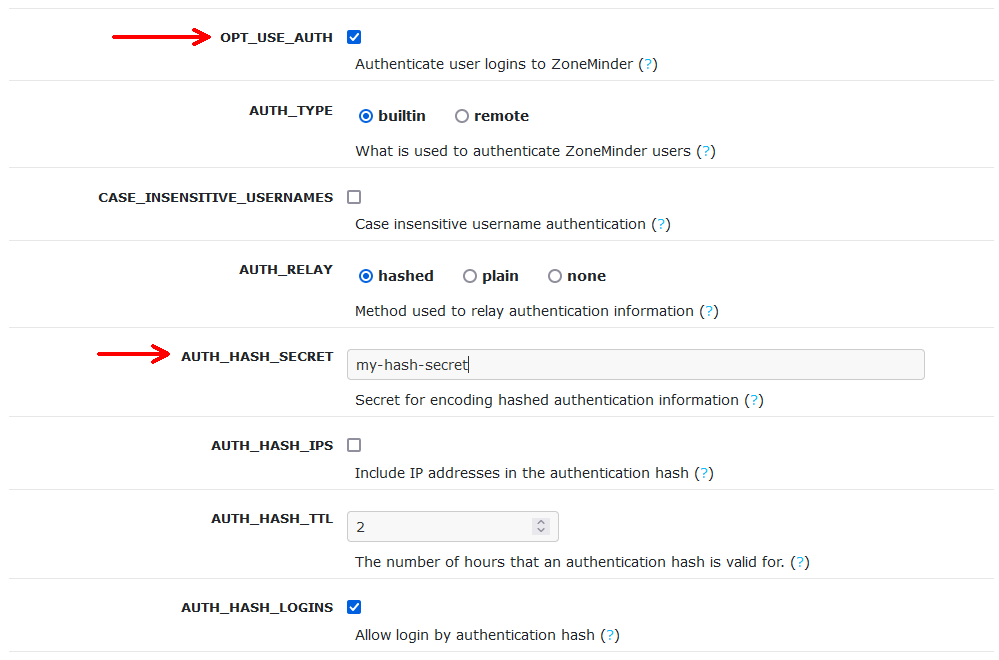 Authentication Parameters in System Tab.
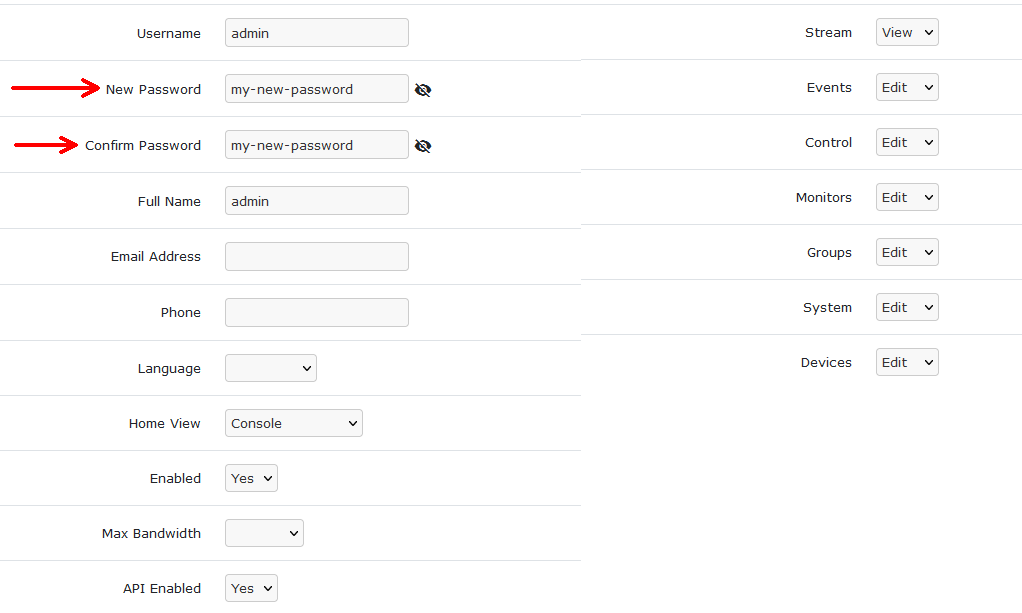 Changing Password in Users Tab
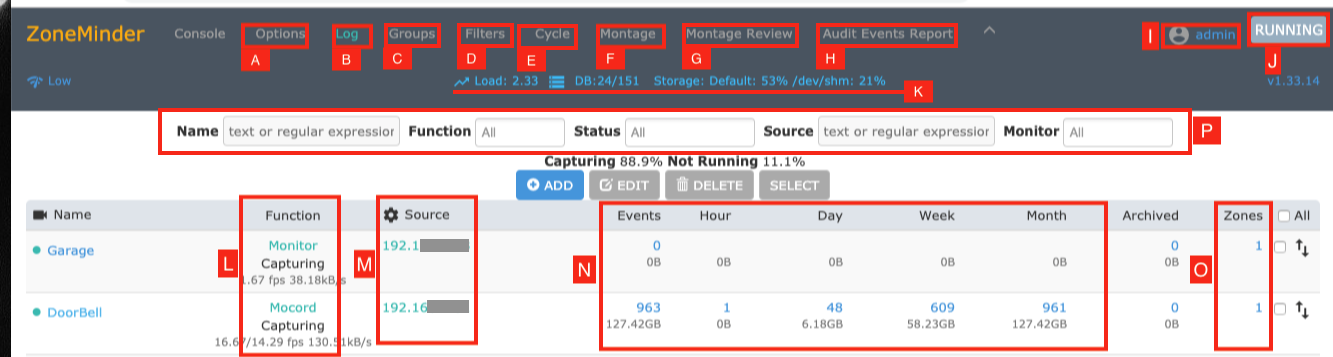 ZoneMinder Console for Existing Configured Server.
This is the Console window in ZoneMinder and shows a summary of your
Monitors, associated events, Zones, server status and links to other
available functionality. A brief description of many of these items is
given below. Each section has a much more detailed description contained
in the ZoneMinder documentation.
ZoneMinder Console for Existing Configured Server.
This is the Console window in ZoneMinder and shows a summary of your
Monitors, associated events, Zones, server status and links to other
available functionality. A brief description of many of these items is
given below. Each section has a much more detailed description contained
in the ZoneMinder documentation.
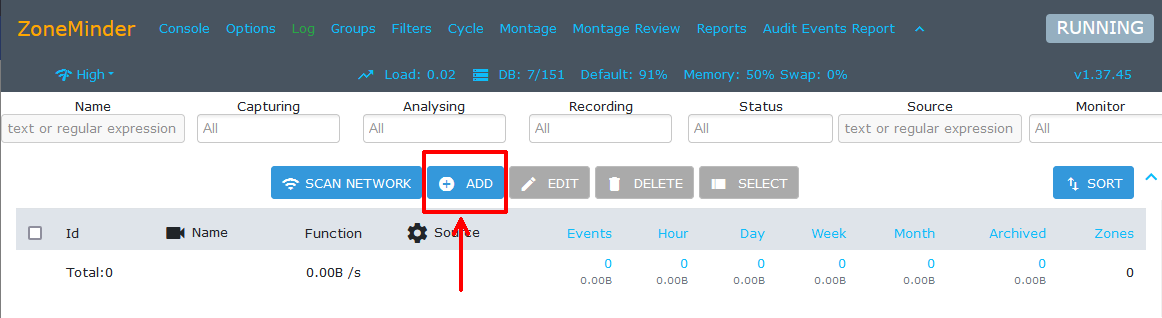 ../_images/getting-started-add-monitor.png
 ../_images/getting-started-add-monitor-general-1.png
Configuring Monitor - General Tab
../_images/getting-started-add-monitor-general-1.png
Configuring Monitor - General Tab
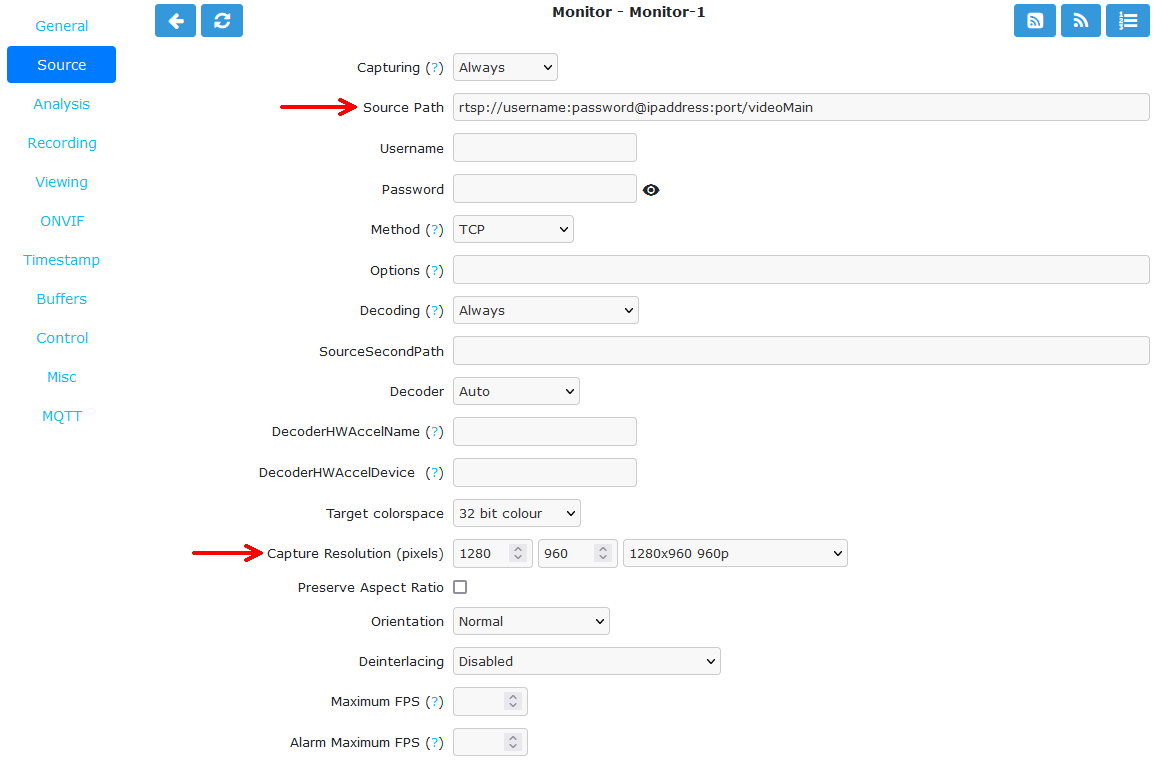 ../_images/getting-started-add-monitor-source-1.png
Configuring Monitor - Source Tab
../_images/getting-started-add-monitor-source-1.png
Configuring Monitor - Source Tab
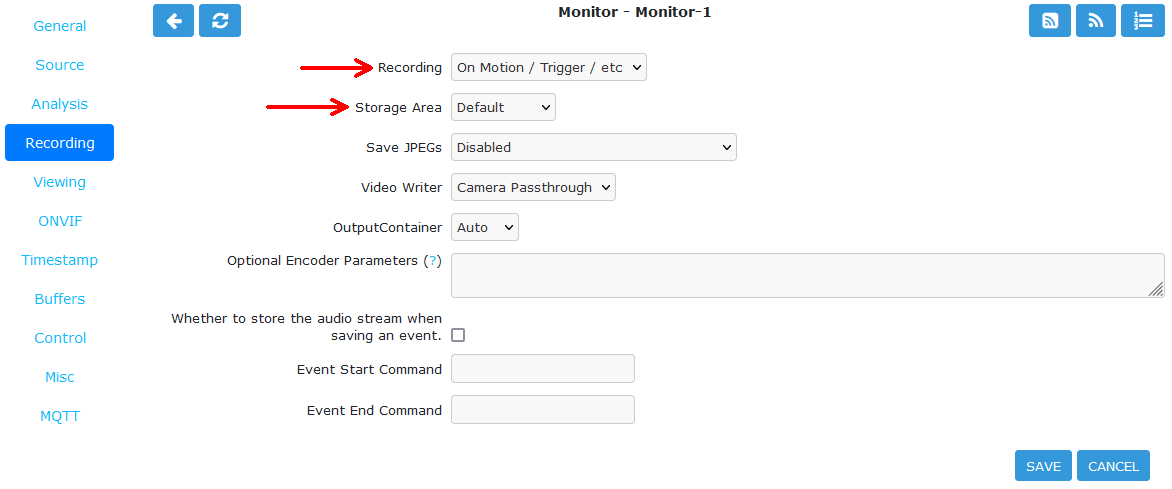 ../_images/getting-started-add-monitor-recording.png
Configuring Monitor - Recording Tab
../_images/getting-started-add-monitor-recording.png
Configuring Monitor - Recording Tab
 ../_images/getting-started-add-monitor-ready.png
Console with Configured Monitor
../_images/getting-started-add-monitor-ready.png
Console with Configured Monitor
 ../_images/getting-started-zones.png
Configuring Zones - Zone List
../_images/getting-started-zones.png
Configuring Zones - Zone List
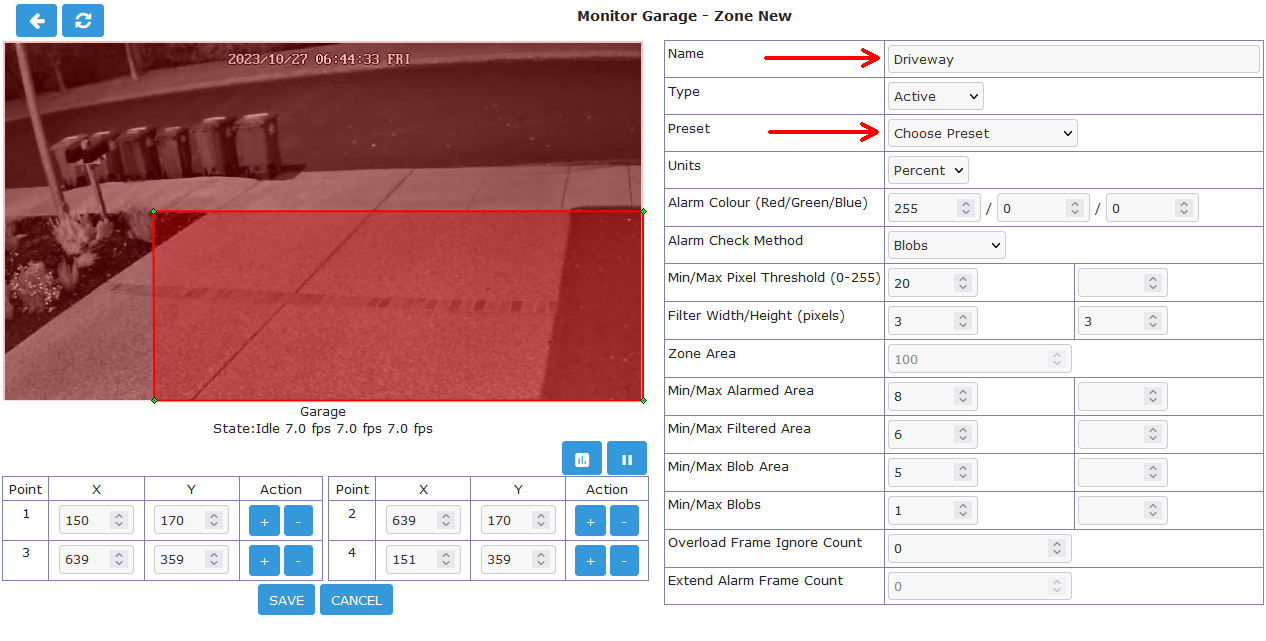 ../_images/getting-started-zones-new.png
Configuring Zones - Defining Zone Analysis and Zone Area
../_images/getting-started-zones-new.png
Configuring Zones - Defining Zone Analysis and Zone Area
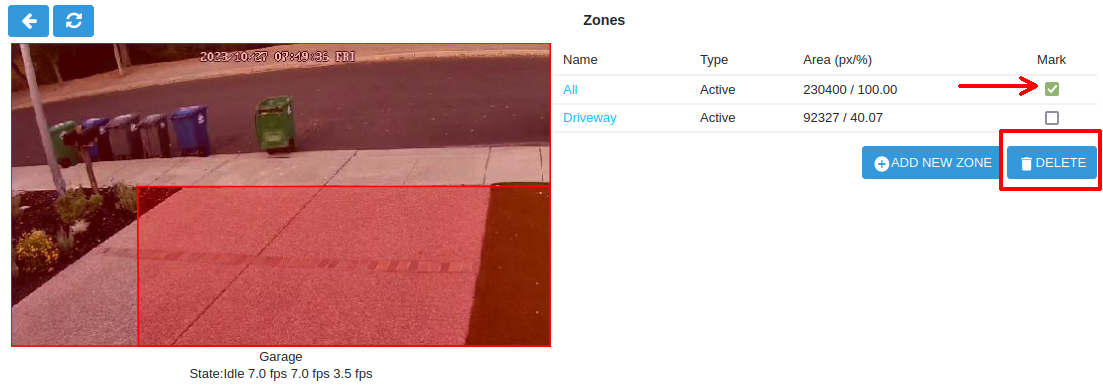 ../_images/getting-started-zones-delete.png
Configuring Zones - Deleting the Default All Zone
../_images/getting-started-zones-delete.png
Configuring Zones - Deleting the Default All Zone
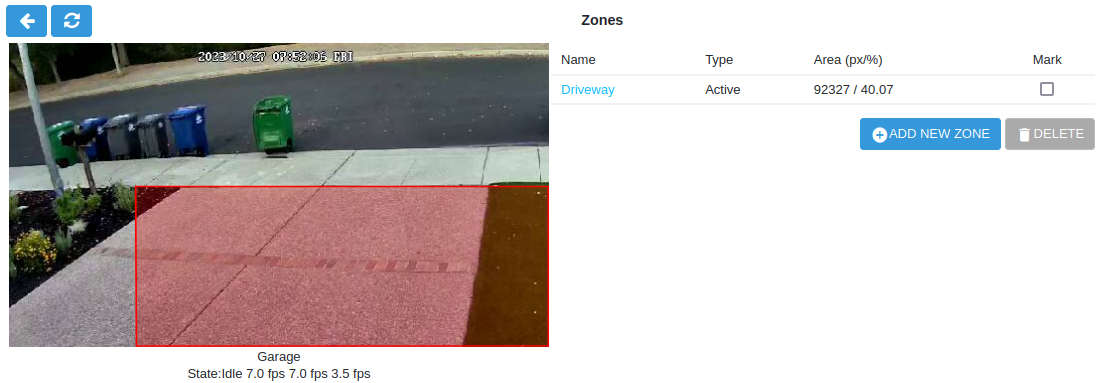 ../_images/getting-started-zones-final.png
A Fully Configured Zone
../_images/getting-started-zones-final.png
A Fully Configured Zone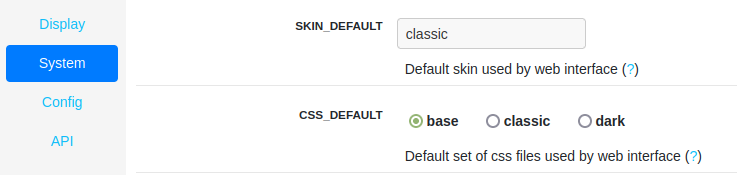 ../_images/getting-started-options-system.png
 ../_images/getting-started-options-display.png
 ../_images/getting-started-theme-base.png
Example of Base Theme Console
../_images/getting-started-theme-base.png
Example of Base Theme Console
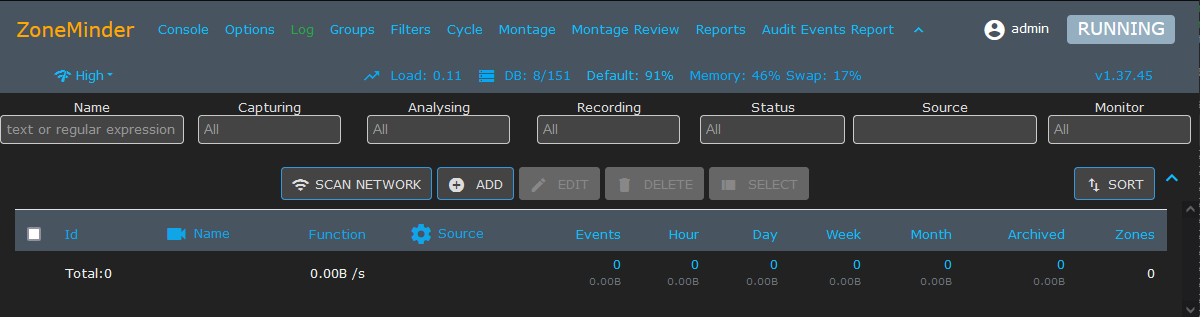 ../_images/getting-started-theme-dark.png
Example of Dark Theme Console
../_images/getting-started-theme-dark.png
Example of Dark Theme Console
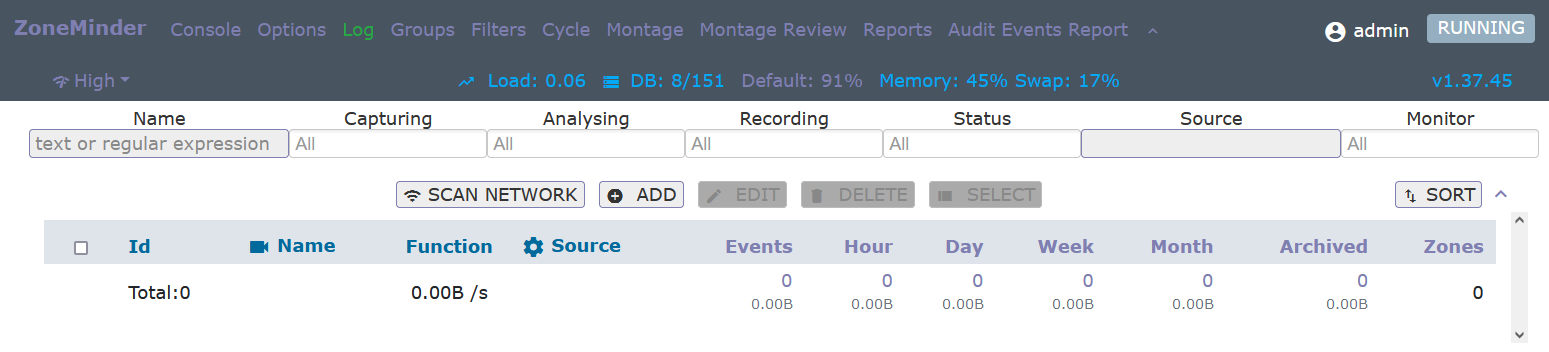 ../_images/getting-started-theme-classic.png
Example of Classic Theme Console
../_images/getting-started-theme-classic.png
Example of Classic Theme Console