Over-All Length (OAL)
- explained in detail -
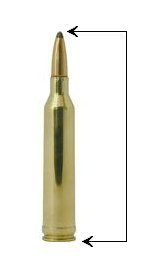
I'm always finding shooters looking for a more complete understanding
of the term "over-all length" (OAL) and how to find the best
length for their handloads. Most reloaders have noticed that
reloading manuals show one specific OAL for every different caliber.
This OAL dimension shows the industry standard (SAAMI spec.) for
a particular cartridge. Those published loads have been tested
to be safe at that specific length, and they will always fit in your
magazine. However, finding the "optimum" OAL for your particular
rifle requires a bit more information than most reloading manuals
provide. That's where the confusion sets in.
Understanding the unique bullet ogive (side of each bullet) will help
clear things up. The bullet ogive is much more relevant than the
actual OAL regarding chamber pressure. This article explains
"the rest of the story".
Factory ammo is also made according to industry standard
dimensions so your handloads will fit in any rifle of the same caliber,
and their ammo will always fit in your magazine. As a result,
they seat their bullets at least .100" deeper than necessary. Some rifles
(especially Weatherby Magnums) have well over .250"
of free-bore (distance to the rifling). They do this to safely
reach the highest velocity possible. On most production rifles,
if you seat your bullets close to the rifling, your handloads will be
too long to fit in your magazine. Finding the optimum OAL for
maximum accuracy usually requires you to reduce the distance that the
bullet travels before it contacts the rifling. This also helps
maintain concentric alignment between bullet and the bore, so that your
bullet gets a good start down the barrel.
Setting the OAL correctly for your "particular"
chamber is the cheapest accuracy improvement there is. However,
increasing the OAL will increase chamber pressure. To understand
why chamber pressure is increased, think about this example of "forward
momentum". A car can easily drive over a curb with a little
running start; but if you park right up against the curb and step on
the gas - it requires a whole lot
more force to start moving. Keeping this in mind, it's easy to
understand why seating your bullet against the rifling increases
chamber pressure. When we increase the OAL, we need to work up
loads with caution, and expect chamber pressure to increase.
Experienced shooters know that this is one essential step to improve
rifle accuracy. The optimum length of accurate handloads will
almost always be quite a bit longer than factory loads.
 We need to remember that the tip of the bullet is
not what contacts the barrel. Actual contact with the rifling
occurs along the side of the bullet, so that's where the OAL
measurement should be made. The picture at the right shows a
"slotted case tool" that I made to determine the exact OAL measurement.
This length measurement is based on where the bullet contacts
the rifling. I have one of these modified cases for each rifle
caliber that I reload. Just take a resized case, and cut 3 or 4
slots in the neck. This is an easy project with a Dremel tool
using a cut-off disk. This makes a great chamber length gauge
that will grip a bullet with just enough tension to hold it in place.
This becomes an OAL gauge for one specific caliber using one
particular type of bullet.
We need to remember that the tip of the bullet is
not what contacts the barrel. Actual contact with the rifling
occurs along the side of the bullet, so that's where the OAL
measurement should be made. The picture at the right shows a
"slotted case tool" that I made to determine the exact OAL measurement.
This length measurement is based on where the bullet contacts
the rifling. I have one of these modified cases for each rifle
caliber that I reload. Just take a resized case, and cut 3 or 4
slots in the neck. This is an easy project with a Dremel tool
using a cut-off disk. This makes a great chamber length gauge
that will grip a bullet with just enough tension to hold it in place.
This becomes an OAL gauge for one specific caliber using one
particular type of bullet.
I use this "split case tool" to do find the exact
distance between the bullet and the rifling. With the test
bullet seated in my "split case tool", simply insert this round into
your chamber. The rifling will push the bullet deeper into the
case. Then carefully extract the round without disturbing the
bullet. After this gizmo is extracted, you can measure it from
the bullet ogive back to the base of the cartridge. This
measurement is then used to adjust the seating depth of your dies and
comparing to that measurement to your completed handloads.
 The picture at the left shows another use for our Digital Headspace Gauge.
It is shown measuring the "split case tool". At this
point, just zero the gauge and then measure your handloads. This
gauge will then display the distance to the rifling that YOUR handloads
will have in YOUR particular rifle. In most cases a -.002"
jump to the rifling is ideal. Due to the irregular point on most
bullets, you can't expect to measure a consistent OAL to the tip of the
bullets. Except for a good fit in your magazine, the total
over-all length is not as important. It is more accurate to
measure the over-all length of your cartridges from the bullet ogive.
The picture at the left shows another use for our Digital Headspace Gauge.
It is shown measuring the "split case tool". At this
point, just zero the gauge and then measure your handloads. This
gauge will then display the distance to the rifling that YOUR handloads
will have in YOUR particular rifle. In most cases a -.002"
jump to the rifling is ideal. Due to the irregular point on most
bullets, you can't expect to measure a consistent OAL to the tip of the
bullets. Except for a good fit in your magazine, the total
over-all length is not as important. It is more accurate to
measure the over-all length of your cartridges from the bullet ogive.
Your barrel will eventually develop enough throat
erosion to increase the OAL setting for your rifle. Magnum
calibers (and several other hot cartridges) usually cause considerable
throat erosion after firing just a few rounds in a new barrel.
However, that wear will slow down considerably after the barrel is
broken in. When testing the accuracy of handloads for hunting
rifles, start experimenting with the longest OAL that will fit in your
magazine. Then start making your handloads in .003" shorter increments until you find the OAL that shoots best. I usually settle on the longest OAL setting
that will shoot well, and fit in the magazine.
If you are seeking the ultimate accuracy (and if you don't plan to use your magazine) you should start at least .001" behind
the rifling, and try reducing the OAL in .003"
increments, until you come up with the most accurate load. I
always avoid seating the bullet long enough to contact the rifling,
because you will eventually need to extract a loaded round. When
that happens, you could find that you have a bullet stuck in the
rifling. You'll become aware of this as your case pulls away
from the bullet, spilling powder all over the place.
Maximum accuracy is only possible after you've
found the optimum OAL for your particular chamber. Give this
method a try, and see how much your accuracy improves.