 Three Transistor Radio - Whippersnapper 2
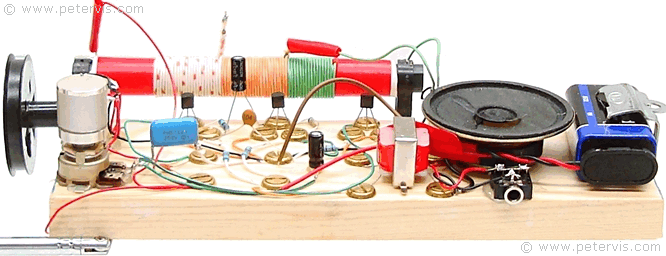
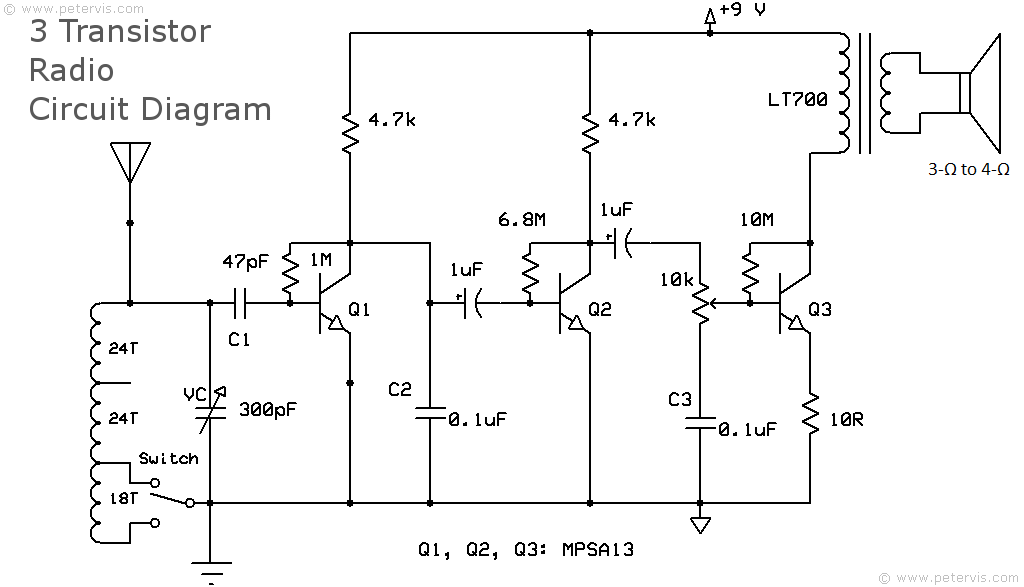
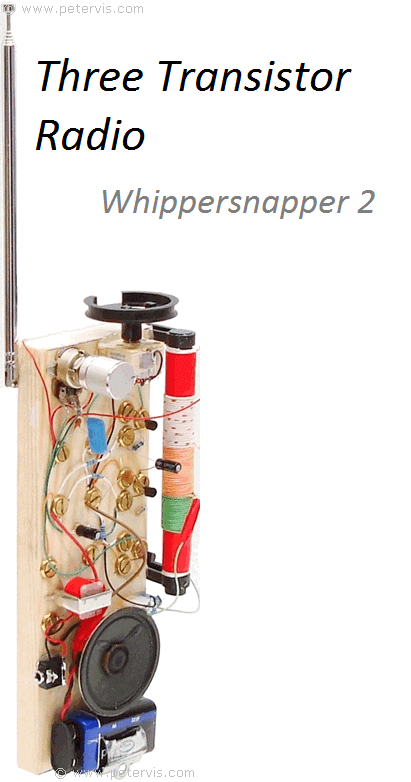 Three Transistor Radio
This three-transistor AM pocket radio is extremely powerful because it uses
MPSA13 Darlington transistors, where each transistor has a DC current gain
(hFE) of 10,000. In addition, it uses the top-secret spy antenna coil with
high-grade copper found in CAT 5 networking cable. A portable device such as
this enables one to listen discretely to all sorts of radio signals, and
whippersnappers throughout the world will be tuning into spy radio signals.
If you cannot find a cheap LT700 transformer, then I have an alternative
version of this radio Whippersnapper 3 that uses a power amplifier IC that
is ear splitting loud.
Please note that this circuit is not for beginners. Ideally, you should have
had considerable experience with building crystal radios first.
A general-purpose transistor such as the BC549C is not very efficient at
amplifying fast radio frequency (RF) signals, because high frequency signals
usually pass through without much effect, however when I was experimenting
with some cheap transistors, I found that the MPSA13 worked extremely well
for RF signals. The MPSA13 is a low-cost Darlington transistor that is
readily available and is efficient at amplifying RF signals.
This is a wonderful portable radio, which hobbyists will want to make,
because it is extremely simple to construct, and the parts I have selected
are low-cost and readily found at places such as eBay. If you decide to use
this with a pair of stereo headphones, then you should be able to enjoy high
quality sound.
Three Transistor Radio
This three-transistor AM pocket radio is extremely powerful because it uses
MPSA13 Darlington transistors, where each transistor has a DC current gain
(hFE) of 10,000. In addition, it uses the top-secret spy antenna coil with
high-grade copper found in CAT 5 networking cable. A portable device such as
this enables one to listen discretely to all sorts of radio signals, and
whippersnappers throughout the world will be tuning into spy radio signals.
If you cannot find a cheap LT700 transformer, then I have an alternative
version of this radio Whippersnapper 3 that uses a power amplifier IC that
is ear splitting loud.
Please note that this circuit is not for beginners. Ideally, you should have
had considerable experience with building crystal radios first.
A general-purpose transistor such as the BC549C is not very efficient at
amplifying fast radio frequency (RF) signals, because high frequency signals
usually pass through without much effect, however when I was experimenting
with some cheap transistors, I found that the MPSA13 worked extremely well
for RF signals. The MPSA13 is a low-cost Darlington transistor that is
readily available and is efficient at amplifying RF signals.
This is a wonderful portable radio, which hobbyists will want to make,
because it is extremely simple to construct, and the parts I have selected
are low-cost and readily found at places such as eBay. If you decide to use
this with a pair of stereo headphones, then you should be able to enjoy high
quality sound.
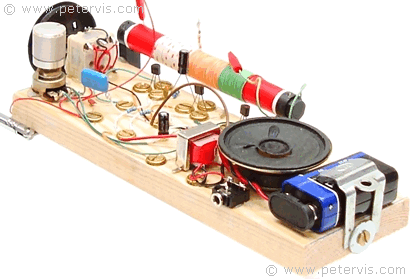
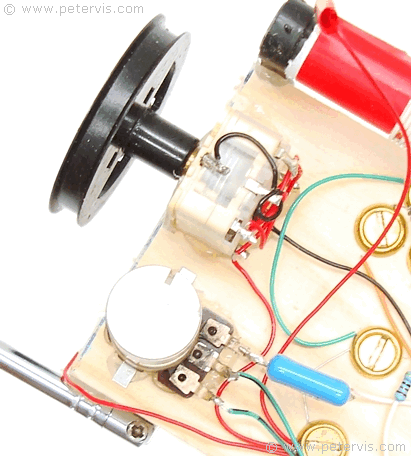
Pocket Radio This radio design provides straightforward amplification of the radio signal, consequently you will hear whatever the aerial and ferrite antenna receive, and being portable, you can move the direction of the radio to receive the best signal. When listening through a good pair of headphones, I was surprised how clear the medium wave (MW) band actually is. Although this is a three-transistor design, each transistor is a Darlington with a high gain, and therefore the reception is excellent. I tried many radio circuits designed by ‘experts’, however, my own design turned out to be the best. I suppose I should have had more faith in my own abilities! TABLE
Radio Controls
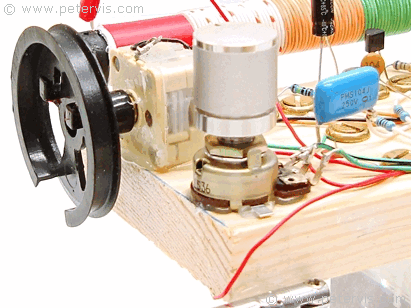 The construction is extremely simple and clean. I am using a combination of
techniques to reduce the cost and construction time. For the main circuit, I
am using the screw cup system, which is the same as that in the Ladybird
book radio. For mounting the tuning capacitor and the volume control, I am
using the modern hot-glue gun with clear glue sticks. This technique also
helps to eliminate any metal near the variable capacitor and ferrite rod.
The construction is extremely simple and clean. I am using a combination of
techniques to reduce the cost and construction time. For the main circuit, I
am using the screw cup system, which is the same as that in the Ladybird
book radio. For mounting the tuning capacitor and the volume control, I am
using the modern hot-glue gun with clear glue sticks. This technique also
helps to eliminate any metal near the variable capacitor and ferrite rod.
Troubleshooting
 Tuning Capacitor and Volume Control
Your success upon building this circuit depends upon your skill in radio
electronics and the components you use. You should follow the circuit build and
components closely. I have had bearded "professionals" use any old coil, and any
old ferrite rod, and any old variable capacitor, and then email me that it did
not work for them. If you consider yourself an "expert" and you use any old
components then please do not email me, as you are well on the way to making
your own radio design!
If you are having problems, then the first step is to test your ferrite coil and
variable capacitor combination. Start by building a crystal radio using these
components, and including a germanium diode and crystal earpiece. If you are
able to receive stations, then and only then, continue further to building the
transistor circuit. Ideally, you should build it one stage at a time and check
for a signal at each stage using a crystal earpiece. This way, if you lose the
signal, then you know which stage to focus on.
Remember, any old monkey can plug components into a breadboard blindly, but it
takes a skilled engineer to build a circuit stage by stage. In the following
pages of this article you can see the circuit diagram and an explanation of the
stages.
Tuning Capacitor and Volume Control
Your success upon building this circuit depends upon your skill in radio
electronics and the components you use. You should follow the circuit build and
components closely. I have had bearded "professionals" use any old coil, and any
old ferrite rod, and any old variable capacitor, and then email me that it did
not work for them. If you consider yourself an "expert" and you use any old
components then please do not email me, as you are well on the way to making
your own radio design!
If you are having problems, then the first step is to test your ferrite coil and
variable capacitor combination. Start by building a crystal radio using these
components, and including a germanium diode and crystal earpiece. If you are
able to receive stations, then and only then, continue further to building the
transistor circuit. Ideally, you should build it one stage at a time and check
for a signal at each stage using a crystal earpiece. This way, if you lose the
signal, then you know which stage to focus on.
Remember, any old monkey can plug components into a breadboard blindly, but it
takes a skilled engineer to build a circuit stage by stage. In the following
pages of this article you can see the circuit diagram and an explanation of the
stages.
 This Article Continues...