RF Tx Rx
From: https://randomnerdtutorials.com/rf-433mhz-transmitter-receiver-module-with-arduino/
Complete Guide for RF 433MHz Transmitter/Receiver
Module With Arduino
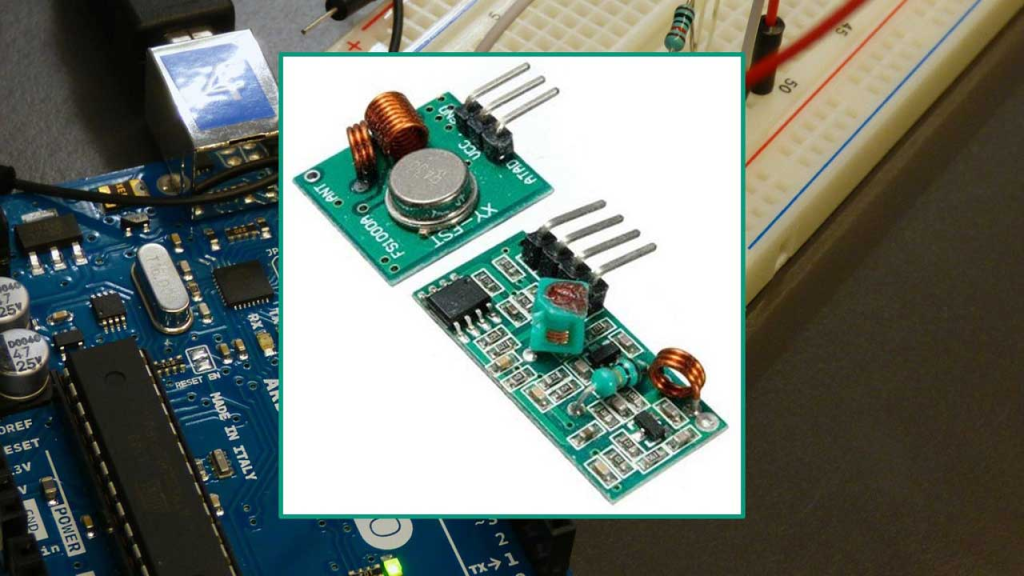
This post is a guide for the popular RF 433MHz Transmitter/Receiver modules
with Arduino. We’ll explain how they work and share an Arduino project
example that you can apply to use in your own projects.
 We have other tutorials about the 433MHz transmitter/receiver that you may
found useful:
Description
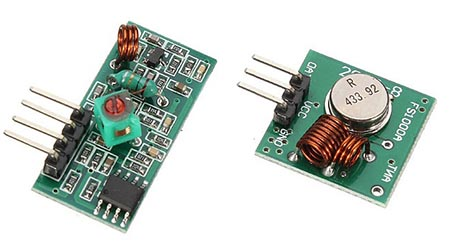
Throughout this tutorial we’ll be using the FS1000A transmitter and
corresponding receiver, but the instructions provided also work with other
433MHz transmitter/receiver modules that work in a similar fashion. These RF
modules are very popular among the Arduino tinkerers and are used on a wide
variety of applications that require wireless control.
These modules are very cheap and you can use them with any microcontroller,
whether it’s an Arduino, ESP8266, or ESP32.
Specifications RF 433MHz Receiver
- Frequency Range: 433.92 MHz
- Modulation: ASK
- Input Voltage: 5V
- Price: $1 to $2
Specifications RF 433MHz Transmitter
- Frequency Range: 433.92MHz
- Input Voltage: 3-12V
- Price: $1 to $2
Where to buy?
 You can purchase these modules for just a few dollars. Click here to compare the
RF 433MHz transmitter/receiver on several stores and find the best price.
Arduino with RF 433MHz Transmitter/Receiver Modules
In this section, we’ll build a simple example that sends a message from an
Arduino to another Arduino board using 433 MHz. An Arduino board will be
connected to a 433 MHz transmitter and will send the “Hello World!”
message. The other Arduino board will be connected to a 433 MHz receiver to
receive the messages.
Parts Required
You need the following components for this example:
You can use the preceding links or go directly to MakerAdvisor.com/tools to find
all the parts for your projects at the best price!
Installing the RadioHead Library
The RadioHead library provides an easy way to work with the 433 MHz
transmitter/receiver with the Arduino. Follow the next steps to install that
library in the Arduino IDE:
- Click here to download the RadioHead library. You should have a .zip folder
in your Downloads folder.
- Unzip the RadioHead library.
- Move the RadioHead library folder to the Arduino IDE installation libraries
folder.
- Restart your Arduino IDE
The RadioHead library is great and it works with almost all RF modules in
the market. You can read more about the RadioHead library here.
Transmitter Circuit
Wire the transmitter module to the Arduino by following the next schematic diagram.
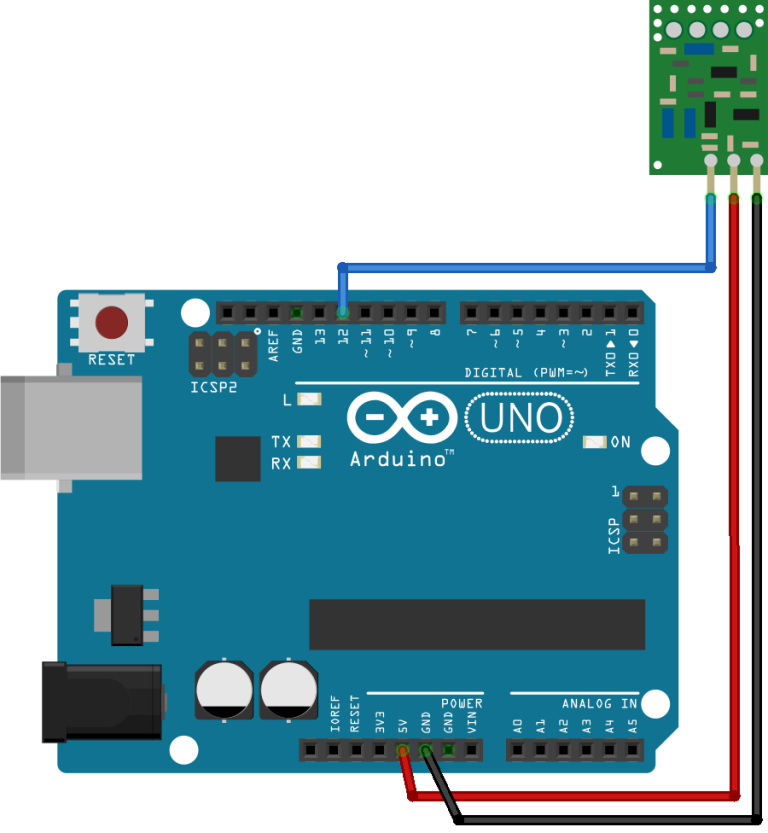 Important:
always check the pinout for the transmitter module you’re
using. Usually, there are labels next to the pins. Alternatively, you can
also take a look at your module’s datasheet.
Transmitter Sketch
Upload the following code to the Arduino board that will act as a
transmitter. This is based on one of the examples provided by the RadioHead
library.
/*H*******************************************************
*
*********************************************************/
#include <RH_ASK.h>
#include <SPI.h> // NOT ACTUALLY USED BUT NEEDED TO COMPILE
// **************** DEFINES ****************************
// **************** PROTOTYPES *************************
// **************** VARIABLES **************************
RH_ASK driver;
/*F*******************************************************
*
*********************************************************/
void
setup()
{
Serial.begin( 9600 ); // Debugging only
if( !driver.init() )
Serial.println( "init failed" );
}
/*F*******************************************************
*
*********************************************************/
void
loop()
{
const char *msg = "Hello World!";
driver.send( (uint8_t*)msg, strlen( msg ));
driver.waitPacketSent();
delay( 1000 );
}
How the transmitter sketch works
First, include the RadioHead ASK library.
#include
This library needs the SPI library to work. So, you also need to include the
SPI library.
#include
After that, create a RH_ASK object called driver.
In the setup(), initialize the RH_ASK object by using the init() method.
Serial.begin( 9600 ); // Debugging only
if( !driver.init() )
Serial.println("init failed");
In the loop(), we write and send our message. The message is saved on the
msg variable. Please note that the message needs to be of type char.
const char *msg = "Hello World!";
This message contains the “Hello World!” message, but you can send anything you
want as long as it is in char format.
Finally, we send our message as follows:
driver.send( (uint8_t*)msg, strlen( msg ) );
driver.waitPacketSent();
The message is being sent every second, but you can adjust this delay time.
delay( 1000 );
Receiver Circuit
Wire the receiver module to another Arduino by following the next schematic
diagram.
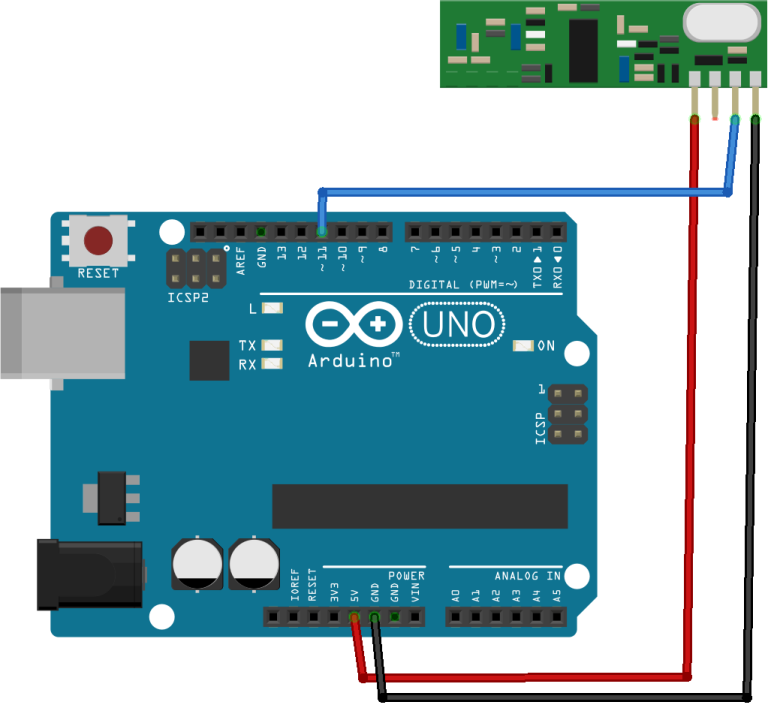 Important:
always check the pinout for the transmitter module you’re using. Usually, there
are labels next to the pins. Alternatively, you can also take a look at your
module’s datasheet.
Receiver Sketch
Upload the code below to the Arduino connected to the receiver. This is
based on one of the examples provided by the RadioHead library.
/*H*******************************************************
*
*********************************************************/
#include <RH_ASK.h>
#include <SPI.h> // Not actualy used but needed to compile
// **************** DEFINES ****************************
// **************** PROTOTYPES *************************
// **************** VARIABLES **************************
RH_ASK driver;
/*F*******************************************************
*
*********************************************************/
void
setup()
{
Serial.begin( 9600 ); // Debugging only
if( !driver.init())
Serial.println( "init failed" );
}
/*F*******************************************************
*
*********************************************************/
void
loop()
{
uint8_t buf[12];
uint8_t buflen = sizeof( buf );
if( driver.recv( buf, &buflen) ) // NON-BLOCKING
{
int i;
// Message with a good checksum received, dump it.
Serial.print( "Message: " );
Serial.println( (char*)buf );
}
}
How the receiver sketch works
Similarly to the previous sketch, you start by including the necessary libraries:
#include
#include
You create a RH_ASK object called driver:
RH_ASK driver;
In the setup(), initialize the RH_ASKobject.
void
setup()
{
Serial.begin( 9600 ); // Debugging only
if( !driver.init() )
Serial.println( "init failed" );
}
In the loop(), we need to set a buffer that matches the size of the message
we’ll receive. “Hello World!” has 12 characters. You should adjust the buffer
size accordingly to the message you’ll receive (spaces and punctuation also
count).
uint8_t buf[12];
uint8_t buflen = sizeof(buf);
Then, check if you’ve received a valid message. If you receive a valid message,
print it in the serial monitor.
if( driver.recv(buf, &buflen))
{
int i;
// Message with a good checksum received, dump it.
Serial.print( "Message: " );
Serial.println( (char*)buf );
}
Demonstration
In this project the transmitter is sending a message “Hello World!” to
the receiver via RF. Those messages are being displayed in receiver’s
serial monitor. The following figure shows what you should see in your
Arduino IDE serial monitor.
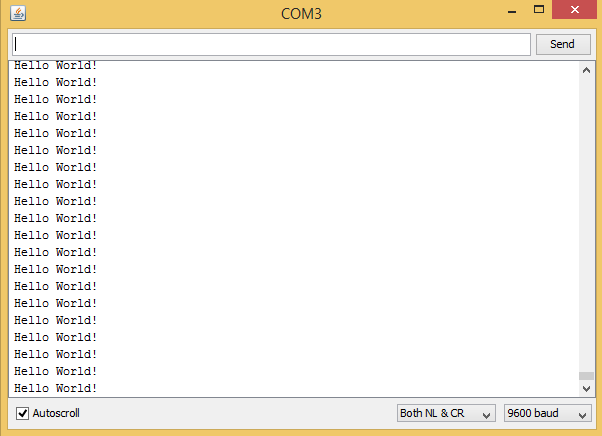 receiver serial monitor
Wrapping Up
You need to have some realistic expectations when using this module. They
work very well when the receiver and transmitter are close to each other. If
you separate them too far apart you’ll lose the communication. The
communication range will vary. It depends on how much voltage you’re
supplying to your transmitter module, RF noise in your environment, and if
you’re using an external antenna.
If you want to use 433 MHz remote controls to communicate with your Arduino,
follow this tutorial: Decode and Send 433 MHz RF Signals with Arduino.
If you are an Arduino beginner, we recommend following our Arduino Mini
Course. It will help you quickly getting started with this amazing board
(and it is free!).
You may also like the following resources:
Arduino Step-by-step Projects course
Guide to SD card module with Arduino
Guide to DHT11/DHT22 Humidity and Temperature Sensor with Arduino
Guide to Ultrasonic Sensor with Arduino
You can find all our Arduino projects and tutorials here.
 We have other tutorials about the 433MHz transmitter/receiver that you may
found useful:
We have other tutorials about the 433MHz transmitter/receiver that you may found useful:
 You can purchase these modules for just a few dollars. Click here to compare the
RF 433MHz transmitter/receiver on several stores and find the best price.
 Important:
always check the pinout for the transmitter module you’re
using. Usually, there are labels next to the pins. Alternatively, you can
also take a look at your module’s datasheet.
 Important:
always check the pinout for the transmitter module you’re using. Usually, there
are labels next to the pins. Alternatively, you can also take a look at your
module’s datasheet.
 receiver serial monitor