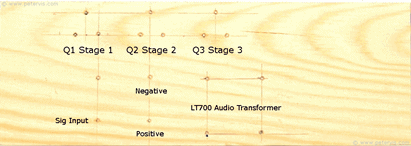
 Three Transistor Radio Circuit Diagram
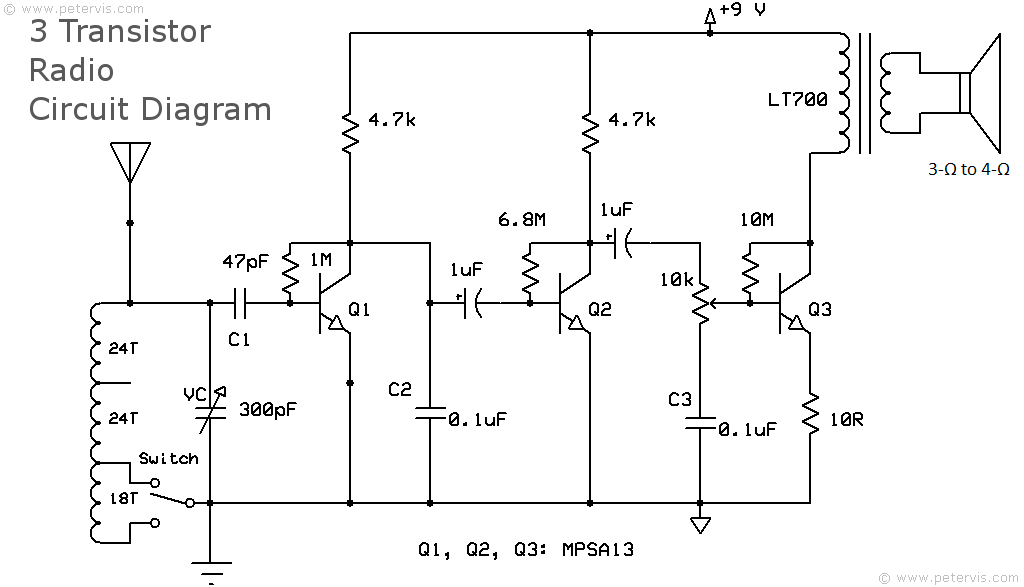 This three-transistor AM radio circuit is a clean and minimalistic design that
faithfully amplifies radio signals so that you can hear them through a speaker.
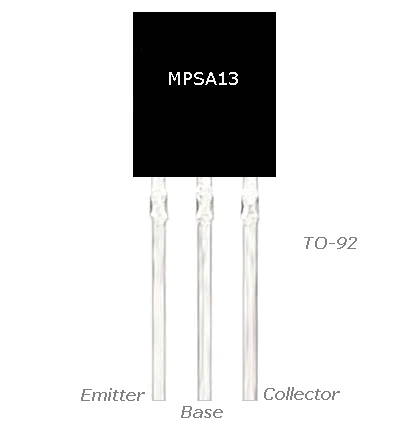
I am using the MPSA13 transistor for this design because internally it is a
Darlington and therefore has very high gain. At each stage, I am using very high
value self-biasing resistors to get the maximum out of each Darlington. The base
junctions receive an extremely small amount of positive current so they
self-centre automatically.
Ideally you should use the screwcup system for this build because breadboard and
stripboard builds may introduce crosstalk issues. If you decide to install it
inside a case, then use an ABS plastic or wood case, instead of a metal one,
because the metal will prevent the ferrite rod from operating properly. This
circuit uses the LT700 audio transformer to drive the speaker, however if you
are unable to find this component, then I have an alternative design in the
Whippersnapper 3 article that uses an IC power amplifier instead.
This three-transistor AM radio circuit is a clean and minimalistic design that
faithfully amplifies radio signals so that you can hear them through a speaker.
I am using the MPSA13 transistor for this design because internally it is a
Darlington and therefore has very high gain. At each stage, I am using very high
value self-biasing resistors to get the maximum out of each Darlington. The base
junctions receive an extremely small amount of positive current so they
self-centre automatically.
Ideally you should use the screwcup system for this build because breadboard and
stripboard builds may introduce crosstalk issues. If you decide to install it
inside a case, then use an ABS plastic or wood case, instead of a metal one,
because the metal will prevent the ferrite rod from operating properly. This
circuit uses the LT700 audio transformer to drive the speaker, however if you
are unable to find this component, then I have an alternative design in the
Whippersnapper 3 article that uses an IC power amplifier instead.
Stage 1
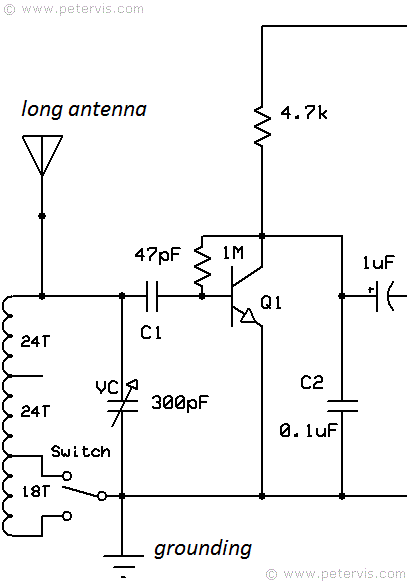
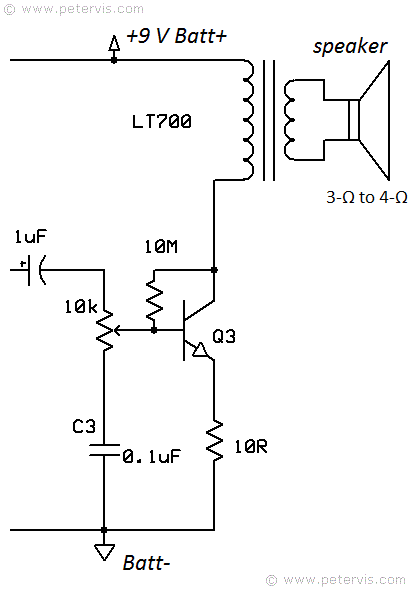

 Parts and Components
The cost of components and parts is forever increasing, and therefore it is
logical to recycle some of the parts you may already have. Whilst components
such as the loudspeaker and variable capacitor may not be so critical, the fixed
ceramic disc capacitors are. In particular, C1, C2, and C3 maintain the
bandwidth of the high-gain amplifier. The values shown fix it to receive signals
within the medium wave (MW) band. Changing these will change the characteristics
of the amplifier stages.
=======================================================
Parts and Components
The cost of components and parts is forever increasing, and therefore it is
logical to recycle some of the parts you may already have. Whilst components
such as the loudspeaker and variable capacitor may not be so critical, the fixed
ceramic disc capacitors are. In particular, C1, C2, and C3 maintain the
bandwidth of the high-gain amplifier. The values shown fix it to receive signals
within the medium wave (MW) band. Changing these will change the characteristics
of the amplifier stages.
=======================================================
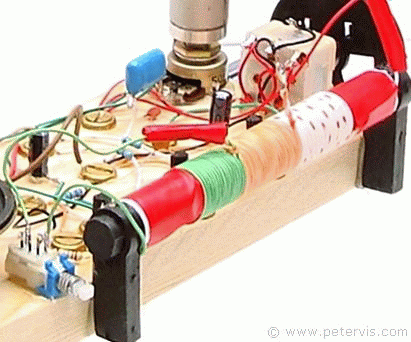
 Three Transistor Radio Ferrite Coil Antenna
 I am using a ferrite rod approximately 10 mm in diameter, and the coil occupies
a 6 cm length. Therefore, any rod longer than 6 cm is good enough, although
ideally it has to be around 12 cm long.
For the coil, I am using a single core wire, which came out of a CAT 5 UTP
computer networking cable. You require only 1-metre length of this cable, which
you will need to open to get to the single wires. The MK484 radio project shows
how to make this type of coil assembly. I chose this type of wire because it is
cheap and readily available at any electrical and hardware store, but most
importantly, it works extremely well due to the high specification copper they
use to make the wire.
I am using a ferrite rod approximately 10 mm in diameter, and the coil occupies
a 6 cm length. Therefore, any rod longer than 6 cm is good enough, although
ideally it has to be around 12 cm long.
For the coil, I am using a single core wire, which came out of a CAT 5 UTP
computer networking cable. You require only 1-metre length of this cable, which
you will need to open to get to the single wires. The MK484 radio project shows
how to make this type of coil assembly. I chose this type of wire because it is
cheap and readily available at any electrical and hardware store, but most
importantly, it works extremely well due to the high specification copper they
use to make the wire.
 Ferrite Rod and Coil Stages
In this ferrite coil design, the orange/white stage consists of 24 turns, the
orange stage is 24 turns, and the green stage is 18 turns. Ferrite Rod and Coil
Ferrite Rod and Coil Stages
In this ferrite coil design, the orange/white stage consists of 24 turns, the
orange stage is 24 turns, and the green stage is 18 turns. Ferrite Rod and Coil
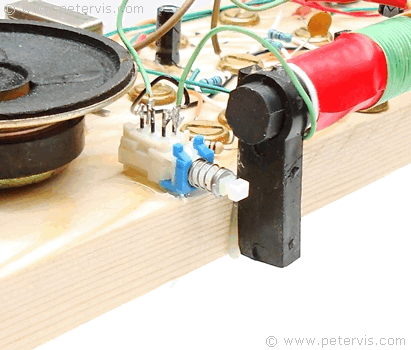 Coil Selector Switch
The earth for the coil can be either after the end of the orange section, or
green section, and there is a two pole selector switch to select between either
of the two. By extending the coil with the green section, I am able to receive
some additional stations in the medium wave (MW) band. The switch is optional
because you may decide to have a longer coil all the time.
=======================================================
Coil Selector Switch
The earth for the coil can be either after the end of the orange section, or
green section, and there is a two pole selector switch to select between either
of the two. By extending the coil with the green section, I am able to receive
some additional stations in the medium wave (MW) band. The switch is optional
because you may decide to have a longer coil all the time.
=======================================================
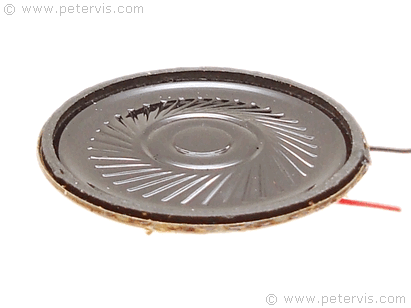
 Three Transistor Radio Loudspeaker and Transformer
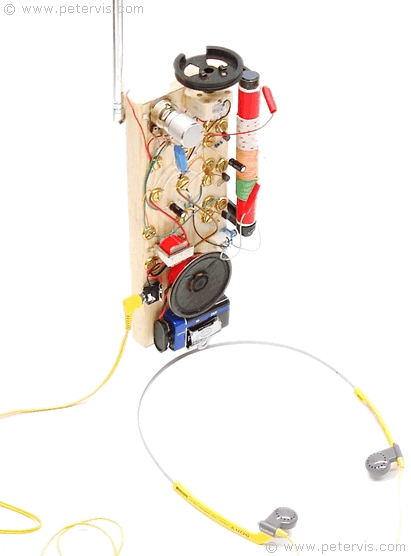
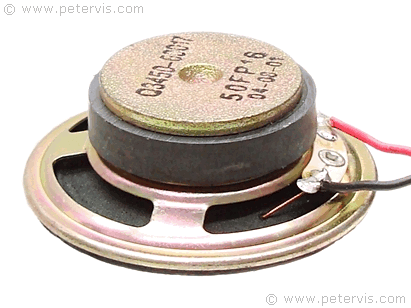 I had a couple of small speakers such as this and decided to use it for this
project; however, it is not the best choice because when you place a piece of
metal or a magnet near a ferrite rod, it usually prevents it from working.
Ideally, what is required is a speaker with a plastic frame and shielded magnet.
I had a couple of small speakers such as this and decided to use it for this
project; however, it is not the best choice because when you place a piece of
metal or a magnet near a ferrite rod, it usually prevents it from working.
Ideally, what is required is a speaker with a plastic frame and shielded magnet.
 LT700 Audio Output Transformer
The centre tap of the LT700 transformer is not used and I have raised its
terminal up to move it out of the way. I decided not to cut it as I may wish to
use it for other projects in the future.
LT700 Audio Output Transformer
The centre tap of the LT700 transformer is not used and I have raised its
terminal up to move it out of the way. I decided not to cut it as I may wish to
use it for other projects in the future.
 Luckily I managed to find this modern one which is low profile and almost
entirely plastic. This modern one is much louder as well and therefore worth
getting, however it means spending around two bucks.
Luckily I managed to find this modern one which is low profile and almost
entirely plastic. This modern one is much louder as well and therefore worth
getting, however it means spending around two bucks.
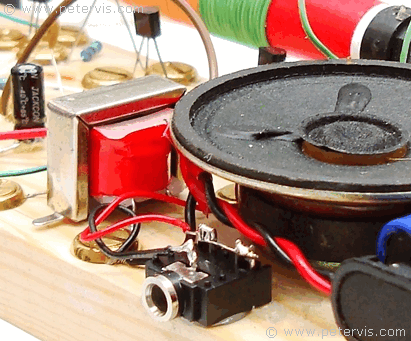 Stereo Jack Socket
=======================================================
Stereo Jack Socket
=======================================================
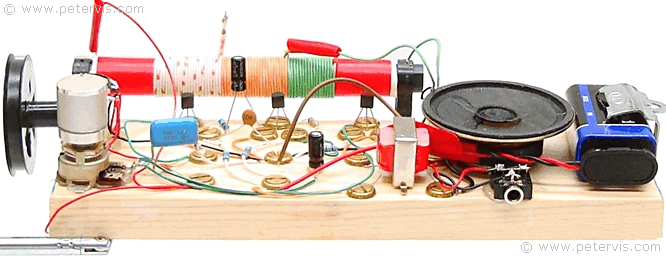
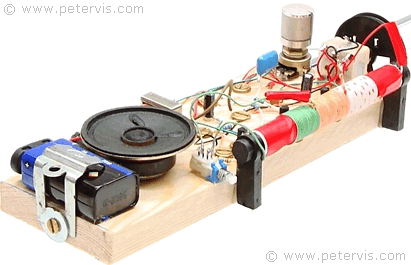
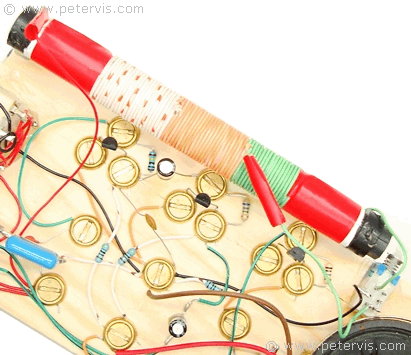
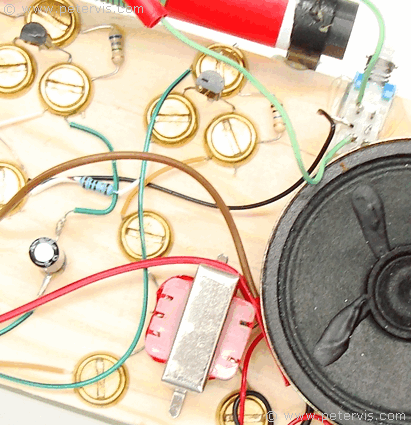
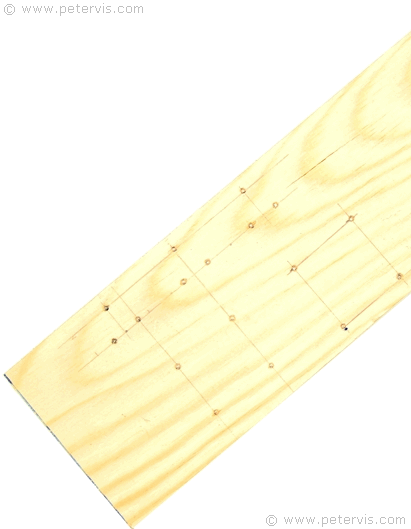
 3 Transistor Radio
Three Transistor Radio Baseboard Layout
3 Transistor Radio
Three Transistor Radio Baseboard Layout
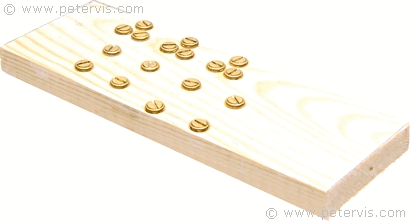 Finished view of the baseboard.
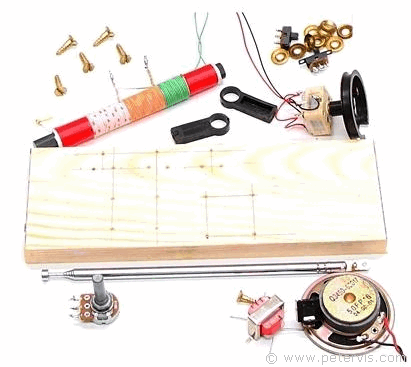
For the baseboard, I am using a piece of off-cut wood, which I got free at my
local hardware store. You will require a piece of wood 65 mm × 200 mm × 15 mm.
It should have a smooth surface and square cut. They usually throw away pieces
this small, and if there is a nice person there, then they may let you have it
free.
I am all for using recycled components, and therefore you may decide to make
your radio a different size, depending upon the components you have at hand.
Finished view of the baseboard.
For the baseboard, I am using a piece of off-cut wood, which I got free at my
local hardware store. You will require a piece of wood 65 mm × 200 mm × 15 mm.
It should have a smooth surface and square cut. They usually throw away pieces
this small, and if there is a nice person there, then they may let you have it
free.
I am all for using recycled components, and therefore you may decide to make
your radio a different size, depending upon the components you have at hand.
 Brass Screws and Screw Cups
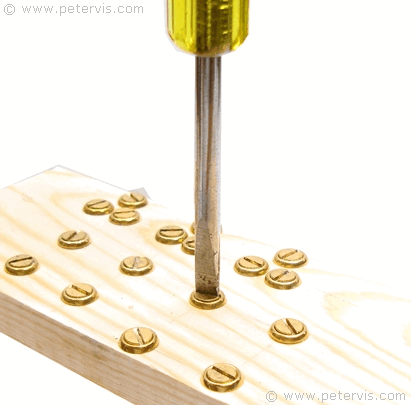 I decided to make this build in the same fashion as the ladybird book radio,
using brass screws and screw cups. If you require more information, then I would
suggest looking at some of my previous radio projects.
=======================================================
I decided to make this build in the same fashion as the ladybird book radio,
using brass screws and screw cups. If you require more information, then I would
suggest looking at some of my previous radio projects.
=======================================================
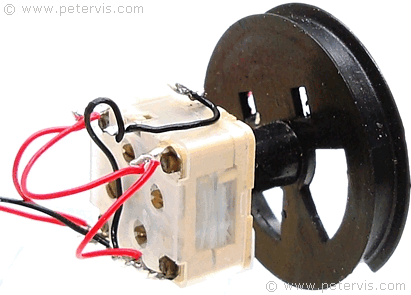 Three Transistor Radio Variable Capacitor
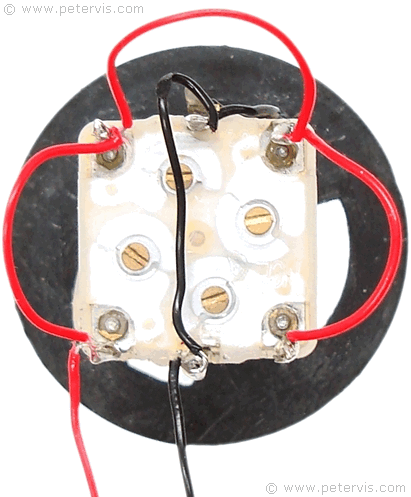 All I have done here is connect all the stages together in parallel to make
one 320 pF variable capacitor. Remember that when the capacitors are
connected in parallel, the capacitance adds together. The centre terminals
usually connect to the shaft and are earth, whilst the terminal at each
corner is for each stage.
With a cheap digital meter, you can measure the capacitance to make sure you
have wired it correctly. The four screws are the trimmers, which are set with
the digital meter. Rotating the trimmer screws, changes the capacitance reading
on the meter. You need to set all four trimmers to achieve a minimum reading on
your meter.
All I have done here is connect all the stages together in parallel to make
one 320 pF variable capacitor. Remember that when the capacitors are
connected in parallel, the capacitance adds together. The centre terminals
usually connect to the shaft and are earth, whilst the terminal at each
corner is for each stage.
With a cheap digital meter, you can measure the capacitance to make sure you
have wired it correctly. The four screws are the trimmers, which are set with
the digital meter. Rotating the trimmer screws, changes the capacitance reading
on the meter. You need to set all four trimmers to achieve a minimum reading on
your meter.
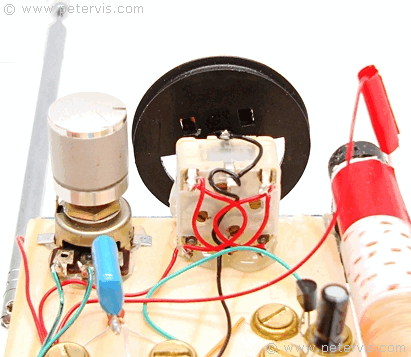 Capacitor Mounting
When you mount a variable capacitor, ideally you need to avoid placing any
metal, especially any magnetic metal, nearby. In this build, I am using my hot
melt glue gun, and a blob of clear plastic glue is good enough to robustly
secure the variable capacitor.
=======================================================
Capacitor Mounting
When you mount a variable capacitor, ideally you need to avoid placing any
metal, especially any magnetic metal, nearby. In this build, I am using my hot
melt glue gun, and a blob of clear plastic glue is good enough to robustly
secure the variable capacitor.
=======================================================