 A Traditional and Simplified Version
Children enjoy searching for buried treasure, and using a metal detector is
far more productive than digging random holes. In this article, Dev presents
two versions of metal detector circuitry. First, he updates the traditional
beat frequency oscillator approach, to use a digital mixer. Second, he
builds one more suitable for a child, using a PIC16 microcontroller that
allows push-button zeroing and adjustable sensitivity.
Metal detectors sense conductive objects by their influence on an inductance
coil. The coil usually is part of the inductance-capacitance tank circuit
that determines the frequency of an oscillator. Unlike the principle of a
slug-tuned inductance coil, in which the insertion of a magnetic material
such as ferrite increases its inductance, a conductor within the magnetic
field lines of an inductance coil acts as a shorted turn that decreases its
inductance. That’s because the conductor develops induced currents
opposite to those in the coil, in accordance with Lenz’s law.
Most metal detectors have two oscillators typically within the frequency
range of the AM radio band, centered around 1MHz. One oscillator has as its
inductance a flat, large-diameter coil that’s swept over the ground to
detect buried conductors. The other oscillator uses either a variable
inductance or variable capacitance to allow tuning to the same frequency as
the search oscillator. The frequencies of both oscillators are combined in a
mixer that generates the sum and difference of the frequencies. The sum is
outside the audio range, but the difference produces an audio signal that
indicates a change in the search oscillator frequency and the presence of
metal. A block diagram of a “beat frequency” metal detector is shown in
Figure 1.
A Traditional and Simplified Version
Children enjoy searching for buried treasure, and using a metal detector is
far more productive than digging random holes. In this article, Dev presents
two versions of metal detector circuitry. First, he updates the traditional
beat frequency oscillator approach, to use a digital mixer. Second, he
builds one more suitable for a child, using a PIC16 microcontroller that
allows push-button zeroing and adjustable sensitivity.
Metal detectors sense conductive objects by their influence on an inductance
coil. The coil usually is part of the inductance-capacitance tank circuit
that determines the frequency of an oscillator. Unlike the principle of a
slug-tuned inductance coil, in which the insertion of a magnetic material
such as ferrite increases its inductance, a conductor within the magnetic
field lines of an inductance coil acts as a shorted turn that decreases its
inductance. That’s because the conductor develops induced currents
opposite to those in the coil, in accordance with Lenz’s law.
Most metal detectors have two oscillators typically within the frequency
range of the AM radio band, centered around 1MHz. One oscillator has as its
inductance a flat, large-diameter coil that’s swept over the ground to
detect buried conductors. The other oscillator uses either a variable
inductance or variable capacitance to allow tuning to the same frequency as
the search oscillator. The frequencies of both oscillators are combined in a
mixer that generates the sum and difference of the frequencies. The sum is
outside the audio range, but the difference produces an audio signal that
indicates a change in the search oscillator frequency and the presence of
metal. A block diagram of a “beat frequency” metal detector is shown in
Figure 1.
 Figure 1 Block diagram of a beat frequency metal detector.
Armed with information from some hobbyist electronics magazines and a
tutorial on mixer circuits from the ARRL handbook, I built a simple,
transistorized metal detector when I was in high school. The oscillator
frequencies were in the AM broadcast band, and this allowed a student who
didn’t own an oscilloscope to troubleshoot the circuit design.
You never know what knowledge from your youth will be useful later in life.
My experience with metal detectors helped solve a problem that my colleagues
and I had in growing large crystals of an important semiconductor, gallium
arsenide. We needed to produce crystals of uniform diameter, and the usual
approach, weighing the crystal as it grew, was not an option. That was
because the process of creating the crystals involved solidifying them from
a crucible of molten material in a pressure chamber at about 1,250°C and
25atm.
Instead of using an electronic balance to measure the mass gained by the
crystal, I used a position-sensing inductance coil to sense the conductive
surface of the molten gallium arsenide. A motor in a feedback loop raised
the crucible to achieve a constant gap between the sensing coil and the
molten surface, as the crystal was solidified from the liquid by pulling.
The coil used in this case was 17 turns of molybdenum wire wound on a 10mm
diameter form to a length of 13mm [1].
Figure 1 Block diagram of a beat frequency metal detector.
Armed with information from some hobbyist electronics magazines and a
tutorial on mixer circuits from the ARRL handbook, I built a simple,
transistorized metal detector when I was in high school. The oscillator
frequencies were in the AM broadcast band, and this allowed a student who
didn’t own an oscilloscope to troubleshoot the circuit design.
You never know what knowledge from your youth will be useful later in life.
My experience with metal detectors helped solve a problem that my colleagues
and I had in growing large crystals of an important semiconductor, gallium
arsenide. We needed to produce crystals of uniform diameter, and the usual
approach, weighing the crystal as it grew, was not an option. That was
because the process of creating the crystals involved solidifying them from
a crucible of molten material in a pressure chamber at about 1,250°C and
25atm.
Instead of using an electronic balance to measure the mass gained by the
crystal, I used a position-sensing inductance coil to sense the conductive
surface of the molten gallium arsenide. A motor in a feedback loop raised
the crucible to achieve a constant gap between the sensing coil and the
molten surface, as the crystal was solidified from the liquid by pulling.
The coil used in this case was 17 turns of molybdenum wire wound on a 10mm
diameter form to a length of 13mm [1].
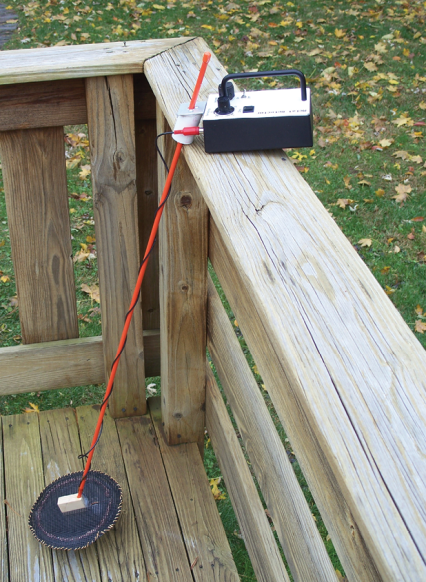
COIL CONSTRUCTION A rule of thumb for a flat inductance coil is that its magnetic field lines will extend about the same distance as the coil diameter. In a metal detector application, this means that if you’re only willing to dig a hole that’s 6” deep, the coil should be 6” in diameter. The coil that I used was 12 turns of AWG-26 enameled copper wire, formed around a 6” outside diameter food storage container and then removed. The coil was stiffened to retain its shape by wrapping it in a spiral polyethylene cable jacket. Alternative wraps could be thin plastic tubing with a lengthwise slit, foam tape (as used in poster-board mounting), or vinyl tape. External capacitance changes affect the oscillator frequency, so the coil is shielded by wrapping it in a conductive foil that’s connected to the circuit ground. I used a wide copper tape for this; similar tape in a narrower width is used by craftsmen to create stained glass artwork, and can be found at some craft stores. Copper is a good choice, since the shield connection can be soldered. Household aluminum foil can also be used, in which case, the connection needs to be mechanical. One way to accomplish this is to insert a piece of outer braid of a coaxial cable a few inches beneath the foil, and tightly tape the outer area of the foil. The braid can then be soldered for the connection. Since my metal detector would be used by children, I tried to make it as lightweight as possible. The coil assembly was mounted on top of a slightly larger circle of 0.050” thick acrylic plastic, obtained from a home goods store. The coil was held in place on the plastic sheet by string, threaded through four peripheral holes and reinforced with silicone adhesive. A wooden block was drilled with a 60-degree hole, and attached to the center of the plastic sheet with two nylon bolts and epoxy. A fiberglass rod of the type used for property boundary marking was likewise obtained from a home goods store and epoxied into the hole in the wood block. For additional protection, the coil assembly was covered top and bottom with a plastic mesh material obtained from a craft store. The mesh layers were secured by threading string around the periphery (Figure 2). The coil is soldered to a 4’ length of RG-174/U coaxial cable. Although this is a 50Ω cable, we’re not using it as a transmission line, so it adds an insignificant 150pF to the resonant capacitance. The coil shield can be connected to the outside braid of the coaxial cable that connects to the coil. Figure 2 Coil construction. Connections to the coil and its foil shielding (a); the coil mounted on the top of its acrylic plastic base (b); and the coil and base covered with a protective plastic mesh (c) are shown here.
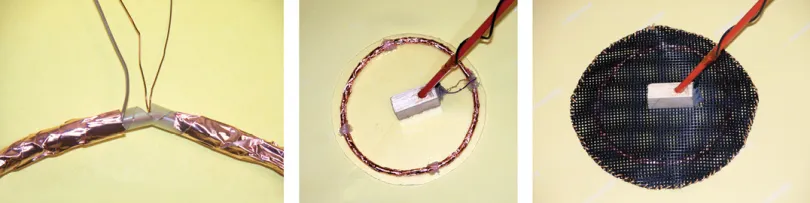 Figure 2
Coil construction. Connections to the coil and its foil shielding (a); the
coil mounted on the top of its acrylic plastic base (b); and the coil and
base covered with a protective plastic mesh (c) are shown here.
Figure 2
Coil construction. Connections to the coil and its foil shielding (a); the
coil mounted on the top of its acrylic plastic base (b); and the coil and
base covered with a protective plastic mesh (c) are shown here.
UPDATED TRADITIONAL CIRCUIT There are many published circuits for beat frequency metal detectors that use transistors to realize the oscillators, mixer, and amplifier. Unfortunately, simple transistorized radio-frequency mixers are inefficient, so I decided to update this type of circuit with a digital mixer (Figure 3). The sensing and reference oscillators are also implemented using digital circuitry in the form of CMOS logic gates, some of which are biased to act as analog amplifiers. The circuit is powered by a 9V battery. CMOS inverting logic circuits, such as the 4011 used here in a Colpitts oscillator configuration, can be biased into linear operation by a resistor connecting their input and output to function as amplifiers. Cascading two inverters of a 4011B gives you an amplifier with a gain of about 1,000, which is more than sufficient to drive the LC resonator into oscillation. First-generation CMOS logic circuits, called the A-series, had only as many FETs needed to produce the required logic function. As a consequence, they have lower gain, but probably enough for these oscillators. The B-series CMOS logic circuits (“B” is for “buffered”) have cascaded inverters at the output of the typical A-series circuitry, so they have much more gain. The additional stages of the 4011 in Figure 3 buffer the oscillator signals. Figure 3 Circuit using the traditional beat frequency approach to metal detecting, updated with a digital mixer and CMOS logic ICs as components for the oscillators. The circuit can be further simplified by eliminating the amplifier and using a piezoelectric speaker connected to pins 12 and 13 of the 4013 mixer, as described in the text. The values of inductance and capacitance in the parallel LC resonant circuit are typically in the range of about 1000 pF and 25 micro-H. As explained in the text, the 4011 NAND gates can be either the older 4011A series, or the newer, buffered 4011B series. Figure 3 Circuit using the traditional beat frequency approach to metal detecting, updated with a digital mixer and CMOS logic ICs as components for the oscillators. The circuit can be further simplified by eliminating the amplifier and using a piezoelectric speaker connected to pins 12 and 13 of the 4013 mixer, as described in the text. The values of inductance and capacitance in the parallel LC resonant circuit are typically in the range of about 1000 pF and 25 micro-H. As explained in the text, the 4011 NAND gates can be either the older 4011A series, or the newer, buffered 4011B series. The circuit uses the 4013, a D-type flip-flop as a digital mixer. This is a dual device, and it’s always a worthwhile precaution to ground all unused inputs of CMOS logic devices. The output square wave is amplified by a TI LM380 audio power amplifier to drive either a loudspeaker or a pair of headphones. This amplifier can be eliminated in a truly bare-bones circuit by connecting a piezoelectric speaker to the logic signals at pins 12 and 13 of the 4013. These provide an 18V square wave for a 9V power supply, which is enough to drive the piezoelectric element to a high sound volume. The essential problem with this circuit and its analog cousins is the need to adjust the reference oscillator, to match its frequency to that of the sensing oscillator, each of which is about 500kHz to 700kHz. This demands either a variable inductance, as shown in the circuit diagram, or a variable capacitance. The needed adjustment is distracting for adults, and it might be too difficult for young children. This problem inspired me to design an advanced metal detector using a PIC microcontroller. ADVANCED APPROACH My advanced metal detector uses the PIC16F688 (PIC16) microcontroller as a frequency counter and to monitor changes in the search oscillator frequency from a baseline value. To make this metal detector behave like a traditional metal detector, the difference frequency was reconstructed, using a voltage -controlled oscillator (VCO) to drive the loudspeaker or headphones. A block diagram is shown in Figure 4. You might think that the microcontroller could just output this difference frequency on a pin, thus eliminating the VCO. However, there would be too many simultaneous processes happening to do this effectively. Figure 4 Block diagram of the advanced metal detector. A digital value of the frequency difference between current frequency and a captured reference value is converted to a voltage by the digital-to-analog converter (DAC), and this voltage signal drives a voltage-controlled oscillator (VCO). Figure 4 Block diagram of the advanced metal detector. A digital value of the frequency difference between current frequency and a captured reference value is converted to a voltage by the digital-to-analog converter (DAC), and this voltage signal drives a voltage-controlled oscillator (VCO). The search coil oscillator uses the same CMOS logic circuit as shown in Figure 3, powered by 5V instead of 9V to make it compatible with the PIC microcontroller. The PIC16 Timer1 internal counter is used to count frequency over a 100ms interval. The frequency of my oscillator was about 565kHz, but coil and capacitor variation might bring the frequency to 700kHz, which calculates to 70,000 counts in 0.1 second. Since the PIC16’s Timer1 internal counter is just 16 bits (65,536) in length, the counter will overflow in that case. This isn’t a problem, though, because we’re interested in a difference and not an absolute frequency. But we need to ensure that the oscillator frequency isn’t near 655kHz, or there could be problems. At this critical value, if the counter for one oscillator overflows, but the other doesn’t, the frequency difference value will be way out of range. The oscillation frequency is easy to check with an oscilloscope, frequency counter, or AM radio. — ADVERTISMENT— —Advertise Here— Upon start-up, the counter value is stored and subsequently compared with the current count. The difference is converted to a voltage by a DAC, which drives a simple triangle-wave VCO. A traditional beat frequency metal detector can only output an audio signal that’s the true difference frequency, so very low frequencies are not easily heard, and the ultimate sensitivity is thereby limited. With a digital value for the difference frequency, a multiplied value can be used to increase sensitivity. The circuit diagram shown in Figure 5 details the construction. The sense coil oscillator connects to the Timer1 internal counter of the PIC16. Software captures the count value 10 times each second. When power is applied, or when the zero switch is depressed and released, the sense coil frequency is sampled and stored. This allows a difference frequency to be calculated upon subsequent counts. The potentiometer provides an analog signal that selects a multiplier value for this difference frequency, and a voltage value of this is created by the DAC to drive the VCO. Figure 5 Circuit diagram of the advanced metal detector. The reset switch and in-circuit serial programming connector are optional, since they are only used in software development. The PIC16F688 is a good choice, because it has a stable 8MHz internal oscillator. The MCP 4921 is a commonly available 12-bit digital-to-analog converter (DAC). The dual op amp, voltage -controlled oscillator circuit is one of my favorites, since it's simple and works with a single voltage supply.Figure 5 Circuit diagram of the advanced metal detector. The reset switch and in -circuit serial programming connector are optional, since they are only used in software development. The PIC16F688 is a good choice, because it has a stable 8MHz internal oscillator. The MCP 4921 is a commonly available 12-bit digital-to-analog converter (DAC). The dual op amp, voltage-controlled oscillator circuit is one of my favorites, since it’s simple and works with a single voltage supply. The VCO circuit is one of my favorites. It’s essentially an integrator that linearly charges and discharges a capacitor at a rate determined by the voltage input. The comparator with positive feedback switches the transistor on and off to determine whether the capacitor is charging or discharging. This action produces a triangle waveform, and this is amplified by the LM380 audio power amplifier to drive a loudspeaker or headphones. The power was more than sufficient to drive the 28mm, 8Ω miniature loudspeaker that I used. The headphones I used needed a 100Ω series resistor, instead of the 10Ω resistor used for the loudspeaker. Otherwise, the volume was too loud. I etch my own PCBs, so they are always created with just a single side of copper and a few needed jumpers. The board for this project is 3” x 4”, and it fit into a plastic project box that was 3.5” wide x 6” high x 1.75” deep. The box also had enough room to contain the front panel switches and potentiometers, the miniature loudspeaker, and a 9V battery pack. The only battery packs I could find included an on-off switch that might become a nuisance, so I used a dab of silicone sealant to ensure that this switch was always on. A photograph of the board mounted in the enclosure and the circuit board layout are shown in Figure 6. Figure 6 Assembled circuit board mounted in the enclosure (a), and the circuit board layout (b). The front panel controls are beneath the board, and the 9V battery pack can be seen at the bottom, with the miniature loudspeaker and a headphone jack mounted at the left side.Figure 6 Assembled circuit board mounted in the enclosure (a), and the circuit board layout (b). The front panel controls are beneath the board, and the 9V battery pack can be seen at the bottom, with the miniature loudspeaker and a headphone jack mounted at the left side. SOFTWARE AND OPERATION Software for the PIC16F688 microcontroller was written in PIC Basic, and the source code is available on the Circuit Cellar’s Article Material webpage. The PIC16F688 is an ideal choice for use in the advanced metal detector since it has a very accurate 8MHz internal clock. This is important for getting an accurate frequency count at the rapid pace of 10 samples per second. It also includes an analog input that simplifies setting the sensitivity. The current demand of the circuit is 35mA in its quiescent state, and 100mA when a tone is sounding. This leads to about a day’s lifetime for a typical battery. Upon power-up, the search oscillator frequency is obtained and stored as a reference value. It’s important that the search coil is distant from any metal objects when power is applied; otherwise, the baseline will be set incorrectly. During the course of operation, the zero switch can be depressed and released to get a new reference value. Ten times a second, the search coil frequency count is obtained and subtracted from the reference value. The absolute value of the difference of these is obtained and multiplied by a factor selected by the sensitivity control. The sensitivity function operates by converting the analog voltage across the potentiometer to a digital multiplicand with value of 1, 2, 4, 8, or 16, as derived from a logic chain that translates the linear voltage to a stepped value. The frequency difference count, multiplied by this factor, is then sent to the DAC, where it is converted to a voltage, and then to a tone by the VCO. The front panel is shown in Figure 7 along with the completed metal detector. Figure 7 Control panel of the advanced metal detector (a) and an overall view (b).Figure 7 Control panel of the advanced metal detector (a) and an overall view (b). The metal detector was designed to be easily held by both adults and children. As noted in the coil construction description, it was designed to be lightweight, with a fiberglass rod connecting the coil to the electronics. As shown in Figure 7, the rod was connected to the control box via a fixture that allowed setting the height of the coil. This fixture was built around a short piece of PVC pipe that was filled with a fast-setting polyurethane material, and then drilled to accommodate the rod and a tapped 1/4-20 hole for a steel bolt with a knob to tighten the rod in place. The software responds to an absolute frequency change, and this allows detection of both ferrous materials and non-ferrous conductors. Since ferrous materials, such as steel, decrease the search coil frequency, and non-ferrous conductors cause an increase, the software can be changed to detect either one or the other. The usual case is rejecting steel nails, screws, and other ferrous scrap so as to detect only more valuable items. I tried this, and it worked, but I eventually settled on a universal metal detector. The primary reason was that oscillator drift in one direction or the other would be masked by not producing a tone, and you would not know when it was appropriate to re-zero the detector. However, it would be possible to modify the software to re-zero automatically at intervals when the frequency dwells on the wrong side of the original baseline. Figure 8 shows the response of the metal detector at a 1x sensitivity, when detecting a 3” square of copper-clad circuit board on my workshop floor. The calculated response at the 16x sensitivity is also shown. Figure 8 Measured audio output for the advanced metal detector, when detecting a 3" square of copper-clad circuit board at the 1x sensitivity setting. Also shown is the calculated response at the 16x sensitivity setting. Larger conductive objects would be detectable at greater distances. Figure 8 Measured audio output for the advanced metal detector, when detecting a 3″ square of copper-clad circuit board at the 1x sensitivity setting. Also shown is the calculated response at the 16x sensitivity setting. Larger conductive objects would be detectable at greater distances. FIELD TEST The metal detector was tested by my 10-year-old grandson in the backyard of his house. To our amazement, he quickly found a die-cast zinc toy buried a few inches underground near a garden bed. This toy had been lost decades earlier by a previous occupant of the house. REFERENCE [1] U. S. Patent Number 4,912,407, Non-Contacting Inductively Coupled Displacement Sensor System, March. 27, 1990, now expired. Code and Supporting Files PUBLISHED IN CIRCUIT CELLAR MAGAZINE • SEPTEMBER 2022 #386 – Get a PDF of the issue