Configuring the DNS Server for An Ubuntu Mail Server: Just follow this step by step guide, and you shouldn’t have any problems setting up the configuration!
- Log In and Update Your Server
Log into your server using SSH. If you’re having trouble, check out our
PuTTY tutorial! After logging in, you should update your machine using the
following command:
apt-get update
-
Install Bind
To configure a DNS server that will use Postfix we’ll need an additional
tool – Bind. Let’s install it first:
sudo apt install bind9
- Configure /var/cache/db.test
At this point, we must take into account that the IP address of our Ubuntu
machine is 192.168.250.7, it is necessary to replace it with the IP address
where we will perform the installation. For this example we’ll use
mail.test.com as a FQDNS.
So, now it is necessary to create a new zone for our example. To do this,
create a new file with the zone information.
sudo nano /var/cache/bind/db.test
Then, add the following:
$ORIGIN test.com.
$TTL 1D
@ IN SOA ns1 root(
1 ;serial
1D ;refresh
2H ;retry
2W ;expire
5H ;minimum
);
@ IN NS ns1
ns1 IN A 192.168.250.7
mail IN A 192.168.250.7
@ IN MX 5 mail
Remember, we must replace the IP address with that of your server, and
change the domain to the one you wish to use. Press CTRL+O to save the
changes and CTRL+X to close the nano editor.
-
Add New Zone to Bind Configuration
Before enabling the newly created zone it is necessary to check the
configuration of the file.
sudo named-checkzone test.com. /var/cache/bind/db.test
Now we can add our new zone to the Bind zone configuration file. To do this,
run the following command:
sudo nano /etc/bind/named.conf.default-zones
And add the new zone:
zone "test.com." {
type master;
file "db.test";
};
Again, CTRL+O to save the changes and CTRL+X to close it.
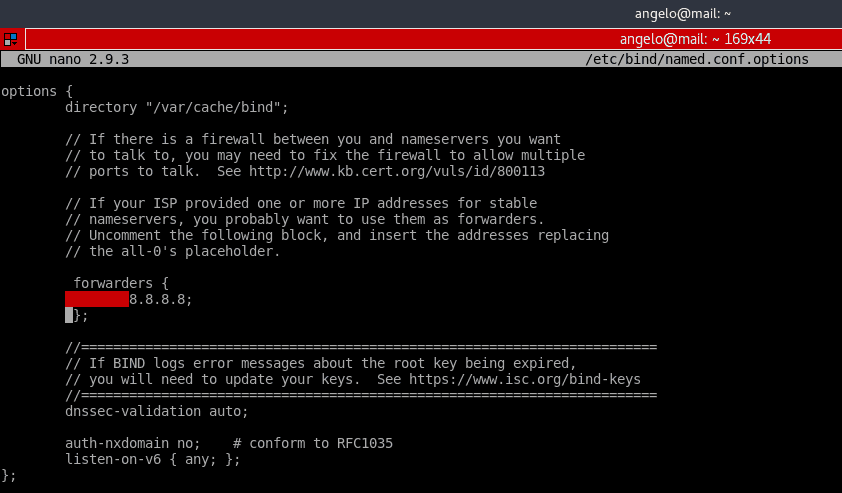
- Configure /etc/bind/named.conf.options
Now, in the file /etc/bind/named.conf.options it is necessary to uncomment
the forwarders line and include the Google DNS – 8.8.8.8. For that simply
remove the // symbols as shown in the screenshot below.
sudo nano /etc/bind/named.conf.optionsEditing DNS zone to set up an Ubuntu
Mail Server
- Restart Bind Now, we have to restart the bind9 service. You can do it with one of two commands: sudo systemctl reload bind9 or sudo systemctl restart bind9
How to Install and Setup Mail Server on Ubuntu We’re almost there, your Ubuntu email server is ready to come online. Here’s what you should do:
- Install Postfix Email Server
Now it is time to install Postfix. Postfix is an email server written in C.
Its main feature is the speed of execution and open source nature. Install
it with the following command:
sudo apt install postfix
During installation, we will be asked to configure the package. On the first
screen, choose the option Internet Site.
Then, we have to enter the name of the server. In this case test.com.
Postfix is very flexible and allows extensive configuration, but for this
tutorial we’ll fix with the default configuration.
- Add User Then, we have to add our user to the group mail: sudo usermod -aG mail $(whoami) After that, we have to create the users and add them to the mail group so they can send and receive mail. I’ll add Gabriel: sudo useradd -m -G mail -s /bin/bash/ gabriel Then, we need to set a password to the newly created user: sudo passwd gabriel
Test the Ubuntu Mail Server Now to prove what we just did. We will send and receive an email from the terminal. To do this, we will install the mailutils package: sudo apt install mailutils Next, we send an email to the other email account user named gabriel. Type in the subject and the message. After that, press CTRL+D to finish. To start writing an email enter the following command: mail gabriel@test.com Now we can log into another user and check the mail utility. There, after running the mail command, we will see the email we just sent to the other test user. To access the email just write the number of the mail, in this case, 1. To test outbound emails from this user, just try another email address: mail angelo@test.com That’s it! You’re sending emails from your very own email server on Ubuntu.
Conclusion An email server is easy to set up but might be a bit complex to manage. In Linux, it is recommended to do it for its security and resource management. On the other hand, in a bigger company, it can be very useful to have a fully configured and functional email server out of the box, like the one offered by Hostinger. Alternatively, host your own email server to get complete control over the service. There are many ways to improve and maintain an email server. It is a process that takes time and is constantly evolving. So we recommend that you keep going deeper into the subject! Good luck and happy mailing!