How to Bypass the Microsoft Outlook IP Blacklist & Other Blacklists
Last Updated: May 3rd, 2022 Xiao Guoan (Admin) 22 Comments
In previous tutorials, I explained how you can easily set up your own mail
server using iRedMail or Modoboa, and you can also build an email server from
scratch. However, sometimes your outgoing emails might be rejected due to IP
address blacklisting. Some folks have a hard time getting off the Microsoft
Outlook IP blacklist, which is used by outlook.com, hotmail.com, live.com, and
msn.com mail servers.
I will show you how to bypass Microsoft Outlook IP Blacklist. If your mail
server IP address is also blocked by other blacklists, I will show you how to
get around it at the end of this article. Please note that you need to follow
the entire tutorial even if your IP address is not blacklisted by Microsoft.
Microsoft Outlook Blacklist
Microsoft Outlook typically sends back the following message if your IP address
is blocked.
host eur.olc.protection.outlook.com[104.47.22.161] said:
550 5.7.1 Unfortunately, messages from [xx.xx.xx.xx] weren't sent.
Please contact your Internet service provider since part of their network
is on our block list (S3150). You can also refer your provider to
http://mail.live.com/mail/troubleshooting.aspx#errors.
[DB8EUR06FT013.eop-eur06.prod.protection.outlook.com] (in reply to MAIL
FROM command)
As you can see, the whole IP range is blocked. Personally, I don’t think this
anti-spam technique should be used due to the collateral damage done to
legitimate senders. In contrast, Gmail is much more intelligent in handling IP
reputation. You can submit the sender information form to solve this problem.
Sometimes Microsoft would unblock your IP address, sometimes your request would
be refused.
A surefire way to get your IP address off the Outlook blacklist is to get your
mail server certified by Return Path. However, it’s very expensive. You need to
pay a one-time $200 application fee and at least $1,375 license fee per year. I
will show you a free way to bypass the Outlook IP blacklist.
Using SMTP Relay Service to Bypass Microsoft Outlook IP Blacklist
You can configure your mail server to relay emails via SMTP relay services. They
maintain a good IP reputation, so your emails can get through IP blacklists.
There are many SMTP relay services. Some charge a little fee, some offer free
quotas every month.
You don’t have to configure your mail server to relay all of your emails. I will
show you how to configure your Postfix SMTP server to relay emails that are sent
to outlook.com, hotmail.com, live.com and msn.com email addresses only, so you
won’t use up free quota quickly. There are not many people using Microsoft
mailboxes these days. Only 6.5% of my subscribers are using hotmail, outlook,
live, and msn email addresses.
Here I recommend the SendinBlue SMTP relay service, which allows you to send
9,000 emails/month for free. No credit card required.
Configure SendinBlue SMTP Relay
Create a free account at SendinBlue. Once you complete your user profile, click
the transactional tab, you will get your SMTP settings.
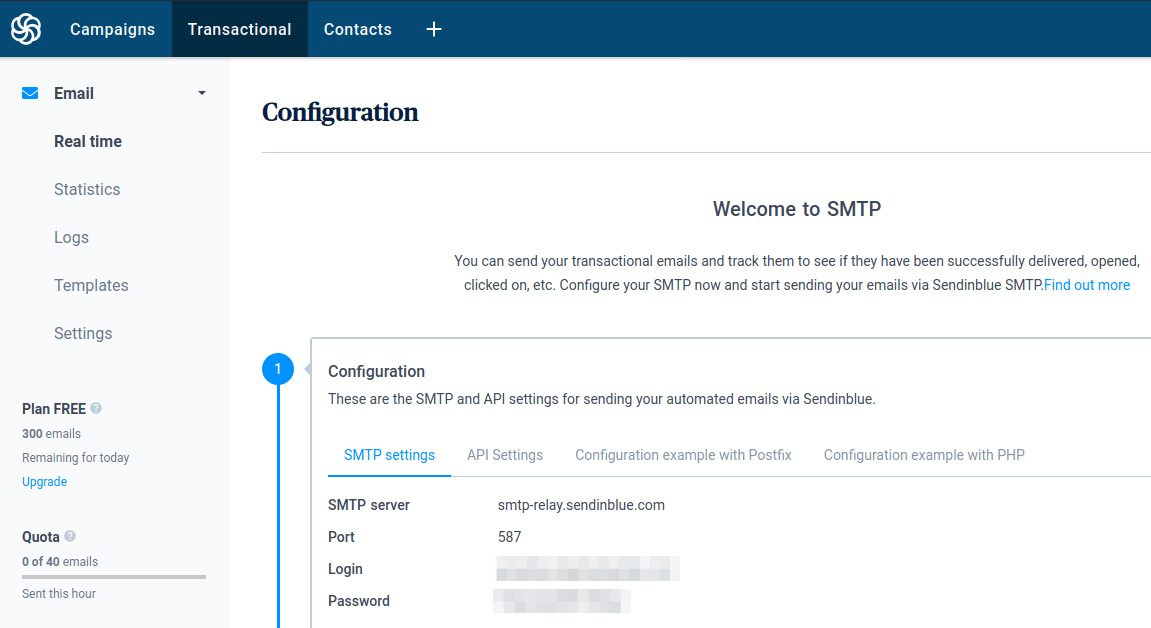 sendinblue SMTP relay settings
Note that you might need to contact Sendinblue customer service in order to
activate the transactional email service.
SSH into your mail server and install the libsasl2-modules package, which is
required for SASL authentication.
sudo apt install libsasl2-modules
If you use CentOS/Rocky Linux/Alma Linux, then install the following packages
instead.
sudo dnf install cyrus-sasl-plain cyrus-sasl-md5
Next, open the Postfix main configuration file with a command-line text editor
like Nano.
sudo nano /etc/postfix/main.cf
Add the following line at the end of this file.
transport_maps = regexp:/etc/postfix/transport.microsoft
Hint
If you use iRedMail, you can find the existing transport_maps parameter and add
the regexp line.
transport_maps =
regexp:/etc/postfix/transport.microsoft
proxy:mysql:/etc/postfix/mysql/transport_maps_user.cf
proxy:mysql:/etc/postfix/mysql/transport_maps_maillist.cf
proxy:mysql:/etc/postfix/mysql/transport_maps_domain.cf
If you use Modoboa, you can find the existing tranport_maps parameter and add
the regexp line.
transport_maps =
regexp:/etc/postfix/transport.microsoft
proxy:mysql:/etc/postfix/sql-transport.cf
proxy:mysql:/etc/postfix/sql-spliteddomains-transport.cf
Then add the following lines to the end of this file.
# outbound relay configurations
smtp_sasl_auth_enable = yes
smtp_sasl_password_maps = hash:/etc/postfix/sasl_passwd
smtp_sasl_security_options = noplaintext, noanonymous
smtp_tls_security_level = may
header_size_limit = 4096000
Save and close the file. Next, create the /etc/postfix/transport.microsoft file.
sudo nano /etc/postfix/transport.microsoft
Add the following line in this file. This tells Postfix to use Sendinblue SMTP
relay if the recipient is a Microsoft mailbox user.
/.*@(outlook|hotmail|live|msn)\..*/i relay:[smtp-relay.sendinblue.com]:587
Save and close the file. The create the .db file.
sudo postmap /etc/postfix/transport.microsoft
Next, create the /etc/postfix/sasl_passwd file.
sudo nano /etc/postfix/sasl_passwd
Add the SMTP relay host and SMTP credentials to this file like below. Replace
smtp_username and smtp_password with your own username and password that are
given by SendinBlue. Note there’s a colon between the username and password.
[smtp-relay.sendinblue.com]:587 smtp_username:smtp_password
Save and close the file. Then create the corresponding hash db file with postmap.
sudo postmap /etc/postfix/sasl_passwd
Now you should have a file /etc/postfix/sasl_passwd.db. Restart Postfix for the
changes to take effect.
sudo systemctl restart postfix
By default, sasl_passwd and sasl_passwd.db file can be read by any user on the
server. Change the permission to 600 so only root can read and write to these
two files.
sudo chmod 0600 /etc/postfix/sasl_passwd /etc/postfix/sasl_passwd.db
From now on, Postfix will use Sendinblue SMTP relay to send emails to Microsoft
mailbox users. You can send a test email to a hotmail.com, outlook.com, live.com
or msn.com email address.
Note that you need to click the Senders & IPs tab in your account dashboard to
add your domain.
sendinblue SMTP relay settings
Note that you might need to contact Sendinblue customer service in order to
activate the transactional email service.
SSH into your mail server and install the libsasl2-modules package, which is
required for SASL authentication.
sudo apt install libsasl2-modules
If you use CentOS/Rocky Linux/Alma Linux, then install the following packages
instead.
sudo dnf install cyrus-sasl-plain cyrus-sasl-md5
Next, open the Postfix main configuration file with a command-line text editor
like Nano.
sudo nano /etc/postfix/main.cf
Add the following line at the end of this file.
transport_maps = regexp:/etc/postfix/transport.microsoft
Hint
If you use iRedMail, you can find the existing transport_maps parameter and add
the regexp line.
transport_maps =
regexp:/etc/postfix/transport.microsoft
proxy:mysql:/etc/postfix/mysql/transport_maps_user.cf
proxy:mysql:/etc/postfix/mysql/transport_maps_maillist.cf
proxy:mysql:/etc/postfix/mysql/transport_maps_domain.cf
If you use Modoboa, you can find the existing tranport_maps parameter and add
the regexp line.
transport_maps =
regexp:/etc/postfix/transport.microsoft
proxy:mysql:/etc/postfix/sql-transport.cf
proxy:mysql:/etc/postfix/sql-spliteddomains-transport.cf
Then add the following lines to the end of this file.
# outbound relay configurations
smtp_sasl_auth_enable = yes
smtp_sasl_password_maps = hash:/etc/postfix/sasl_passwd
smtp_sasl_security_options = noplaintext, noanonymous
smtp_tls_security_level = may
header_size_limit = 4096000
Save and close the file. Next, create the /etc/postfix/transport.microsoft file.
sudo nano /etc/postfix/transport.microsoft
Add the following line in this file. This tells Postfix to use Sendinblue SMTP
relay if the recipient is a Microsoft mailbox user.
/.*@(outlook|hotmail|live|msn)\..*/i relay:[smtp-relay.sendinblue.com]:587
Save and close the file. The create the .db file.
sudo postmap /etc/postfix/transport.microsoft
Next, create the /etc/postfix/sasl_passwd file.
sudo nano /etc/postfix/sasl_passwd
Add the SMTP relay host and SMTP credentials to this file like below. Replace
smtp_username and smtp_password with your own username and password that are
given by SendinBlue. Note there’s a colon between the username and password.
[smtp-relay.sendinblue.com]:587 smtp_username:smtp_password
Save and close the file. Then create the corresponding hash db file with postmap.
sudo postmap /etc/postfix/sasl_passwd
Now you should have a file /etc/postfix/sasl_passwd.db. Restart Postfix for the
changes to take effect.
sudo systemctl restart postfix
By default, sasl_passwd and sasl_passwd.db file can be read by any user on the
server. Change the permission to 600 so only root can read and write to these
two files.
sudo chmod 0600 /etc/postfix/sasl_passwd /etc/postfix/sasl_passwd.db
From now on, Postfix will use Sendinblue SMTP relay to send emails to Microsoft
mailbox users. You can send a test email to a hotmail.com, outlook.com, live.com
or msn.com email address.
Note that you need to click the Senders & IPs tab in your account dashboard to
add your domain.
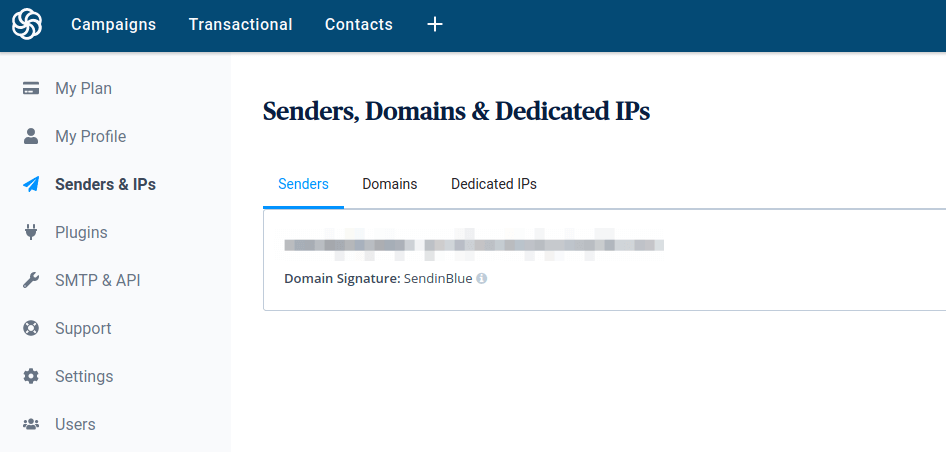 sendinblue add senders and domains
Set Up SPF/DKIM Authentication in SendinBlue
In your SendinBlue dashboard, click your account name on the upper-right corner,
then click Senders & IP. Select the Domains tab -> Manage -> Authenticate this
omain.
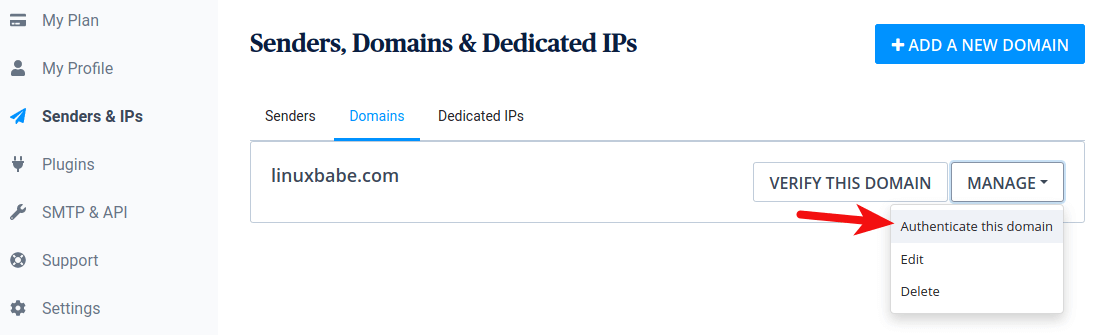 sendinblue authenticate domain
A popup appears. You need to add the first 3 records for your domain.
sendinblue authenticate domain
A popup appears. You need to add the first 3 records for your domain.
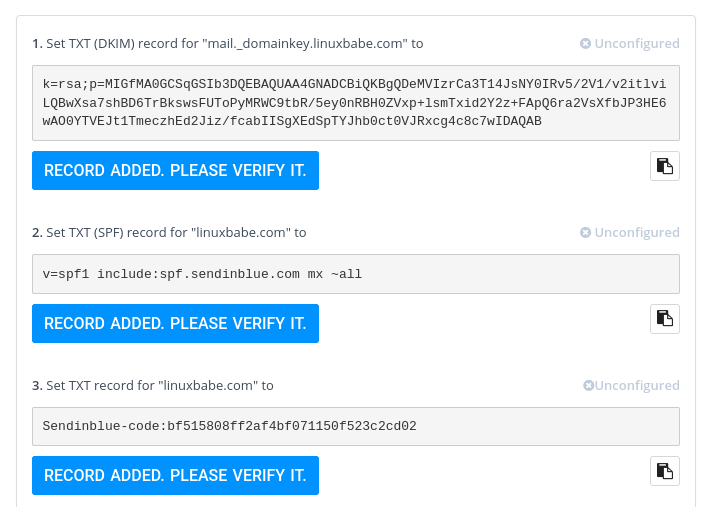 sendinblue spf and DKIM authentication
Troubleshooting Tip
If your Postfix SMTP server failed to send the email via SMTP relay, and you see
the following error in the mail log (/var/log/mail.log).
sasl authentication failed cannot authenticate to server no mechanism available
it’s probably because your system is missing the libsasl2-modules package, which
can be installed with the following command.
sudo apt install libsasl2-modules
Then restart Postfix.
sudo systemctl restart postfix
Note: Sometimes the above error could be caused by an invalid TLS certificate
(self-signed or expired) on the SMTP relay server. However, this rarely happens
when you use Sendinblue.
How to Bypass Third-Party Email Blacklists
Now you can send emails to Microsoft mailboxes, but there are also other
third-party blacklists such as the Proofpoint blacklist, which is used by
icloud.com and also many other domain names. You can’t list all possible domain
names that use the Proofpoint blacklist in the Postfix transport file, so how
can you tell Postfix to bypass third-party blacklists?
In this case, you need to tell Postfix to fall back to Sendinblue SMTP relay if
email delivery fails. Open the main.cf file.
sudo nano /etc/postfix/main.cf
Add the following line at the end of this file.
smtp_fallback_relay = [smtp-relay.sendinblue.com]:587
In this way, Postfix will try delivering the email by itself, and if the
delivery failed, Postfix will use the Sendinblue SMTP relay.
smtp_fallback_relay is not perfect, because it only works when the email is
soft bounced (code 4xx). If your outgoing email is hard bounced (code 5xx), then
Postfix won’t use the fallback relay.
Fortunately, you can change the SMTP relay code from 5xx to 4xx, so Postfix will
think all bounced emails are soft bounce and it will fall back to Sendinblue
SMTP relay. To make this work, add the following line at the bottom of the
/etc/postfix/main.cf file.
smtp_reply_filter = pcre:/etc/postfix/smtp_reply_filter
Save and close the file. Then create the /etc/postfix/smtp_reply_filter file.
sudo nano /etc/postfix/smtp_reply_filter
Add the following line in this file. Please don’t add any whitespace at the
beginning of this line.
/^5(.*)$/ 4$1
Save and close the file. Next, build this lookup table.
sudo postmap /etc/postfix/smtp_reply_filter
Install the PCRE map support for Postfix.
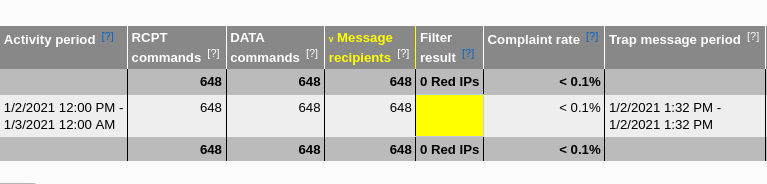 microsoft outlook hotmail mail traffic and spam data
 microsoft outlook email IP reputation