Build Your Email Server on Ubuntu with Postfix
From: https://www.linuxbabe.com/mail-server/setup-basic-postfix-mail-sever-ubuntu
Build Your Own Email Server on Ubuntu:
Basic Postfix Setup
Why run your own email server? Perhaps you have a website, which needs to send
emails to users, or maybe you want to store your emails on your own server to
protect your privacy. However, building your own email server can be a pain in
the butt because there are so many software components you need to install and
configure properly. To make this journey easy for you, I’m creating a tutorial
series on how to build your own email server on Ubuntu.

	Build Your Own Email Server on Ubuntu Basic Postfix Setup

I’m confident to say that this is the best and most comprehensive tutorial
series about building an email server from scratch on the Internet. Not only
will you have a working email server, but also you will have a much better
understanding of how email works. This tutorial series is divided into 15 parts.
Build Your Own Email Server on Ubuntu Basic Postfix Setup
I’m confident to say that this is the best and most comprehensive tutorial
series about building an email server from scratch on the Internet. Not only
will you have a working email server, but also you will have a much better
understanding of how email works. This tutorial series is divided into 15 parts.
I know this seems to be a very daunting task. However, based on what you want to
achieve, you might not need to follow all of them. My articles are easy to
follow, so if you dedicate some time to it, you will have a working email server.
Hint: If you don’t want to build an email server from scratch, which is a long
and tedious process, you can use Scalahosting managed VPS to set up a
full-featured mail server quickly and easily.
This article is part 1 of this tutorial series. In this article, I will show you
how to set up a very basic Postfix SMTP server, also known as an MTA (message
transport agent). Once you finish this article, you should be able to send and
receive emails with your own email domain on your own email server. This
tutorial is tested on Ubuntu 22.04, Ubuntu 20.04, and Ubuntu 18.04 server.
About Postfix
Postfix is a state-of-the-art message transport agent (MTA), aka SMTP server,
which serves two purposes.
- It’s responsible for transporting email messages from a mail client/mail
user agent (MUA) to a remote SMTP server.
- It’s also used to accept emails from other SMTP servers.
Postfix was built by Wietse Venema who is a Unix and security expert. It’s easy
to use, designed with security and modularity in mind, with each module running
at the lowest possible privilege level required to get the job done. Postfix
integrates tightly with Unix/Linux and does not provide functionalities that
Unix/Linux already provides. It’s reliable in both simple and stressful
conditions.
Postfix was originally designed as a replacement for Sendmail – the traditional
SMTP server on Unix. In comparison, Postfix is more secure and easier to
configure. It is compatible with Sendmail, so if you uninstall Sendmail and
replace it with Postfix, your existing scripts and programs will continue to
work seamlessly.
In this tutorial, you will learn how to configure Postfix for a single domain.
Choosing the Right Hosting Provider
It’s not an easy task to find a VPS (Virtual Private Server) provider suitable
for email hosting. Many hosting companies like DigitalOcean blocks port 25.
DigitalOcean would not unblock port 25, so you will need to set up SMTP relay to
bypass blocking, which can cost you additional money. If you use Vultr VPS,
then port 25 is blocked by default. They can unblock it if you open a support
ticket, but they may block it again at any time if they decide your email
sending activity is not allowed. Vultr actually may re-block it if you use their
servers to send newsletters.
Another problem is that big well-known hosting providers like DigitalOcean or
Vultr are abused by spammers. Often the server IP address is on several
blacklists. Vultr has some entire IP ranges blacklisted.
Kamatera VPS is a very good option to run a mail server because
- They don’t block port 25.
- The IP address isn’t on any email blacklist. (At least this is true in my
case. I chose the Dallas data center.) You definitely don’t want to be listed on
the dreaded Microsoft Outlook IP blacklist or the SpamRats blacklist. Some
blacklists block an entire IP range and you have no way to delist your IP
address from this kind of blacklists.
- You can edit PTR record to improve email deliverability.
- They allow you to send newsletters to your email subscribers with no hourly
limits or daily limit, whatsoever. Note that you are not allowed to send spam,
also known as unsolicited bulk email. If the recipient doesn’t explicitly give
you permission to send emails, and you send emails to them, that’s unsolicited
email.
- You can order multiple IP addresses for a single server. This is very useful
for folks who need to send a large volume of emails. You can spread email
traffic on multiple IP addresses to achieve better email deliverability.
I recommend following the tutorial linked below to properly set up a Linux VPS
server on Kamatera.
- How to Create a Linux VPS Server on Kamatera
You also need a domain name. I registered my domain name from NameCheap because
the price is low and they give you whois privacy protection free for life.
Things To Do Before Installing Postfix
To make Postfix perform better and get the most out of Postfix, you need to
properly set up your Ubuntu server.
Set A Correct Hostname for Ubuntu Server
By default, Postfix uses your server’s hostname to identify itself when
communicating with other MTAs. Hostname can have two forms: a single word and
FQDN.
The single word form is used mostly on personal computers. Your Linux home
computer might be named linux, debian, ubuntu etc. FQDN (Fully Qualified Domain
Name) is commonly used on Internet-facing servers and we should use FQDN on our
mail servers. It consists of two parts: a node name and a domain name. For
example:
mail.linuxbabe.com
is an FQDN. mail is the nodename, linuxbabe.com is the domain name. FQDN will
appear in the smtpd banner. Some MTAs reject messages if your Postfix does not
provide FQDN in smtpd banner. Some MTAs even query DNS to see if FQDN in the
smtpd banner resolves to the IP of your mail server.
Enter the following command to see the FQDN form of your hostname.
hostname -f
If your Ubuntu server doesn’t have an FQDN yet, you can use hostnamectl to set
one.
sudo hostnamectl set-hostname your-fqdn
A common FQDN for mail server is mail.yourdomain.com. You need to log out and
log back in to see this change at the command prompt.
Set Up DNS Records for Your Mail Server
You need to go to your DNS hosting service (usually your domain registrar like
NameCheap) to set up DNS records
MX record
An MX record tells other MTAs that your mail server mail.yourdomain.com is
responsible for email delivery for your domain name.
MX record @ mail.linuxbabe.com
A common name for the MX host is mail.yourdomain.com. You can specify more than
one MX record and set priority for your mail servers. A lower number means
higher priority. Here we only use one MX record and set 0 as the priority value.
(0 – 65535)
Note that when you create the MX record, you should enter @ or your apex domain
name in the name field like below. An apex domain name is a domain name without
any sub-domain.
 email server MX record
A record
An A record maps an FQDN to an IP address.
mail.linuxbabe.com
AAAA record
If your server uses IPv6 address, it’s also a good idea to add AAAA record for
mail.yourdomain.com.
mail.linuxbabe.com
Hint:
If you use Cloudflare DNS service, you should not enable the CDN (proxy)
feature when creating A and AAAA record for mail.your-domain.com. Cloudflare
does not support SMTP or IMAP proxy.
PTR record
A pointer record, or PTR record, maps an IP address to an FQDN. It’s the
counterpart to the A record and is used for reverse DNS (rDNS) lookup.
Reverse resolution of IP address with PTR record can help with blocking
spammers. Many MTAs accept email only if the server is really responsible for a
certain domain. You should definitely set a PTR record for your email server so
your emails have a better chance of landing in the recipient’s inbox instead of
the spam folder.
To check the PTR record for an IP address, you can use the following command.
dig -x +short
or
host
PTR record isn’t managed by your domain registrar. It’s managed by the
organization that gives you an IP address. You get IP address from your hosting
provider, not from your domain registrar, so you must set PTR record for your
IP address in your hosting provider’s control panel. Its value should be your
mail server’s hostname: mail.your-domain.com. If your server uses IPv6 address,
then add a PTR record for your IPv6 address as well.
To edit the reverse DNS record for your Kamatera VPS, log into the Kamatera
client area, then open a support ticket and tell them to add PTR record for your
server IP addresss to point the IP address to mail.your-domain.com. It’s not
convenient, you might think, but this is to keep spammers away from the
platform, so legitimate email senders like us will have a great IP reputation.
Note: Gmail will actually check the A record of the hostname specified in the
PTR record. If the hostname resolves to the same IP address, Gmail will accept
your email. Otherwise, it will reject your email.
After all of the above is done, let’s play with Postfix.
Installing Postfix
On your ubuntu server, run the following two commands.
sudo apt-get update
sudo apt-get install postfix -y
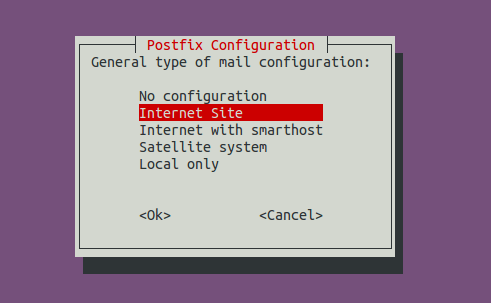
You will be asked to select a type for mail configuration. Normally, you will
want to select the second type: Internet Site.
 build your own email server with postfix
- No configuration means the installation process will not configure any
parameters.
- Internet Site means using Postfix for sending emails to other MTAs and
receiving email from other MTAs.
- Internet with smarthost means using postfix to receive email from other
MTAs, but using another smart host to relay emails to the recipient.
- Satellite system means using smart host for sending and receiving email.
- Local only means emails are transmitted only between local user accounts.
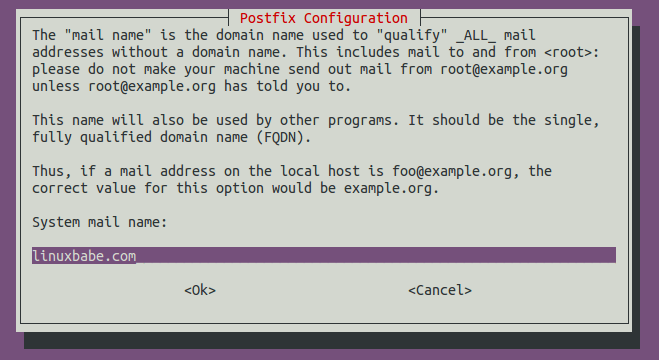
Next, enter your domain name for the system mail name, i.e. the domain name
after @ symbol. For example, my email address is xiao@linuxbabe.com, so I
entered linuxbabe.com for the system mail name. This domain name will be
appended to addresses that don’t have a domain name specified. Note that if you
enter a sub-domain like mail.your-domain.com, you will be able to receive emails
destined for @mail.your-domain.com addresses, but not be able to receive emails
destined for @your-domain.com addresses.
 build your own email server with postfix
Once installed, Postfix will be automatically started and a /etc/postfix/main.c
file will be generated. Now we can check Postfix version with this command:
postconf mail_version
On Ubuntu 22.04, the Postfix version is 3.6.4, and Ubuntu 20.04 ships with
version 3.4.10.
mail_version = 3.6.4
The ss (Socket Statistics) utility tells us that the Postfix master process is
listening on TCP port 25.
sudo ss -lnpt | grep master
build your own email server with postfix
Once installed, Postfix will be automatically started and a /etc/postfix/main.c
file will be generated. Now we can check Postfix version with this command:
postconf mail_version
On Ubuntu 22.04, the Postfix version is 3.6.4, and Ubuntu 20.04 ships with
version 3.4.10.
mail_version = 3.6.4
The ss (Socket Statistics) utility tells us that the Postfix master process is
listening on TCP port 25.
sudo ss -lnpt | grep master
 ubuntu postfix TCP port 25
Postfix ships with many binaries under the /usr/sbin/ directory, as can be seen
with the following command.
dpkg -L postfix | grep /usr/sbin/
Output:
/usr/sbin/postalias
/usr/sbin/postcat
/usr/sbin/postconf
/usr/sbin/postdrop
/usr/sbin/postfix
/usr/sbin/postfix-add-filter
/usr/sbin/postfix-add-policy
/usr/sbin/postkick
/usr/sbin/postlock
/usr/sbin/postlog
/usr/sbin/postmap
/usr/sbin/postmulti
/usr/sbin/postqueue
/usr/sbin/postsuper
/usr/sbin/posttls-finger
/usr/sbin/qmqp-sink
/usr/sbin/qmqp-source
/usr/sbin/qshape
/usr/sbin/rmail
/usr/sbin/sendmail
/usr/sbin/smtp-sink
/usr/sbin/smtp-source
ubuntu postfix TCP port 25
Postfix ships with many binaries under the /usr/sbin/ directory, as can be seen
with the following command.
dpkg -L postfix | grep /usr/sbin/
Output:
/usr/sbin/postalias
/usr/sbin/postcat
/usr/sbin/postconf
/usr/sbin/postdrop
/usr/sbin/postfix
/usr/sbin/postfix-add-filter
/usr/sbin/postfix-add-policy
/usr/sbin/postkick
/usr/sbin/postlock
/usr/sbin/postlog
/usr/sbin/postmap
/usr/sbin/postmulti
/usr/sbin/postqueue
/usr/sbin/postsuper
/usr/sbin/posttls-finger
/usr/sbin/qmqp-sink
/usr/sbin/qmqp-source
/usr/sbin/qshape
/usr/sbin/rmail
/usr/sbin/sendmail
/usr/sbin/smtp-sink
/usr/sbin/smtp-source
Open TCP Port 25 (inbound) in Firewall
The inbound TCP port 25 needs to be open, so Postfix can receive emails from
other SMTP servers. Ubuntu doesn’t enable a firewall by default. If you have
enabled the UFW firewall, you need to open port 25 (inbound) with the following
command.
sudo ufw allow 25/tcp
Then we can scan open ports on the mail server with an online port scanner.
Enter your mail server’s public IP address and select scan all common ports.
 build your own email server redhat
You can see from the above screenshot that TCP port 25 is open on my
mail server.
build your own email server redhat
You can see from the above screenshot that TCP port 25 is open on my
mail server.
Checking If TCP Port 25 (outbound)
is blocked
The outbound TCP port 25 needs to be open, so Postfix can send emails to other
SMTP servers. The outbound TCP port 25 is controlled by your hosting provider,
we can install the telnet utility to check if it’s open or blocked.
sudo apt install telnet
Run the following command on your mail server.
telnet gmail-smtp-in.l.google.com 25
If it’s not blocked, you would see messages like below, which indicates a
connection is successfully established. (Hint: Type in quit and press Enter to
close the connection.)
Trying 74.125.68.26...
Connected to gmail-smtp-in.l.google.com.
Escape character is '^]'.
220 mx.google.com ESMTP y22si1641751pll.208 - gsmtp
If port 25 (outbound) is blocked, you would see something like:
Trying 2607:f8b0:400e:c06::1a...
Trying 74.125.195.27...
telnet: Unable to connect to remote host: Connection timed out
In this case, your Postfix can’t send emails to other SMTP servers. Ask your
ISP/hosting provider to open the outbound port 25 for you. If they refuse your
request, you need to set up SMTP relay to bypass port 25 blocking or use a VPS
like Kamatera that doesn’t block port 25.
Some folks might be asking, “Can I change port 25 to another port to bypass
blocking”? The answer is no. Changing the port works only when you control both
the server-side and client-side. When Postfix sends emails, it acts as the SMTP
client. The recipient’s mail server acts as the SMTP server. You don’t have
control over the receiving SMTP server. SMTP servers are listening on port 25 to
receive emails. They expect SMTP clients to hit port 25. There’s no other port
for receiving emails. If your Postfix don’t connect to port 25 of the receiving
SMTP server, you won’t be able to send emails.
Sending Test Email
As a matter of fact, we can now send and receive email from the command line. If
your Ubuntu server has a user account called user1, then the email address for
this user is user1@yourdomain.com. You can send an email to root user
root@yourdomain.com. You can also send emails to Gmail, yahoo mail or any other
email service.
When installing Postfix, a sendmail binary is placed at /usr/sbin/sendmail,
which is compatible with the traditional Sendmail SMTP server. You can use
Postfix’s sendmail binary to send a test email to your Gmail account like this:
echo "test email" | sendmail your-account@gmail.com
In this simple command, sendmail reads a message from standard input and make
“test email” as the message body, then send this message to your Gmail account.
You should be able to receive this test email in your Gmail inbox (or spam
folder). You can see that although we didn’t specify the from address, Postfix
automatically append a domain name for the from address. That’s because we added
our domain name in system mail name when installing Postfix.
Note:
The From: domain name is determined by the myorigin parameter in Postfix,
not by the myhostname parameter.
You can try to reply to this test email to see if Postfix can receive email
messages. It’s likely that emails sent from your domain are labeled as spam.
Don’t worry about it now. We will solve this problem in later parts of this
tutorial series.
The inbox for each user is located at /var/spool/mail/ or
/var/mail/ file. If you are unsure where to look for the inbox, use
this command.
postconf mail_spool_directory
The Postfix mail log is stored at /var/log/mail.log.
Still Can’t Send Email?
If port 25 (outbound) is not blocked, but you still can’t send emails from your
own mail server to your other email address like Gmail, then you should open the
mail log (/var/log/mail.log) with a command-line text editor, such as Nano.
sudo nano /var/log/mail.log
For example, some folks might see the following lines in the file.
host:
gmail-smtp-in.l.google.com[2404:6800:4003:c03::1b] said: 550-5.7.1
[2a0d:7c40:3000:b8b::2] Our system has detected that 550-5.7.1 this message does
not meet IPv6 sending guidelines regarding PTR 550-5.7.1 records and
authentication. Please review 550-5.7.1
https://support.google.com/mail/?p=IPv6AuthError for more information
This means your mail server is using IPv6 to send the email, but you didn’t set
up IPv6 records. You should go to your DNS manager, set AAAA record for
mail.your-domain.com, then you should also set PTR record for your IPv6 address.
(PTR record is managed by the organization that gives you an IP address.)
To save a file in Nano text editor, press Ctrl+O, then press Enter to confirm.
To exit, press Ctrl+X.
Using the 'mail' program to Send and Read Email
Now let’s install a command-line MUA (mail user agent).
sudo apt-get install mailutils
To send email, type
mail -a FROM:your-account@yourdomain.com username@gmail.com
user@mail:~$ mail -a FROM:xiao@linuxbabe.com username@gmail.com
Cc:
Subject: 2nd test email
I'm sending this email using the mail program.
Enter the subject line and the body text. To tell mail that you have finished
writing, press Ctrl+D and mail will send this email message for you.
To read incoming emails, just type mail.
mail
Here’s how to use the mail program to manage your mailbox.
- To read the first email message, type 1. If only parts of the message is
displayed, press Enter to show the remaining part of the message.
- To display message headers starting from message 1, type h.
- To show the last screenful of messages, type h$ or z.
- To read the next email message, type n.
- To delete message 1, type d 1.
- To delete message 1, 2 and 3, type d 1 2 3.
- To delete messages from 1 to 10, type d 1-10.
- To replay to message 1, type reply 1.
- To exit out of mail, type q.
Messages that have been opened will be moved from /var/mail/ to
/home//mbox file. That means other mail clients can’t read those
messages. To prevent this from happening, type x instead of q to exit out of the
mail.
How To Increase Attachment Size Limit
By default, the attachment cannot be larger than 10MB, which is indicated by the
message_size_limit parameter.
postconf | grep message_size_limit
Output:
message_size_limit = 10240000
This parameter defines the size limit for emails originating from your own mail
server and for emails coming to your mail server.
To allow attachment of 50MB in size, run the following command.
sudo postconf -e message_size_limit=52428800
When postconf command is invoked with the -e (edit) option, it will try to find
the parameter (message_size_limit) in the Postfix main configuration file
(/etc/postfix/main.cf) and change the value. If the parameter can’t be found,
then it adds the parameter at the end of the file.
Note that the message_size_limit should not be larger than the
mailbox_size_limit, otherwise Postfix might not be able to receive emails. The
default value of mailbox_size_limit is 51200000 bytes (about 48MB) in the
upstream Postfix package. On Ubuntu, the default value is set to 0, as can be
seen with
postconf | grep mailbox_size_limit
Output:
mailbox_size_limit = 0
This means that the mailbox has no size limit, which is great.
Restart Postfix for the changes to take effect.
sudo systemctl restart postfix
When sending an email with large attachments from your mail server, you should
also beware of the receiving server’s attachment size limit. For example, You
can not send an attachment larger than 25MB to a Gmail address.
Setting the Postfix Hostname
By default, Postfix SMTP server uses the OS’s hostname. However, the OS hostname
might change, so it’s a good practice to set the hostname directly in Postfix
configuration file. Open the Postfix main configuration file with a command-line
text editor, such as Nano.
sudo nano /etc/postfix/main.cf
Find the myhostname parameter and set mail.yourdomain.com as the value. It’s not
recommended to use the apex domain yourdomain.com as myhostname. Technically you
can use the apex domain, but it will create problems in later parts of this
tutorial series.
myhostname = mail.yourdomain.com
Save and close the file. (To save a file in Nano text editor, press Ctrl+O, then
press Enter to confirm. To exit, press Ctrl+X.) Restart Postfix for the change
to take effect.
sudo systemctl restart postfix
Creating Email Alias
There are certain required aliases that you should configure when operating your
mail server in a production environment. You can add email alias in the
/etc/aliases file, which is a special Postfix lookup table file using a
Sendmail-compatible format.
sudo nano /etc/aliases
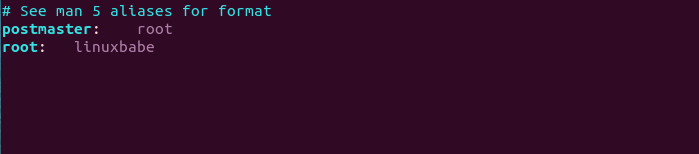
By default, there are only two lines in this file.
# See man 5 aliases for format
postmaster: root
The first line is a comment. The second line is the only definition of an alias
in this file. The left-hand side is the alias name. The right-hand side is the
final destination of the email message. So emails for postmaster@your-domain.com
will be delivered to root@your-domain.com. The postmaster email address is
required by RFC 2142.
Normally we don’t use the root email address. Instead, the postmaster can use a
normal login name to access emails. So you can add the following line. Replace
username with your real username.
root: username
 Ubuntu Postfix email alias
This way, emails for postmaster@your-domain.com will be delivered to
username@your-domain.com. Now you can save and close the file. Then rebuild the
alias database with the newaliases command
sudo newaliases
Ubuntu Postfix email alias
This way, emails for postmaster@your-domain.com will be delivered to
username@your-domain.com. Now you can save and close the file. Then rebuild the
alias database with the newaliases command
sudo newaliases
Using IPv4 Only
By default, Postfix uses both IPv4 and IPv6 protocols, as can been seen with:
postconf inet_protocols
Output:
inet_protocols = all
If your mail server doesn’t have a public IPv6 address, it’s better to disable
IPv6 in Postfix to prevent unnecessary IPv6 connections. Simply run the
following command to disable IPv6 in Postfix.
sudo postconf -e "inet_protocols = ipv4"
Then restart Postfix.
sudo systemctl restart postfix
Upgrading Postfix
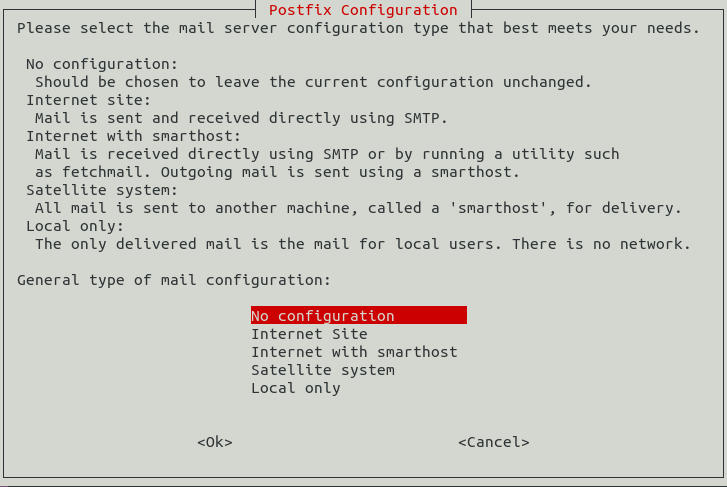
If you run sudo apt update, then sudo apt upgrade, and the system is going to
upgrade Postfix, you might be prompted to choose a configuration type for
Postfix again. This time you should choose No configuration to leave your
current configuration file untouched.
 postfix no configuration
Next Step
Congrats! Now you have a basic Postfix email server up and running. You can send
plain text emails and read incoming emails using the command line. In the next
part of this tutorial series, we will learn how to install Dovecot IMAP server
and enable TLS encryption, which will allow us to use a desktop mail client like
Mozilla Thunderbird to send and receive emails.
Part 2: Install Dovecot IMAP server on Ubuntu & Enable TLS Encryption