4. Set up SPF & DKIM
From: https://www.linuxbabe.com/mail-server/setting-up-dkim-and-spf
Part 4: How to Set up SPF & DKIM with Postfix
on Ubuntu Server
Last Updated: December 5th, 2022 Xiao Guoan (Admin)


After completing part 1 and part 2, we have a working Postfix SMTP server and
Dovecot IMAP server. We can send and receive email using a desktop email client.
Although I have correct MX, A and PTR records, my emails were flagged as spam by
Gmail and Outlook mail. So in this part, we are going to look at how to improve
email delivery to the recipient’s inbox by setting up SPF and DKIM on Ubuntu
server.


What are SPF and DKIM Records?

SPF and DKIM are two types of TXT records in DNS that allow you to detect email
spoofing and help legitimate emails deliver into the recipient’s inbox instead
of the spam folder. If your domain is abused by email spoofing, then your emails
are likely to land in the recipient’s spam folder if they didn’t add you to the
address book.

SPF (Sender Policy Framework) record specifies which hosts or IP addresses are
allowed to send emails on behalf of a domain. You should allow only your own
email server or your ISP’s server to send emails for your domain.

DKIM (DomainKeys Identified Mail) uses a private key to add a signature to
emails sent from your domain. Receiving SMTP servers verify the signature by
using the corresponding public key, which is published in your DNS manager.


Step 1: Create an SPF Record in DNS
In your DNS management interface, create a new TXT record like below.
	TXT  @   v=spf1 mx ~all


	create spf record in DNS

Explanation:
create spf record in DNS
Explanation:
- TXT indicates this is a TXT record.
- Enter @ in the name field.
- v=spf1 indicates this is an SPF record and the SPF record version is SPF1.
- mx means all hosts listed in the MX records are allowed to send emails for
your domain and all other hosts are disallowed.
- ~all indicates that emails from your domain should only come from hosts
specified in the SPF record. Emails that are from other hosts will be flagged as
untrustworthy. Possible alternatives are +all, -all, ?all, but they are rarely
used.
- -all means that emails sent from not-allowed hosts should be rejected, never
to land in the recipient’s inbox or spam folder. I have seen it used by
facebook.com, but we generally don’t need such a strict policy.
Some folks might think that -all will be better as it will reject emails from
untrusted hosts. Well, using -all in your SPF policy can cause your own emails
to be rejected when the recipient has two SMTP servers and the main SMTP server
goes offline, your emails will be temporarily stored on the backup SMTP server.
When the main SMTP server comes back online, the email will be relayed from the
backup SMTP server to the main SMTP server. Since you didn’t list the
recipient’s backup SMTP server in your SPF policy, the email will be rejected by
the recipient’s main SMTP server. So you should use ~all in your SPF policy.
Note
that some DNS managers require you to wrap the SPF record with quotes like below.
TXT @ "v=spf1 mx ~all"
To check if your SPF record is propagated to the public Internet, you can use
the dig utility on your Linux box like below. (On Ubuntu, you need to install
the bind9-dnsutils package in order to use dig command: sudo apt install
bind9-dnsutils)
dig your-domain.com txt
The txt option tells dig that we only want to query TXT records.
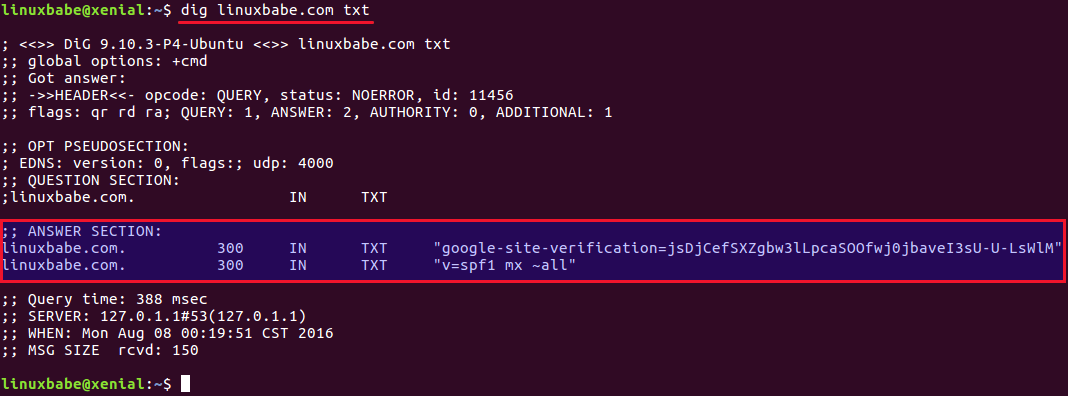 use dig utility to query spf record
You can also use the dmarcian SPF surveyor to test your SPF record syntax.
use dig utility to query spf record
You can also use the dmarcian SPF surveyor to test your SPF record syntax.
Step 2: Configuring SPF Policy Agent
We also need to tell our Postfix SMTP server to check for SPF record of incoming
emails. This doesn’t help ensure outgoing email delivery but help with detecting
forged incoming emails.
First, install required packages:
sudo apt install postfix-policyd-spf-python
Then edit the Postfix master process configuration file.
sudo nano /etc/postfix/master.cf
Add the following lines at the end of the file, which tells Postfix to start the
SPF policy daemon when it’s starting itself.
policyd-spf unix - n n - 0 spawn
user=policyd-spf argv=/usr/bin/policyd-spf
Save and close the file. Next, edit Postfix main configuration file.
sudo nano /etc/postfix/main.cf
Append the following lines at the end of the file. The first line specifies the
Postfix policy agent timeout setting. The following lines will impose a
restriction on incoming emails by rejecting unauthorized email and checking SPF
record.
policyd-spf_time_limit = 3600
smtpd_recipient_restrictions =
permit_mynetworks,
permit_sasl_authenticated,
reject_unauth_destination,
check_policy_service unix:private/policyd-spf
Save and close the file. Then restart Postfix.
sudo systemctl restart postfix
Next time, when you receive an email from a domain that has an SPF record, you
can see the SPF check results in the raw email header. The following header
indicates the sender sent the email from an authorized host.
Received-SPF: Pass (sender SPF authorized).
Step 3: Setting up DKIM
First, install OpenDKIM which is an open-source implementation of the DKIM
sender authentication system.
sudo apt install opendkim opendkim-tools
Then add postfix user to opendkim group.
sudo gpasswd -a postfix opendkim
Edit OpenDKIM main configuration file.
sudo nano /etc/opendkim.conf
Find the following line.
Syslog yes
By default, OpenDKIM logs will be saved in /var/log/mail.log file. Add the
following line so OpenDKIM will generate more detailed logs for debugging.
Logwhy yes
 opendkim logwhy yes
Locate the following lines.
#Domain example.com
#KeyFile /etc/dkimkeys/dkim.key
#Selector 2007
By default, they are commented out. Please don’t uncomment them.
Then, find the following lines. Uncomment them and replace simple with
relaxed/simple.
#Canonicalization simple
#Mode sv
#SubDomains no
Then add the following lines below #ADSPAction continue line. If your file
doesn’t have #ADSPAction continue line, then just add them below SubDomains no.
AutoRestart yes
AutoRestartRate 10/1M
Background yes
DNSTimeout 5
SignatureAlgorithm rsa-sha256
opendkim logwhy yes
Locate the following lines.
#Domain example.com
#KeyFile /etc/dkimkeys/dkim.key
#Selector 2007
By default, they are commented out. Please don’t uncomment them.
Then, find the following lines. Uncomment them and replace simple with
relaxed/simple.
#Canonicalization simple
#Mode sv
#SubDomains no
Then add the following lines below #ADSPAction continue line. If your file
doesn’t have #ADSPAction continue line, then just add them below SubDomains no.
AutoRestart yes
AutoRestartRate 10/1M
Background yes
DNSTimeout 5
SignatureAlgorithm rsa-sha256
 ubuntu opendkim canonicalization
Next, add the following lines at the end of this file. (Note that On Ubuntu
18.04 and 20.04, the UserID is already set to opendkim)
#OpenDKIM user
# Remember to add user postfix to group opendkim
UserID opendkim
# Map domains in From addresses to keys used to sign messages
KeyTable refile:/etc/opendkim/key.table
SigningTable refile:/etc/opendkim/signing.table
# Hosts to ignore when verifying signatures
ExternalIgnoreList /etc/opendkim/trusted.hosts
# A set of internal hosts whose mail should be signed
InternalHosts /etc/opendkim/trusted.hosts
Save and close the file.
ubuntu opendkim canonicalization
Next, add the following lines at the end of this file. (Note that On Ubuntu
18.04 and 20.04, the UserID is already set to opendkim)
#OpenDKIM user
# Remember to add user postfix to group opendkim
UserID opendkim
# Map domains in From addresses to keys used to sign messages
KeyTable refile:/etc/opendkim/key.table
SigningTable refile:/etc/opendkim/signing.table
# Hosts to ignore when verifying signatures
ExternalIgnoreList /etc/opendkim/trusted.hosts
# A set of internal hosts whose mail should be signed
InternalHosts /etc/opendkim/trusted.hosts
Save and close the file.
Step 4: Create Signing Table, Key Table
and Trusted Hosts File
Create a directory structure for OpenDKIM
sudo mkdir /etc/opendkim
sudo mkdir /etc/opendkim/keys
Change the owner from root to opendkim and make sure only opendkim user can read
and write to the keys directory.
sudo chown -R opendkim:opendkim /etc/opendkim
sudo chmod go-rw /etc/opendkim/keys
Create the signing table.
sudo nano /etc/opendkim/signing.table
Add the following two lines to the file. This tells OpenDKIM that if a sender on
your server is using a @your-domain.com address, then it should be signed with
the private key identified by default._domainkey.your-domain.com. The second
line tells that your sub-domains will be signed by the private key as well.
*@your-domain.com default._domainkey.your-domain.com
*@*.your-domain.com default._domainkey.your-domain.com
Save and close the file. Then create the key table.
sudo nano /etc/opendkim/key.table
Add the following line, which tells the location of the private key.
default._domainkey.your-domain.com your-domain.com:default:
/etc/opendkim/keys/your-domain.com/default.private
Save and close the file. Next, create the trusted hosts file.
sudo nano /etc/opendkim/trusted.hosts
Add the following lines to the newly created file. This tells OpenDKIM that if
an email is coming from localhost or from the same domain, then OpenDKIM should
only sign the email but not perform DKIM verification on the email.
127.0.0.1
localhost
.your-domain.com
Save and close the file.
Note:
You should not add an asterisk in the domain name like this:
*.your-domain.com. There should be only a dot before the domain name.
Step 5: Generate Private/Public Keypair
Since DKIM is used to sign outgoing messages and verify incoming messages, we
need to generate a private key for signing and a public key for remote verifier.
Public key will be published in DNS.
Create a separate folder for the domain.
sudo mkdir /etc/opendkim/keys/your-domain.com
Generate keys using opendkim-genkey tool.
sudo opendkim-genkey -b 2048 -d your-domain.com -D
/etc/opendkim/keys/your-domain.com -s default -v
The above command will create 2048 bits keys. -d (domain) specifies the domain.
-D (directory) specifies the directory where the keys will be stored and we use
default as the selector (-s), also known as the name. Once the command is
executed, the private key will be written to default.private file and the
public key will be written to default.txt file.
Make opendkim as the owner of the private key.
sudo chown opendkim:opendkim /etc/opendkim/keys/your-domain.com/default.private
And change the permission, so only the opendkim user has read and write access
to the file.
sudo chmod 600 /etc/opendkim/keys/your-domain.com/default.private
Step 6: Publish Your Public Key in DNS Records
Display the public key
sudo cat /etc/opendkim/keys/your-domain.com/default.txt
The string after the p parameter is the public key.
 opendkim display public dkim record
In your DNS manager, create a TXT record, enter default._domainkey in the name
field. Then go back to the terminal window, copy everything between the
parentheses and paste it into the value field of the DNS record. You need to
delete all double quotes and white spaces in the value field. If you don’t
delete them, then the key test in the next step will probably fail.
opendkim display public dkim record
In your DNS manager, create a TXT record, enter default._domainkey in the name
field. Then go back to the terminal window, copy everything between the
parentheses and paste it into the value field of the DNS record. You need to
delete all double quotes and white spaces in the value field. If you don’t
delete them, then the key test in the next step will probably fail.
 dkim record
Step 7: Test DKIM Key
Enter the following command on Ubuntu server to test your key.
sudo opendkim-testkey -d your-domain.com -s default -vvv
If everything is OK, you will see Key OK in the command output.
opendkim-testkey: using default configfile /etc/opendkim.conf
opendkim-testkey: checking key 'default._domainkey.your-domain.com'
opendkim-testkey: key secure
opendkim-testkey: key OK
Note
that your DKIM record may need sometime to propagate to the Internet.
Depending on the domain registrar you use, your DNS record might be propagated
instantly, or it might take up to 24 hours to propagate. You can go to
https://www.dmarcanalyzer.com/dkim/dkim-check/, enter default as the selector
and enter your domain name to check DKIM record propagation.
If you see Key not secure in the command output, don’t panic. This is because
DNSSEC isn’t enabled on your domain name. DNSSEC is a security standard for
secure DNS query. Most domain names haven’t enabled DNSSEC. There’s absolutely
no need to worry about Key not secure. You can continue to follow this guide.
If you see the query timed out error, you need to comment out the following line
in /etc/opendkim.conf file and restart opendkim.service.
TrustAnchorFile /usr/share/dns/root.key
Step 8: Connect Postfix to OpenDKIM
Postfix can talk to OpenDKIM via a Unix socket file. The default socket file
used by OpenDKIM is /var/run/opendkim/opendkim.sock, as shown in
/etc/opendkim.conf file. But the postfix SMTP daemon shipped with Ubuntu runs
in a chroot jail, which means the SMTP daemon resolves all filenames relative
to the Postfix queue directory (/var/spool/postfix).So we need to change the
OpenDKIM Unix socket file.
Create a directory to hold the OpenDKIM socket file and allow only opendkim user
and postfix group to access it.
sudo mkdir /var/spool/postfix/opendkim
sudo chown opendkim:postfix /var/spool/postfix/opendkim
Then edit the OpenDKIM main configuration file.
sudo nano /etc/opendkim.conf
Find the following line (Ubuntu 18.04)
Socket local:/var/run/opendkim/opendkim.sock
or (Ubuntu 22.04/20.04)
Socket local:/run/opendkim/opendkim.sock
Replace it with the following line. (If you can’t find the above line, then add
the following line.)
Socket local:/var/spool/postfix/opendkim/opendkim.sock
Save and close the file.
If you can find the following line in /etc/default/opendkim file.
SOCKET="local:/var/run/opendkim/opendkim.sock"
or
SOCKET=local:$RUNDIR/opendkim.sock
Change it to
SOCKET="local:/var/spool/postfix/opendkim/opendkim.sock"
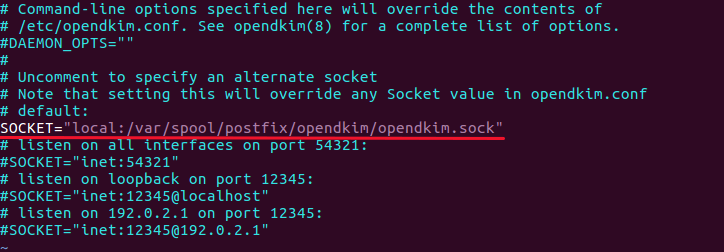 opendkim socket
Save and close the file.
Next, we need to edit the Postfix main configuration file.
sudo nano /etc/postfix/main.cf
Add the following lines at the end of this file, so Postfix will be able to call
OpenDKIM via the milter protocol.
# Milter configuration
milter_default_action = accept
milter_protocol = 6
smtpd_milters = local:opendkim/opendkim.sock
non_smtpd_milters = $smtpd_milters
Save and close the file. Then restart opendkim and postfix service.
sudo systemctl restart opendkim postfix
opendkim socket
Save and close the file.
Next, we need to edit the Postfix main configuration file.
sudo nano /etc/postfix/main.cf
Add the following lines at the end of this file, so Postfix will be able to call
OpenDKIM via the milter protocol.
# Milter configuration
milter_default_action = accept
milter_protocol = 6
smtpd_milters = local:opendkim/opendkim.sock
non_smtpd_milters = $smtpd_milters
Save and close the file. Then restart opendkim and postfix service.
sudo systemctl restart opendkim postfix
Step 9: SPF and DKIM Check
You can now send a test email from your mail server to your Gmail account to see
if SPF and DKIM checks are passed. On the right side of an opened email message
in Gmail, if you click the show original button from the drop-down menu, you can
see the authentication results.
 Gmail SPF and DKIM check scalahosting
Your email server will also perform SPF and DKIM checks on the sender’s domain.
You can see the results in the email headers. The following is SPF and DKIM
check on a sender using Gmail.
Received-SPF: Pass (mailfrom) identity=mailfrom;
client-ip=2607:f8b0:4864:20::c2d; helo=mail-yw1-xc2d.google.com;
envelope-from=someone@gmail.com; receiver=
Authentication-Results: email.linuxbabe.com;
dkim=pass (2048-bit key; unprotected) header.d=gmail.com header.i=@gmail.com
header.b="XWMRd2co";
dkim-atps=neutral
Gmail SPF and DKIM check scalahosting
Your email server will also perform SPF and DKIM checks on the sender’s domain.
You can see the results in the email headers. The following is SPF and DKIM
check on a sender using Gmail.
Received-SPF: Pass (mailfrom) identity=mailfrom;
client-ip=2607:f8b0:4864:20::c2d; helo=mail-yw1-xc2d.google.com;
envelope-from=someone@gmail.com; receiver=
Authentication-Results: email.linuxbabe.com;
dkim=pass (2048-bit key; unprotected) header.d=gmail.com header.i=@gmail.com
header.b="XWMRd2co";
dkim-atps=neutral
Postfix Can’t Connect to OpenDKIM
If your message is not signed and DKIM check failed, you can check postfix log
(/var/log/mail.log) to see what’s wrong with your configuration. If you find the
following error in the Postfix mail log (/var/log/mail.log),
connect to Milter service local:opendkim/opendkim.sock:
No such file or directory
you should check if the opendkim systemd service is actually running.
systemctl status opendkim
If opendkim is running and you still see the above error, it means Postfix can’t
connect to OpenDKIM via the Unix domain socket (local:opendkim/opendkim.sock).
To fix this error, you can configure OpenDKIM to use TCP/IP socket instead of
Unix domain socket. (Unix domain socket is usually faster than TCP/IP socket. If
it doesn’t work on your server, then you should use TCP/IP socket.)
sudo nano /etc/opendkim.conf
Find the following line:
Socket local:/var/spool/postfix/opendkim/opendkim.sock
Replace it with
Socket inet:8892@localhost
So OpenDKIM will be listening on the 127.0.0.1:8892 TCP/IP socket. Save and
close the file. Then edit Postfix main config file.
sudo nano /etc/postfix/main.cf
Find the following line:
smtpd_milters = local:opendkim/opendkim.sock
Replace it with:
smtpd_milters = inet:127.0.0.1:8892
So Postfix will connect to OpenDKIM via the TCP/IP socket. Restart OpenDKIM and
Postfix.
sudo systemctl restart opendkim postfix
Checking the OpenDKIM Logs
Sometimes, the OpenDKIM journal logs may help you find out what’s wrong.
sudo journalctl -eu opendkim
For example, I once had the following error.
opendkim[474285]: key '1': dkimf_db_get(): Connection was killed
opendkim[474285]: 16F53B606: error loading key '1'
I just need to restart OpenDKIM to fix this error.
sudo systemctl restart opendkim
Configuration Error in Email Client
DKIM signing could fail if you don’t use the correct SMTP/IMAP settings in your
email client.
Correct Settings:
- SMTP protocol: enter mail.your-domain.com as the server name,
choose port 587 and STARTTLS. Choose normal password as the authentication method.
- IMAP protocol: enter mail.your-domain.com as the server name,
choose port 143 and STARTTLS. Choose normal password as the authentication method.
or
- SMTP protocol: enter mail.your-domain.com as the server name,
choose port 465 and SSL/TLS. Choose normal password as the authentication method.
- IMAP protocol: enter mail.your-domain.com as the server name,
choose port 993 and SSL/TLS. Choose normal password as the authentication method.
Wrong Settings:
- Use port 25 as the SMTP port in mail clients to submit outgoing emails.
- No encryption method was selected.
Port 25 should be used for SMTP server to SMTP server communication. Please
don’t use it in your email client to submit outgoing emails.
You should select an encryption method (STARTTLS or SSL/TLS) in your email client.
Testing Email Score and Placement
You can also go to https://www.mail-tester.com. You will see a unique email
address. Send an email from your domain to this address and then check your
score. As you can see, I got a perfect score.
 imporve email server reputation
Mail-tester.com can only show you a sender score. There’s another service called
GlockApps that allow you to check if your email is placed in the recipient’s
inbox or spam folder, or rejected outright. It supports many popular email
providers like Gmail, Outlook, Hotmail, YahooMail, iCloud mail, etc
imporve email server reputation
Mail-tester.com can only show you a sender score. There’s another service called
GlockApps that allow you to check if your email is placed in the recipient’s
inbox or spam folder, or rejected outright. It supports many popular email
providers like Gmail, Outlook, Hotmail, YahooMail, iCloud mail, etc
 glockapps email placement test scalahosting
Microsoft Mailboxes
In my test, the email landed in my Gmail inbox. However, it’s stilled labeled as
spam in my outlook.com email although both SPF and DKIM are passed.
Microsoft uses an internal blacklist that blocks many legitimate IP addresses.
If your emails are rejected by Outlook or Hotmail, you need to follow the
tutorial linked below to bypass the Microsoft Outlook blacklist.
How to Bypass the Microsoft Outlook Blacklist & Other Blacklists
What if Your Emails Are Still Being Marked as Spam?
The most important two factors are domain reputation and IP reputation. You can
use an email warm-up service to improve your reputation automatically.
Automatic IP and Domain Warm-up For Your Email Server
I have more tips for you in this article:
7 effective tips to stop your emails from being marked as spam
Next Step
In part 5, we will see how to create DMARC record to protect your domain from
email spoofing. As always, if you found this post useful, please subscribe to
our free newsletter or follow us on Twitter, or like our Facebook page.
Note
In this article, I used umask 002 in the /etc/opendkim.conf file. A visitor
commented below that this solved his problem. However, on Ubuntu 18.04 the
default umask in /etc/opendkim.conf file is set to 007, which works fine on my
production servers. The umask defines the permission of the OpenDKIM socket file
(/var/spool/postfix/opendkim/opendkim.sock)
002: Users not in the opendkim group have read and execute permission, but no
write permission.
007: Users not in the opendkim group have no read, write, or execute
permission.
If I remember correctly, the umask 002 value is the default on Ubuntu 14.04 and
16.04, so I used it when I was writing this article for a Ubuntu 16.04 server.
If you added postfix user to the opendkim group, there should be no need to
change the umask to 002.
sudo gpasswd -a postfix opendkim
I listed this command in the installing OpenDKIM section, but why some people
don’t pay attention and skip this command? I wonder.