Part 3: PostfixAdmin
From: Configuring SASL Auth
Part 3: PostfixAdmin – Create Virtual Mailboxes
on Ubuntu Mail Server
Last Updated: November 28th, 2022 Xiao Guoan (Admin) 232 Comments

In previous articles, we discussed how to set up your own mail server on Ubuntu
from scratch. In part 1 and part 2 of this tutorial series, we learned how to
set up Postfix SMTP server and Dovecot IMAP server, but so far we can only have
email addresses for users with local Unix accounts. This tutorial is going to
show you how to create virtual mailboxes on Ubuntu mail server with
PostfixAdmin, which is an open-source web-based interface to configure and
manage a Postfix-based email server for many domains and users.

With virtual mailboxes, we don’t need to create a local Unix account for each
email address. If you are going to set up a mail server for a company or
organization, it’s always better to have an easy way to create virtual mailboxes
in a web-based interface, which also allows users to change their passwords.
That’s where PostfixAdmin comes in.


PostfixAdmin Features
- manage mailboxes, virtual domains, and aliases
- vacation/out-of-office messages (Personally I think it’s better done in
Roundcube webmail)
- alias domains (forwarding one domain to another with recipient validation)
- users can manage their own mailbox (change alias, password and vacation
message)
- quota support for single mailboxes and total quota of a domain
- fetchmail integration: You can fetch emails from your original email address
to your new email address.
- command-line client postfixadmin-cli for those who don’t want to click
around in a web interface 😉
Note
- This tutorial works on Ubuntu 22.04, Ubuntu 20.04, and Ubuntu 18.04.
- This tutorial uses MariaDB/MySQL database server. If you prefer to use
PostgreSQL database server, please follow this PostfixAdmin/PostgreSQL tutorial.
- Once you finish part 3, you can no longer use local Unix accounts as email
addresses. You must create email addresses from the PostfixAdmin web interface.
Prerequisites
It’s required that you have followed part 1 and part 2 of this tutorial series
before continuing to read this article. If you followed mail server tutorials on
other websites, I recommend purging your configurations (sudo apt purge postfix
dovecot-core) and start over with my tutorial series, so you are not going to be
confused by different setup processes.
Once the above requirements are met, let’s install and configure PostfixAdmin.
Step 1: Install MariaDB/MySQL Database Server
PostfixAdmin is written in PHP and requires a database (MySQL/MariaDB,
PostgreSQL or SQLite). This article will use MariaDB database, which is a
drop-in replacement for MySQL. It is developed by former members of MySQL team
who are concerned that Oracle might turn MySQL into a closed-source product.
Enter the following command to install MariaDB on Ubuntu.
sudo apt install mariadb-server mariadb-client
Hint: If you prefer to use MySQL, you can install it with: sudo apt install
mysql-server-8.0.
After it’s installed, MariaDB server should be automatically started. Use
systemctl to check its status.
systemctl status mariadb
Output:
mariadb.service - MariaDB 10.3.22 database server
Loaded: loaded (/lib/systemd/system/mariadb.service; enabled; vendor preset: enabled)
Active: active (running) since Fri 2020-04-10 14:19:16 UTC; 18s ago
Docs: man:mysqld(8)
https://mariadb.com/kb/en/library/systemd/
Main PID: 9161 (mysqld)
Status: "Taking your SQL requests now..."
Tasks: 31 (limit: 9451)
Memory: 64.7M
CGroup: /system.slice/mariadb.service
└─9161 /usr/sbin/mysqld
If it’s not running, start it with this command:
sudo systemctl start mariadb
To enable MariaDB to automatically start at boot time, run
sudo systemctl enable mariadb
Now run the post-installation security script.
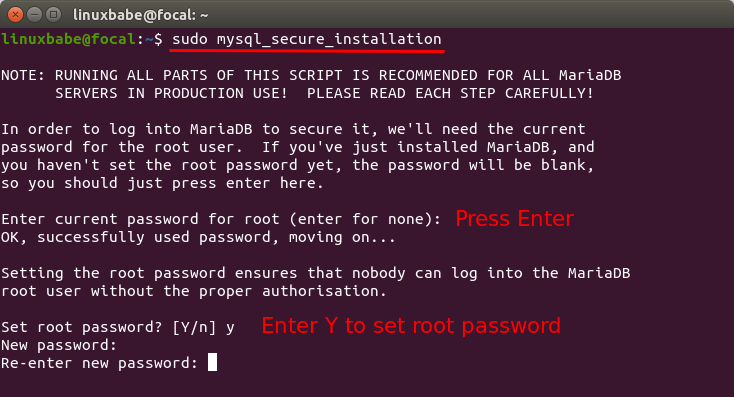
sudo mysql_secure_installation
When it asks you to enter MariaDB root password, press Enter key as the root
password isn’t set yet. Then enter y to set the root password for MariaDB server.
 ubuntu-20.04-install-LAMP-stack-MariaDB
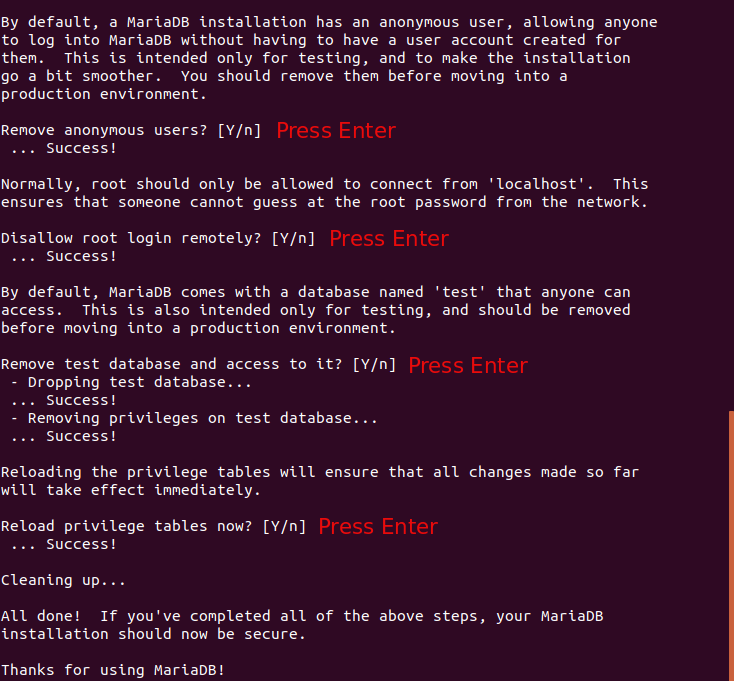
Next, you can press Enter to answer all remaining questions, which will remove
anonymous user, disable remote root login and remove test database. This step is
a basic requirement for MariaDB database security. (Notice that Y is
capitalized, which means it is the default answer. )
ubuntu-20.04-install-LAMP-stack-MariaDB
Next, you can press Enter to answer all remaining questions, which will remove
anonymous user, disable remote root login and remove test database. This step is
a basic requirement for MariaDB database security. (Notice that Y is
capitalized, which means it is the default answer. )
 Install-LAMP-stack-on-Ubuntu-20.04-MariaDB-Database-server
Step 2: Download PostfixAdmin on Ubuntu Server
PostfixAdmin is included in the default Ubuntu repository. However, I don’t
recommend it for the following reasons:
- It can create problems when you upgrade the Ubuntu system to a new version,
resulting in upgrade failure.
- If you use Nginx, the postfixadmin package might automatically install
Apache on your system.
- If you use MySQL, this package might remove MySQL from your system.
- The default postfixadmin package has a login loop issue from time to time.
You will also sometimes encounter the Invalid token! (CSRF check failed) error.
So I will show you how to install the latest version of PostfixAdmin. Go to
PostfixAdmin Gitbub page to download the latest version. You can use the wget
tool to download it from command line. The download link is always available in
the format below. If a new version comes out, simply replace 3.3.11 with the new
version number.
sudo apt install wget
wget https://github.com/postfixadmin/postfixadmin/archive/postfixadmin-3.3.11.tar.gz
Once downloaded, extract the archive to the /var/www/ directory and rename it to
postfixadmin.
sudo mkdir -p /var/www/
sudo tar xvf postfixadmin-3.3.11.tar.gz -C /var/www/
sudo mv /var/www/postfixadmin-postfixadmin-3.3.11 /var/www/postfixadmin
Step 3: Setting Up Permissions
PostfixAdmin requires a templates_c directory, and the web server needs read and
write access to this directory, so run the following commands.
sudo mkdir -p /var/www/postfixadmin/templates_c
sudo apt install acl
sudo setfacl -R -m u:www-data:rwx /var/www/postfixadmin/templates_c/
Starting with Dovecot 2.3.11, the web server user needs permission to read Let’s
Encrypt TLS certificate in order to do password hashing. Run the following two
commands to grant permissions.
sudo setfacl -R -m u:www-data:rx /etc/letsencrypt/live/ /etc/letsencrypt/archive/
Step 4: Create a Database and User for PostfixAdmin
Log into MySQL/MariaDB shell as root with the following command.
sudo mysql -u root
Once you are logged in, create a database for PostfixAdmin using the following
command. I named it postfixadmin, but you can use whatever name you like. (Don’t
leave out the semicolon.)
create database postfixadmin;
Then enter the command below to create a database user for PostfixAdmin. Replace
postfixadmin_password with your preferred password. Note that the password
should not contain the # character, or you might not be able to log in later.
create user 'postfixadmin'@'localhost' identified by 'postfixadmin_password';
Grants all privileges of postfixadmin database to the user.
grant all privileges on postfixadmin.* to 'postfixadmin'@'localhost';
Flush the privileges table for the changes to take effect and then get out of
MariaDB shell.
flush privileges;
exit;
Step 5: Configure PostfixAdmin
The default PostfixAdmin configuration file is config.inc.php. We need to create
a config.local.php file and add custom configurations.
sudo nano /var/www/postfixadmin/config.local.php
Add the following lines in the file, so PostfixAdmin can connect to
MySQL/MariaDB database. Replace postfixadmin_password with the real PostfixAdmin
password created in step 4.
<php
$CONF['configured'] = true;
$CONF['database_type'] = 'mysqli';
$CONF['database_host'] = 'localhost';
$CONF['database_port'] = '3306';
$CONF['database_user'] = 'postfixadmin';
$CONF['database_password'] = 'postfixadmin_password';
$CONF['database_name'] = 'postfixadmin';
$CONF['encrypt'] = 'dovecot:ARGON2I';
$CONF['dovecotpw'] = "/usr/bin/doveadm pw -r 5";
if(@file_exists('/usr/bin/doveadm')) { // @ to silence openbase_dir stuff; see
https://github.com/postfixadmin/postfixadmin/issues/171
$CONF['dovecotpw'] = "/usr/bin/doveadm pw -r 5"; # debian
}
Save and close the file. Note that we will use the ARGON2I password scheme. By
default, PostfixAdmin and Dovecot use MD5-CRYPT, which is a weak password
scheme. You can list available password schemes in Dovecot with the following
command.
sudo doveadm pw -l
Sample output:
SHA1 SSHA512 BLF-CRYPT PLAIN HMAC-MD5 OTP SHA512 SHA RPA
DES-CRYPT CRYPT SSHA MD5-CRYPT SKEY PLAIN-MD4 PLAIN-MD5 SCRAM-SHA-1 LANMAN
SHA512-CRYPT CLEAR CLEARTEXT ARGON2I ARGON2ID SSHA256 NTLM MD5 PBKDF2 SHA256
CRAM-MD5 PLAIN-TRUNC SHA256-CRYPT SMD5 DIGEST-MD5 LDAP-MD5
Installing Dovecot 2.3 on Ubuntu 18.04
If you are using Ubuntu 22.04/20.4, you already have Dovecot 2.3. If you use
Ubuntu 18.04, you need to install Dovecot 2.3 from the official upstream
repository, so you will be able to use ARGON2I password scheme.
Create a repository file for Dovecot.
sudo nano /etc/apt/sources.list.d/dovecot.list
Add the following line in the file.
deb [arch=amd64] https://repo.dovecot.org/ce-2.3-latest/ubuntu/bionic
bionic main
Save and close the file. Because this repository is using https, so we need to nstall the apt-transport-https package.
sudo apt install apt-transport-https
Then we need to import the Dovecot PGP key with the following two commands, so
that packages downloaded from this repository can be verified.
curl https://repo.dovecot.org/DOVECOT-REPO-GPG | gpg --import
gpg --export ED409DA1 | sudo tee /etc/apt/trusted.gpg.d/dovecot.gpg
Now update repository and upgrade existing Dovecot packages.
sudo apt update
sudo apt upgrade
If you see a question like below in the upgrade process, it’s always a good idea
to keep the local version and examine what needs to change later.
 dovecot 2.3 argon password scheme
Once the upgrade is finished, check Dovecot version again.
dovecot --version
Output:
2.3.9.2 (cf2918cac)
dovecot 2.3 argon password scheme
Once the upgrade is finished, check Dovecot version again.
dovecot --version
Output:
2.3.9.2 (cf2918cac)
Step 6: Create Apache Virtual Host or Nginx Config
File for PostfixAdmin
Apache
If you use Apache web server, create a virtual host for PostfixAdmin.
sudo nano /etc/apache2/sites-available/postfixadmin.conf
Put the following text into the file. Replace postfixadmin.example.com with your
real domain name and don’t forget to set DNS A record for it.
ServerName postfixadmin.example.com
DocumentRoot /var/www/postfixadmin/public
ErrorLog ${APACHE_LOG_DIR}/postfixadmin_error.log
CustomLog ${APACHE_LOG_DIR}/postfixadmin_access.log combined
Options FollowSymLinks
AllowOverride All
Options FollowSymLinks MultiViews
AllowOverride All
Order allow,deny
allow from all
Save and close the file. Then enable this virtual host with:
sudo a2ensite postfixadmin.conf
Reload Apache for the changes to take effect.
sudo systemctl reload apache2
Now you should be able to see the PostfixAdmin web-based install wizard at
http://postfixadmin.example.com/setup.php.
Nginx
If you use Nginx web server, create a virtual host for PostfixAdmin.
sudo nano /etc/nginx/conf.d/postfixadmin.conf
Put the following text into the file. Replace postfixadmin.example.com with your
real domain name and don’t forget to set DNS A record for it.
server
{
listen 80;
listen [::]:80;
server_name postfixadmin.example.com;
root /var/www/postfixadmin/public/;
index index.php index.html;
access_log /var/log/nginx/postfixadmin_access.log;
error_log /var/log/nginx/postfixadmin_error.log;
location /
{
try_files $uri $uri/ /index.php;
}
location ~ ^/(.+\.php)$
{
try_files $uri =404;
fastcgi_pass unix:/run/php/php8.1-fpm.sock;
fastcgi_index index.php;
fastcgi_param SCRIPT_FILENAME $document_root$fastcgi_script_name;
include /etc/nginx/fastcgi_params;
}
}
- The above configuration uses php8.1-fpm, which is the default for Ubuntu 22.04.
- If you use Ubuntu 20.04, replace php8.1-fpm with php7.4-fpm.
- If you use Ubuntu 18.04, replace php8.1-fpm with php7.2-fpm.
Save and close the file. Then test Nginx configuration.
sudo nginx -t
If the test is successful, reload Nginx for the changes to take effect.
sudo systemctl reload nginx
Now you should be able to see the PostfixAdmin web-based install wizard at
http://postfixadmin.example.com/setup.php.
Step 7: Install Required and Recommended PHP
Modules
Run the following command to install PHP modules required or recommended by
PostfixAdmin.
Ubuntu 22.04
sudo apt install php8.1-fpm php8.1-imap php8.1-mbstring php8.1-mysql php8.1-curl
php8.1-zip php8.1-xml php8.1-bz2 php8.1-intl php8.1-gmp php8.1-redis
Ubuntu 20.04
sudo apt install php7.4-fpm php7.4-imap php7.4-mbstring php7.4-mysql php7.4-json
php7.4-curl php7.4-zip php7.4-xml php7.4-bz2 php7.4-intl php7.4-gmp php7.4-redis
Ubuntu 18.04
sudo apt install php7.2-fpm php7.2-imap php7.2-mbstring php7.2-mysql php7.2-json
php7.2-curl php7.2-zip php7.2-xml php7.2-bz2 php7.2-intl php7.2-gmp php7.2-redis
If you use Apache, you also need to install the libapache2-mod-php package.
sudo apt install libapache2-mod-php
Then restart Apache.
sudo systemctl restart apache2
Step 8: Enabling HTTPS
To encrypt the HTTP traffic, we can enable HTTPS by installing a free TLS
certificate issued from Let’s Encrypt. Run the following command to install
Let’s Encrypt client (certbot) on Ubuntu server.
sudo apt install certbot
If you use Apache, install the Certbot Apache plugin.
sudo apt install python3-certbot-apache
And run this command to obtain and install TLS certificate.
sudo certbot --apache --agree-tos --redirect --hsts --staple-ocsp --email
you@example.com -d postfixadmin.example.com
If you use Nginx, then you also need to install the Certbot Nginx plugin.
sudo apt install python3-certbot-nginx
Next, run the following command to obtain and install TLS certificate.
sudo certbot --nginx --agree-tos --redirect --hsts --staple-ocsp --email
you@example.com -d postfixadmin.example.com
Where
- --nginx: Use the nginx plugin.
- --apache: Use the Apache plugin.
- --agree-tos: Agree to terms of service.
- --redirect: Force HTTPS by 301 redirect.
- --hsts: Add the Strict-Transport-Security header to every HTTP response.
Forcing browser to always use TLS for the domain. Defends against SSL/TLS
Stripping.
- --staple-ocsp: Enables OCSP Stapling. A valid OCSP response is stapled to
the certificate that the server offers during TLS.
The certificate should now be obtained and automatically installed, which is
indicated by the message below.
 postfixadmin ubuntu https
Step 9: Enable Statistics in Dovecot
PostfixAdmin needs to read Dovecot statistics. Edit the Dovecot configuration
file.
sudo nano /etc/dovecot/conf.d/10-master.conf
Add the following lines to the end of this file.
service stats
{
unix_listener stats-reader
{
user = www-data
group = www-data
mode = 0660
}
unix_listener stats-writer
{
user = www-data
group = www-data
mode = 0660
}
}
Save and close the file. Then add the web server to the dovecot group.
sudo gpasswd -a www-data dovecot
Restart Dovecot.
sudo systemctl restart dovecot
Grant permissions to the www-data user.
sudo setfacl -R -m u:www-data:rwx /var/run/dovecot/stats-reader
/var/run/dovecot/stats-writer
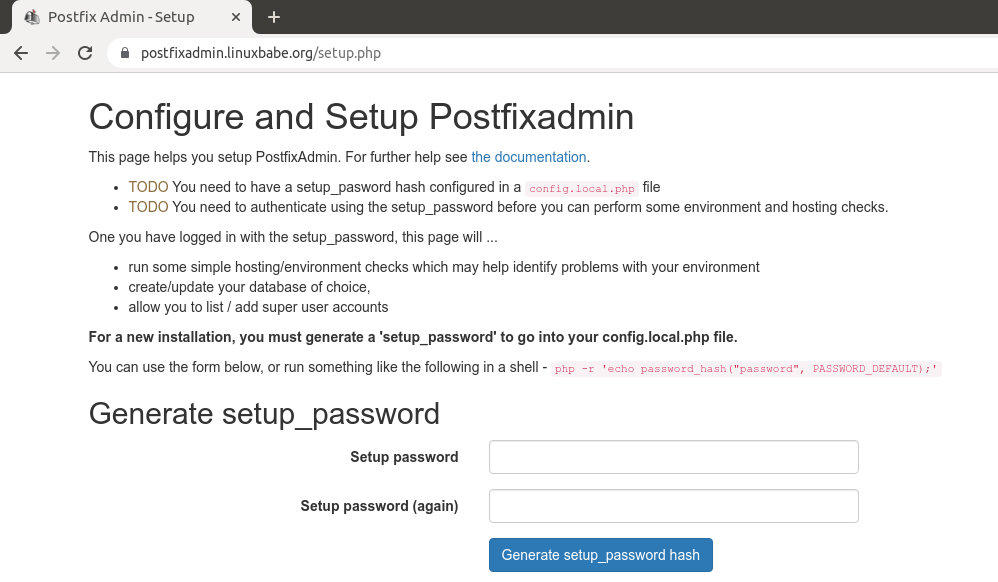
Step 10: Finish the Installation in Web Browser
Go to postfixadmin.example.com/setup.php to run the web-based setup wizard.
First, you need to create a setup password for PostfixAdmin.
 postfixadmin generate setup password
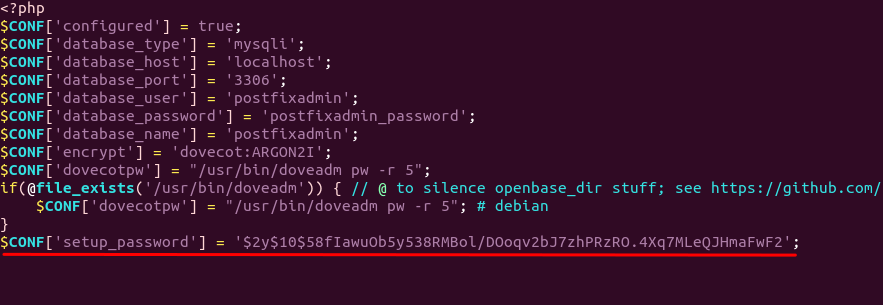
After creating the password hash, PostfixAdmin will display a line like below.
$CONF['setup_password'] =
'$2y$10$58fIawuOb5y538RMBol/DOoqv2bJ7zhPRzRO.4Xq7MLeQJHmaFwF2';
You need to open the config.local.php file.
sudo nano /var/www/postfixadmin/config.local.php
Add the line displayed on PostfixAdmin setup page to the end of the file like
below.
postfixadmin generate setup password
After creating the password hash, PostfixAdmin will display a line like below.
$CONF['setup_password'] =
'$2y$10$58fIawuOb5y538RMBol/DOoqv2bJ7zhPRzRO.4Xq7MLeQJHmaFwF2';
You need to open the config.local.php file.
sudo nano /var/www/postfixadmin/config.local.php
Add the line displayed on PostfixAdmin setup page to the end of the file like
below.
 debian postfixadmin setup password
After saving the file, you need to refresh the PostfixAdmin setup page and enter
the setup password again, then create the admin account. Please don’t use a
Gmail, Yahoo Mail, or Microsoft email address for the admin account, or you
might not be able to log in later. Use an email address on your own domain. You
can create the email address later in PostfixAdmin.
debian postfixadmin setup password
After saving the file, you need to refresh the PostfixAdmin setup page and enter
the setup password again, then create the admin account. Please don’t use a
Gmail, Yahoo Mail, or Microsoft email address for the admin account, or you
might not be able to log in later. Use an email address on your own domain. You
can create the email address later in PostfixAdmin.
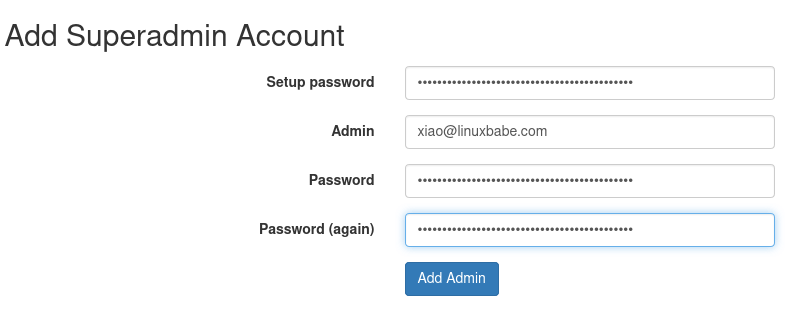 postfixadmin create superadmin account
If you encounter the following error when trying to create a superadmin account,
Password Hashing - attempted to use configured encrypt backend (dovecot:ARGON2I)
triggered an error: /usr/bin/doveadm pw -r 5 failed, see error log for details
or
can’t encrypt password with dovecotpw, see error log for details
It’s because the www-data user doesn’t have permission to read Let’s Encrypt
TLS certificate. To fix it, run the following command to grant permissions.
sudo setfacl -R -m u:www-data:rx /etc/letsencrypt/live/
/etc/letsencrypt/archive/
Sometimes, you might also need to run the following command to fix this error.
sudo setfacl -R -m u:www-data:rwx /var/run/dovecot/stats-reader
/var/run/dovecot/stats-writer
Once the superadmin account is created, you can log into PostfixAdmin at
postfixadmin.example.com/login.php.
postfixadmin create superadmin account
If you encounter the following error when trying to create a superadmin account,
Password Hashing - attempted to use configured encrypt backend (dovecot:ARGON2I)
triggered an error: /usr/bin/doveadm pw -r 5 failed, see error log for details
or
can’t encrypt password with dovecotpw, see error log for details
It’s because the www-data user doesn’t have permission to read Let’s Encrypt
TLS certificate. To fix it, run the following command to grant permissions.
sudo setfacl -R -m u:www-data:rx /etc/letsencrypt/live/
/etc/letsencrypt/archive/
Sometimes, you might also need to run the following command to fix this error.
sudo setfacl -R -m u:www-data:rwx /var/run/dovecot/stats-reader
/var/run/dovecot/stats-writer
Once the superadmin account is created, you can log into PostfixAdmin at
postfixadmin.example.com/login.php.
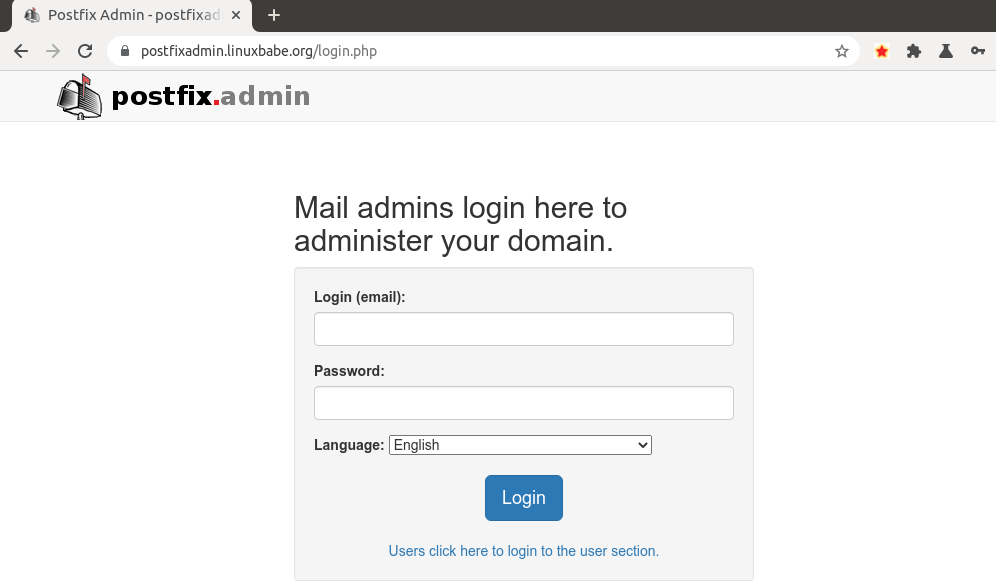 postfixadmin login page debian
Step 11: Checking Tables in the Database
The PostfixAdmin setup process populates the postfixadmin database with some
default tables. It’s helpful for us to know the names and structure of the
tables. Log in to MySQL/MariaDB console.
sudo mysql -u root
Select the postfixadmin database.
USE postfixadmin;
List all tables in this database.
SHOW TABLES;
Output:
+------------------------+
| Tables_in_postfixadmin |
+------------------------+
| admin |
| alias |
| alias_domain |
| config |
| domain |
| domain_admins |
| fetchmail |
| log |
| mailbox |
| quota |
| quota2 |
| vacation |
| vacation_notification |
+------------------------+
13 rows in set (0.001 sec)
The 3 most important tables are:
- domain: contains information on the domains that are using your mail server
to send and receive email.
- mailbox: contains information on every email address, including hashed
password and the location of mail files.
- alias: contains the alias of each email address.
If you are interested, you can check what columns each table contains. For
example, the following command will show us the columns in the domain table.
DESCRIBE domain;
Output:
+-------------+--------------+------+-----+---------------------+-------+
| Field | Type | Null | Key | Default | Extra |
+-------------+--------------+------+-----+---------------------+-------+
| domain | varchar(255) | NO | PRI | NULL | |
| description | varchar(255) | NO | | NULL | |
| aliases | int(10) | NO | | 0 | |
| mailboxes | int(10) | NO | | 0 | |
| maxquota | bigint(20) | NO | | 0 | |
| quota | bigint(20) | NO | | 0 | |
| transport | varchar(255) | NO | | NULL | |
| backupmx | tinyint(1) | NO | | 0 | |
| created | datetime | NO | | 2000-01-01 00:00:00 | |
| modified | datetime | NO | | 2000-01-01 00:00:00 | |
| active | tinyint(1) | NO | | 1 | |
+-------------+--------------+------+-----+---------------------+-------+
Log out of MySQL/MariaDB console.
EXIT;
Step 12: Configure Postfix to Use MySQL/MariaDB Database
By default, Postfix delivers emails only to users with a local Unix account. To
make it deliver emails to virtual users whose information is stored in the
database, we need to configure Postfix to use virtual mailbox domains.
First, we need to add MySQL map support for Postfix by installing the
postfix-mysql package.
sudo apt install postfix-mysql
Then edit the Postfix main configuration file.
sudo nano /etc/postfix/main.cf
Add the following lines at the end of this file.
virtual_mailbox_domains = proxy:mysql:
/etc/postfix/sql/mysql_virtual_domains_maps.cf
virtual_mailbox_maps =
proxy:mysql:/etc/postfix/sql/mysql_virtual_mailbox_maps.cf,
proxy:mysql:/etc/postfix/sql/mysql_virtual_alias_domain_mailbox_maps.cf
virtual_alias_maps =
proxy:mysql:/etc/postfix/sql/mysql_virtual_alias_maps.cf,
proxy:mysql:/etc/postfix/sql/mysql_virtual_alias_domain_maps.cf,
proxy:mysql:/etc/postfix/sql/mysql_virtual_alias_domain_catchall_maps.cf
Where:
- virtual_mailbox_domains points to a file that will tell Postfix how to look
up domain information from the database.
- virtual_mailbox_maps points to files that will tell Postfix how to look up
email addresses from the database.
- virtual_alias_maps points to files that will tell Postfix how to look up
aliases from the database.
We want to use dovecot to deliver incoming emails to the virtual users’ message
store, so also add the following line at the end of this file.
virtual_transport = lmtp:unix:private/dovecot-lmtp
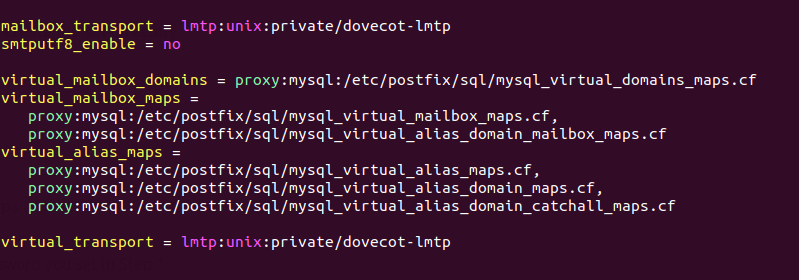 Configure-Postfix-to-Use-MySQL-MariaDB-Database-ubuntu
Save and close the file. Next, we need to create the .cf files one by one.
Create the sql directory.
sudo mkdir /etc/postfix/sql/
Create the mysql_virtual_domains_maps.cf file.
sudo nano /etc/postfix/sql/mysql_virtual_domains_maps.cf
Add the following content. Replace password with the postfixadmin password you
set in Step 2.
user = postfixadmin
password = password
hosts = localhost
dbname = postfixadmin
query = SELECT domain FROM domain WHERE domain='%s' AND active = '1'
#query = SELECT domain FROM domain WHERE domain='%s'
#optional query to use when relaying for backup MX
#query = SELECT domain FROM domain WHERE domain='%s' AND backupmx = '0' AND
active = '1'
#expansion_limit = 100
Create the mysql_virtual_mailbox_maps.cf file.
sudo nano /etc/postfix/sql/mysql_virtual_mailbox_maps.cf
Add the following content.
user = postfixadmin
password = password
hosts = localhost
dbname = postfixadmin
query = SELECT maildir FROM mailbox WHERE username='%s' AND active = '1'
#expansion_limit = 100
Create the mysql_virtual_alias_domain_mailbox_maps.cf file.
sudo nano /etc/postfix/sql/mysql_virtual_alias_domain_mailbox_maps.cf
Add the following content.
user = postfixadmin
password = password
hosts = localhost
dbname = postfixadmin
query = SELECT maildir FROM mailbox,alias_domain WHERE alias_domain.alias_domain
= '%d' and mailbox.username = CONCAT('%u', '@', alias_domain.target_domain) AND
mailbox.active = 1 AND alias_domain.active='1'
Create the mysql_virtual_alias_maps.cf file.
sudo nano /etc/postfix/sql/mysql_virtual_alias_maps.cf
Add the following content.
user = postfixadmin
password = password
hosts = localhost
dbname = postfixadmin
query = SELECT goto FROM alias WHERE address='%s' AND active = '1'
#expansion_limit = 100
Create the mysql_virtual_alias_domain_maps.cf file.
sudo nano /etc/postfix/sql/mysql_virtual_alias_domain_maps.cf
Add the following content.
user = postfixadmin
password = password
hosts = localhost
dbname = postfixadmin
query = SELECT goto FROM alias,alias_domain WHERE alias_domain.alias_domain =
'%d' and alias.address = CONCAT('%u', '@', alias_domain.target_domain) AND alias
active = 1 AND alias_domain.active='1'
Create the mysql_virtual_alias_domain_catchall_maps file.
sudo nano /etc/postfix/sql/mysql_virtual_alias_domain_catchall_maps.cf
Add the following content.
# handles catch-all settings of target-domain
user = postfixadmin
password = password
hosts = localhost
dbname = postfixadmin
query = SELECT goto FROM alias,alias_domain WHERE alias_domain.alias_domain =
'%d' and alias.address = CONCAT('@', alias_domain.target_domain) AND
alias.active = 1 AND alias_domain.active='1'
Since the database passwords are stored in plain text so they should be readable
only by user postfix and root, which is done by executing the following two
commands.
sudo chmod 0640 /etc/postfix/sql/*
sudo setfacl -R -m u:postfix:rx /etc/postfix/sql/
Next, we need to change the value of the mydestination parameter in Postfix. Display the current value:
postconf mydestination
Sample output:
mydestination = $myhostname, linuxbabe.com, localhost.$mydomain, localhost
The mydestination parameter contains a list of domain names that will receive
emails delivered to local Unix accounts. In part 1, we added the apex domain
name (like linuxbabe.com) to mydestination. Since we are going to use virtual
mailbox, we need to remove the apex domain name from the list by issuing the
following command.
sudo postconf -e "mydestination = \$myhostname, localhost.\$mydomain, localhost"
Now let’s open the Postfix main configuration file again.
sudo nano /etc/postfix/main.cf
Add the following lines at the end of this file.
virtual_mailbox_base = /var/vmail
virtual_minimum_uid = 2000
virtual_uid_maps = static:2000
virtual_gid_maps = static:2000
The first line defines the base location of mail files. The remaining 3 lines
define which user ID and group ID Postfix will use when delivering incoming
emails to the mailbox. We use the user ID 2000 and group ID 2000.
Save and close the file. Restart Postfix for the changes to take effect.
sudo systemctl restart postfix
Next, we need to create a user named vmail with ID 2000 and a group with ID 2000.
sudo adduser vmail --system --group --uid 2000 --disabled-login --no-create-home
Create the mail base location.
sudo mkdir /var/vmail/
Make vmail as the owner.
sudo chown vmail:vmail /var/vmail/ -R
Configure-Postfix-to-Use-MySQL-MariaDB-Database-ubuntu
Save and close the file. Next, we need to create the .cf files one by one.
Create the sql directory.
sudo mkdir /etc/postfix/sql/
Create the mysql_virtual_domains_maps.cf file.
sudo nano /etc/postfix/sql/mysql_virtual_domains_maps.cf
Add the following content. Replace password with the postfixadmin password you
set in Step 2.
user = postfixadmin
password = password
hosts = localhost
dbname = postfixadmin
query = SELECT domain FROM domain WHERE domain='%s' AND active = '1'
#query = SELECT domain FROM domain WHERE domain='%s'
#optional query to use when relaying for backup MX
#query = SELECT domain FROM domain WHERE domain='%s' AND backupmx = '0' AND
active = '1'
#expansion_limit = 100
Create the mysql_virtual_mailbox_maps.cf file.
sudo nano /etc/postfix/sql/mysql_virtual_mailbox_maps.cf
Add the following content.
user = postfixadmin
password = password
hosts = localhost
dbname = postfixadmin
query = SELECT maildir FROM mailbox WHERE username='%s' AND active = '1'
#expansion_limit = 100
Create the mysql_virtual_alias_domain_mailbox_maps.cf file.
sudo nano /etc/postfix/sql/mysql_virtual_alias_domain_mailbox_maps.cf
Add the following content.
user = postfixadmin
password = password
hosts = localhost
dbname = postfixadmin
query = SELECT maildir FROM mailbox,alias_domain WHERE alias_domain.alias_domain
= '%d' and mailbox.username = CONCAT('%u', '@', alias_domain.target_domain) AND
mailbox.active = 1 AND alias_domain.active='1'
Create the mysql_virtual_alias_maps.cf file.
sudo nano /etc/postfix/sql/mysql_virtual_alias_maps.cf
Add the following content.
user = postfixadmin
password = password
hosts = localhost
dbname = postfixadmin
query = SELECT goto FROM alias WHERE address='%s' AND active = '1'
#expansion_limit = 100
Create the mysql_virtual_alias_domain_maps.cf file.
sudo nano /etc/postfix/sql/mysql_virtual_alias_domain_maps.cf
Add the following content.
user = postfixadmin
password = password
hosts = localhost
dbname = postfixadmin
query = SELECT goto FROM alias,alias_domain WHERE alias_domain.alias_domain =
'%d' and alias.address = CONCAT('%u', '@', alias_domain.target_domain) AND alias
active = 1 AND alias_domain.active='1'
Create the mysql_virtual_alias_domain_catchall_maps file.
sudo nano /etc/postfix/sql/mysql_virtual_alias_domain_catchall_maps.cf
Add the following content.
# handles catch-all settings of target-domain
user = postfixadmin
password = password
hosts = localhost
dbname = postfixadmin
query = SELECT goto FROM alias,alias_domain WHERE alias_domain.alias_domain =
'%d' and alias.address = CONCAT('@', alias_domain.target_domain) AND
alias.active = 1 AND alias_domain.active='1'
Since the database passwords are stored in plain text so they should be readable
only by user postfix and root, which is done by executing the following two
commands.
sudo chmod 0640 /etc/postfix/sql/*
sudo setfacl -R -m u:postfix:rx /etc/postfix/sql/
Next, we need to change the value of the mydestination parameter in Postfix. Display the current value:
postconf mydestination
Sample output:
mydestination = $myhostname, linuxbabe.com, localhost.$mydomain, localhost
The mydestination parameter contains a list of domain names that will receive
emails delivered to local Unix accounts. In part 1, we added the apex domain
name (like linuxbabe.com) to mydestination. Since we are going to use virtual
mailbox, we need to remove the apex domain name from the list by issuing the
following command.
sudo postconf -e "mydestination = \$myhostname, localhost.\$mydomain, localhost"
Now let’s open the Postfix main configuration file again.
sudo nano /etc/postfix/main.cf
Add the following lines at the end of this file.
virtual_mailbox_base = /var/vmail
virtual_minimum_uid = 2000
virtual_uid_maps = static:2000
virtual_gid_maps = static:2000
The first line defines the base location of mail files. The remaining 3 lines
define which user ID and group ID Postfix will use when delivering incoming
emails to the mailbox. We use the user ID 2000 and group ID 2000.
Save and close the file. Restart Postfix for the changes to take effect.
sudo systemctl restart postfix
Next, we need to create a user named vmail with ID 2000 and a group with ID 2000.
sudo adduser vmail --system --group --uid 2000 --disabled-login --no-create-home
Create the mail base location.
sudo mkdir /var/vmail/
Make vmail as the owner.
sudo chown vmail:vmail /var/vmail/ -R
Step 13: Configure Dovecot to Use MySQL/MariaDB Database
We also need to configure the Dovecot IMAP server to query user information from
the database. First, run the following command to add MySQL support for Dovecot.
sudo apt install dovecot-mysql
Then edit the 10-mail.conf file.
sudo nano /etc/dovecot/conf.d/10-mail.conf
In part 2, we used the following mail_location. Email messages are stored under the Maildir directory under each user’s home directory.
mail_location = maildir:~/Maildir
Since we are using virtual mailbox domain now, we need to enable mail_home for
the virtual users by adding the following line in the file, because virtual
users don’t have home directories by default.
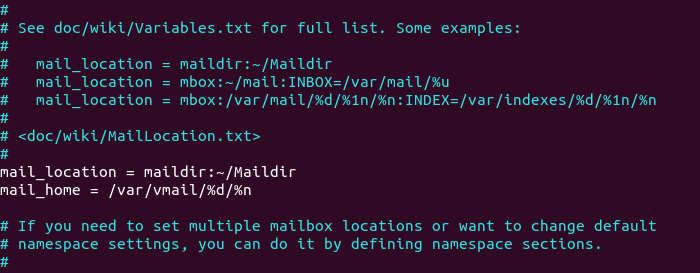 mail_home = /var/vmail/%d/%n/
virtual mailbox home directory
Save and close the file. Then edit the 10-auth.conf file.
sudo nano /etc/dovecot/conf.d/10-auth.conf
In part 2, we used the following value for auth_username_format.
auth_username_format = %n
The %n would drop the domain if it was given. Because in part 2 we were using
local Unix account for the username of every email address, we must use %n to
drop the domain, so users were able to login with the full email address.
Now we are using virtual mailbox domains, which means the username of every
email address includes the domain part, so we need to change the
auth_username_format as follows. %u won’t drop away the domain. This allows
users to login with the full email address.
auth_username_format = %u
Then find the following line.
#auth_default_realm =
Change it to
auth_default_realm = example.com
This is to ensure users who didn’t enter the @example.com part in the username
field can still log in. Dovecot will append the @example.com part if it’s not
given by users.
Next, uncomment the following line at the end of this file, so Dovecot can query
user information from MySQL/MariaDB database.
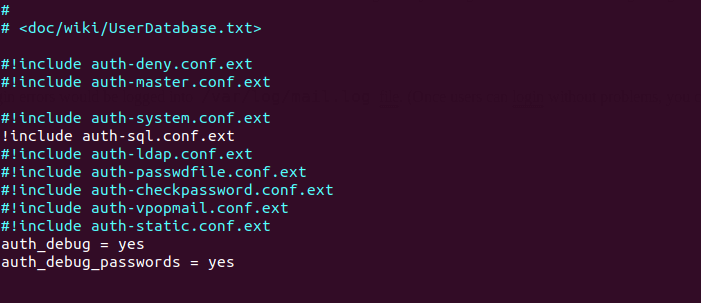
!include auth-sql.conf.ext
Now you probably don’t want local Unix users to send emails without registering
email addresses in PostfixAdmin, then comment out the following line by adding
the # character at the beginning, so Dovecot won’t query the local /etc/passwd
or /etc/shadow file.
#!include auth-system.conf.ext
It can be helpful to add the following two lines in this file to debug login
issues. The login errors would be logged into /var/log/mail.log file. (Once
users can login without problems, you can comment out the following two lines.)
auth_debug = yes
auth_debug_passwords = yes
mail_home = /var/vmail/%d/%n/
virtual mailbox home directory
Save and close the file. Then edit the 10-auth.conf file.
sudo nano /etc/dovecot/conf.d/10-auth.conf
In part 2, we used the following value for auth_username_format.
auth_username_format = %n
The %n would drop the domain if it was given. Because in part 2 we were using
local Unix account for the username of every email address, we must use %n to
drop the domain, so users were able to login with the full email address.
Now we are using virtual mailbox domains, which means the username of every
email address includes the domain part, so we need to change the
auth_username_format as follows. %u won’t drop away the domain. This allows
users to login with the full email address.
auth_username_format = %u
Then find the following line.
#auth_default_realm =
Change it to
auth_default_realm = example.com
This is to ensure users who didn’t enter the @example.com part in the username
field can still log in. Dovecot will append the @example.com part if it’s not
given by users.
Next, uncomment the following line at the end of this file, so Dovecot can query
user information from MySQL/MariaDB database.
!include auth-sql.conf.ext
Now you probably don’t want local Unix users to send emails without registering
email addresses in PostfixAdmin, then comment out the following line by adding
the # character at the beginning, so Dovecot won’t query the local /etc/passwd
or /etc/shadow file.
#!include auth-system.conf.ext
It can be helpful to add the following two lines in this file to debug login
issues. The login errors would be logged into /var/log/mail.log file. (Once
users can login without problems, you can comment out the following two lines.)
auth_debug = yes
auth_debug_passwords = yes
 dovecot mysql Password database
Save and close the file.
Edit the dovecot-sql.conf.ext file.
sudo nano /etc/dovecot/dovecot-sql.conf.ext
Here is the content that you should have in this file. By default, all lines in
this file are commented out, so you can simply copy and paste them at the
bottom. Replace password with the postfixadmin password you set in Step 2.
driver = mysql
connect = host=localhost dbname=postfixadmin user=postfixadmin password=password
default_pass_scheme = ARGON2I
password_query = SELECT username AS user,password FROM mailbox WHERE username =
'%u' AND active='1'
user_query = SELECT maildir, 2000 AS uid, 2000 AS gid FROM mailbox WHERE
username = '%u' AND active='1'
iterate_query = SELECT username AS user FROM mailbox
Restart Dovecot.
sudo systemctl restart dovecot
When a user tries to log in, Dovecot would use the Argon2 algorithm to generate
a password hash from the password entered by the user, then compare it with the
password hash stored in the database.
dovecot mysql Password database
Save and close the file.
Edit the dovecot-sql.conf.ext file.
sudo nano /etc/dovecot/dovecot-sql.conf.ext
Here is the content that you should have in this file. By default, all lines in
this file are commented out, so you can simply copy and paste them at the
bottom. Replace password with the postfixadmin password you set in Step 2.
driver = mysql
connect = host=localhost dbname=postfixadmin user=postfixadmin password=password
default_pass_scheme = ARGON2I
password_query = SELECT username AS user,password FROM mailbox WHERE username =
'%u' AND active='1'
user_query = SELECT maildir, 2000 AS uid, 2000 AS gid FROM mailbox WHERE
username = '%u' AND active='1'
iterate_query = SELECT username AS user FROM mailbox
Restart Dovecot.
sudo systemctl restart dovecot
When a user tries to log in, Dovecot would use the Argon2 algorithm to generate
a password hash from the password entered by the user, then compare it with the
password hash stored in the database.
Step 14: Add Domain and Mailboxes in PostfixAdmin
Log in to PostfixAdmin web interface as the admin. Click the Domain List tab and
select New Domain to add a domain. You can choose how many aliases and mailboxes
are allowed for this domain.
 debian postfixadmin add domain
Then click Virtual List tab and select Add Mailbox to add a new email address
for your domain.
debian postfixadmin add domain
Then click Virtual List tab and select Add Mailbox to add a new email address
for your domain.
 debian postfixadmin Create a new mailbox
Next, you can open your desktop email client such as Mozilla Thunderbird and
add a mail account.
debian postfixadmin Create a new mailbox
Next, you can open your desktop email client such as Mozilla Thunderbird and
add a mail account.
- In the incoming server section, select IMAP protocol, enter
mail.your-domain.com as the server name, choose port 143 and STARTTLS. Choose
normal password as the authentication method.
- In the outgoing section, select SMTP protocol, enter mail.your-domain.com as
the server name, choose port 587 and STARTTLS. Choose normal password as the
authentication method.
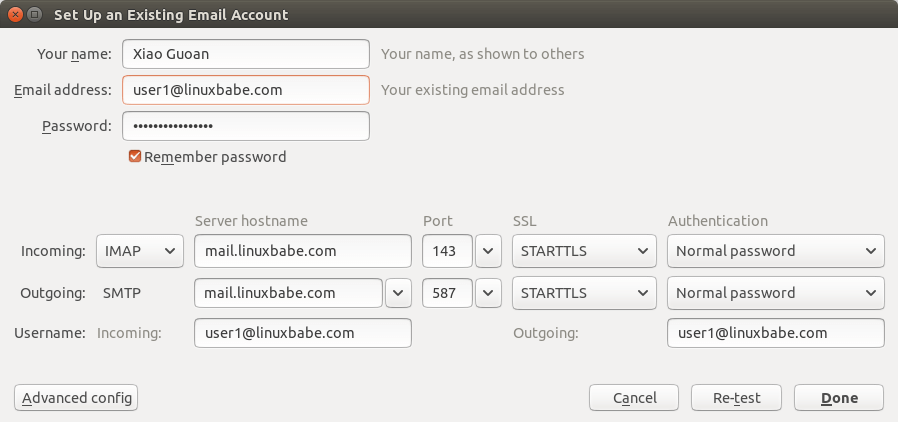 ubuntu postfix dovecot letsencrypt https
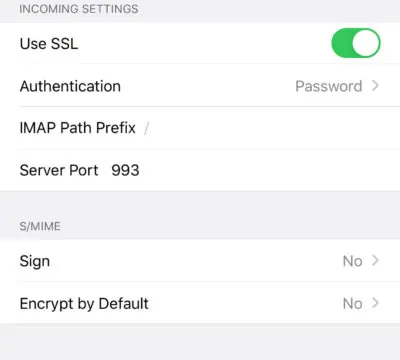
Hint 1: You can also use port 993 with SSL/TLS encryption for IMAP, and use port
465 with SSL/TLS encryption for SMTP. You should not use port 25 as the SMTP
port in mail clients to submit outgoing emails.
Hint 2: If you use Microsoft 365 Outlook email client, then you shouldn’t enable
Secure Password Authentication (SPA), which is a proprietary Microsoft protocol.
Your password is already encrypted by TLS.
You should now be able to connect to your own email server and also send and
receive emails with your desktop email client! Note that you cannot use local
Unix accounts to login now. You must log in with the virtual user created from
PostfixAdmin web interface.
ubuntu postfix dovecot letsencrypt https
Hint 1: You can also use port 993 with SSL/TLS encryption for IMAP, and use port
465 with SSL/TLS encryption for SMTP. You should not use port 25 as the SMTP
port in mail clients to submit outgoing emails.
Hint 2: If you use Microsoft 365 Outlook email client, then you shouldn’t enable
Secure Password Authentication (SPA), which is a proprietary Microsoft protocol.
Your password is already encrypted by TLS.
You should now be able to connect to your own email server and also send and
receive emails with your desktop email client! Note that you cannot use local
Unix accounts to login now. You must log in with the virtual user created from
PostfixAdmin web interface.
Troubleshooting Tips
As a rule of thumb, you should always check the mail log (/var/log/mail.log) on
your mail server when an error happens. The following is a list of specific
errors and troubleshooting tips.
Can’t login from Mail Clients
If you can’t log into your mail server from a desktop mail client, scan your
mail server to find if the ports are open. Note that you should run the
following command from another Linux computer or server. If you run it on your
mail server, then the ports will always appear to be open.
sudo nmap mail.your-domain.com
And check if Dovecot is running.
systemctl status dovecot
You can also check the mail log (/var/log/mail.log), which may give you some
clues. If Dovecot fails to start, the error might not be logged to the
/var/log/mail.log file, you can run the following command to see what’s wrong.
sudo journalctl -eu dovecot
If you see the following error in the mail log, it’s likely that you didn’t set
a correct password in the .cf files under /etc/postfix/sql/ directory.
postfix/trivial-rewrite[28494]: warning: virtual_alias_domains: proxy:mysql:
/etc/postfix/sql/mysql_virtual_alias_maps.cf: table lookup problem
postfix/trivial-rewrite[28494]: warning: virtual_alias_domains lookup failure
If you see the following error in the mail log, it’s because you forgot to add
mail_location = maildir:~/Maildir in the /etc/dovecot/conf.d/10-mail.conf file.
open(/var/mail/username@domain.com) failed: Permission denied (euid=2000(vmail)
egid=2000(vmail) missing +w perm: /var/mail, we're not in group 8(mail), dir
owned by 0:8 mode=0775
Cloudflare DNS
As I said in part 1, if you use Cloudflare DNS service, you should not enable
the CDN (proxy) feature when creating DNS A record and AAAA record for the
hostname of your mail server. Cloudflare doesn’t support SMTP or IMAP proxy.
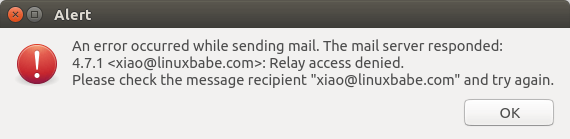
Relay Access Denied
If you see the “relay access denied” error when trying to send emails from a
mail client, it’s most likely that you use port 25 as the SMTP port in your mail
client. As I said a while ago, you should use port 587 or 465 as the SMTP port
in mail clients (Mozilla Thunberbird, Microsoft Outlook, etc) to submit outgoing
emails. Port 25 should be used for SMTP server to SMTP server communications.
 postfix dovecot relay access denied
iOS Mail App
If you use the iOS Mail app to log into your mail server and encounter the
following error.
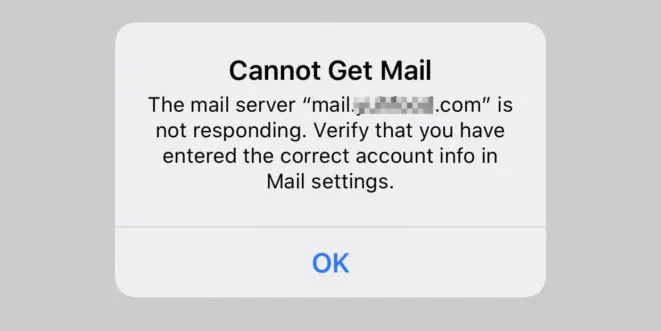 ios the mail server is not responding
You can try to fix it by enforcing SSL encryption, for both SMTP and IMAP.
ios the mail server is not responding
You can try to fix it by enforcing SSL encryption, for both SMTP and IMAP.
 ios mail enforce SSL encryption
Fun fact: It seems the iOS Mail app has difficulty in supporting STARTTLS on
IMAP port 143, but it supports STARTTLS on the submission port 587.
ios mail enforce SSL encryption
Fun fact: It seems the iOS Mail app has difficulty in supporting STARTTLS on
IMAP port 143, but it supports STARTTLS on the submission port 587.
Temporary Lookup Failure
If your mail server was working fine for some time, but suddenly you find the
following error in the mail log,
Aug 25 20:25:24 mx postfix/trivial-rewrite[3313]: warning:
virtual_alias_domains: proxy:mysql:/etc/postfix/sql/mysql_virtual_alias_maps.cf:
table lookup problem
Aug 25 20:25:24 mx postfix/trivial-rewrite[3313]: warning: virtual_alias_domains
lookup failure
Aug 25 20:25:24 mx postfix/submission/smtpd[3464]: NOQUEUE: reject: 451 4.3.0
*lt;user@your-domain.com> Temporary lookup failure; proto=ESMTP
Aug 25 20:25:24 mx postfix/submission/smtpd[3464]: Temporary lookup failure
It’s likely that your MariaDB/MySQL database stopped somehow. You can use the
following command to check when your database server stopped.
sudo journalctl -eu mariadb
or
sudo journalctl -eu mysql
A common cause for this situation is that your server is out-of-memory. Check if
your server has enough memory.
htop
or
free -m
This error can also be caused by too many connections to the MariaDB/MySQL
databases, so it can’t handle more queries. To fix this, you can increase the
number of connections MariaDB/MySQL can handle.
sudo nano /etc/mysql/mariadb.conf.d/50-server.cnf
Find the following line in the Fine Tuning section.
#max_connections = 100
Uncomment it and change the value to 500.
max_connections = 500
If your server has lots of RAM, you can change it to a bigger number like 1000.
max_connections = 1000
Save and close the file. Then restart MariaDB/MySQL.
sudo systemctl restart mysql
Automatically Clean the Junk Folder and Trash Folder
To delete emails in Junk folder for all users, you can run
sudo doveadm expunge -A mailbox Junk all
To delete emails in Trash folder, run
sudo doveadm expunge -A mailbox Trash all
I think it’s better to clean emails that have been in the Junk or Trash folder
for more than 2 weeks, instead of cleaning all emails.
sudo doveadm expunge -A mailbox Junk savedbefore 2w
Then add a cron job to automate the job.
sudo crontab -e
Add the following line to clean Junk and Trash folder every day.
@daily doveadm expunge -A mailbox Junk savedbefore 2w;doveadm expunge -A mailbox
Trash savedbefore 2w
You also need to allow the www-data user to read certificate files by adding the
following line.
@daily setfacl -R -m u:www-data:rx /etc/letsencrypt/live/
/etc/letsencrypt/archive/
To receive report when a Cron job produces an error, you can add the following
line above all Cron jobs.
MAILTO="you@your-domain.com"
Save and close the file. And you’re done.
Change User Password in PostfixAdmin
Users can log into
PostfixAdmin at https://postfixadmin.example.com/users/login.php, then change
their passwords.
Restricting Access to Sendmail
By default, any local user can use the sendmail binary to submit outgoing
emails. Now that your mail server is using virtual mailboxes, you might want to
restrict access to the sendmail binary to trusted local users only, so a
malicious user can’t use it to send a large volume of emails to damage your mail
server’s reputation. Edit the Postfix main configuration file.
sudo nano /etc/postfix/main.cf
Add the following line to the end of this file, so only the root, www-data and
vmail user can submit emails via sendmail. You can also add other usernames.
authorized_submit_users = root,www-data,vmail
Save and close the file. Then restart Postfix.
sudo systemctl restart postfix
How to Deal with Data Breach with Alias
If you use the same email address to register accounts on every website, and the
data is leaked to third parties due to various reasons, then lots of spammers
will buy the leaked email database and send spam.
To prevent your email address from being the target of spammers, you can use
PostfixAdmin to create an alias address for each website. If the data is leaked
to third parties, you can delete the alias and create a new one, so you won’t be
spammed by those third parties.
How to Upgrade PostfixAdmin
Sometimes there might be bugs in the current PostfixAdmin that can be fixed by
upgrading to a new version. It’s very simple to upgrade PostfixAdmin. When a new
version of PostfixAdmin comes out, then you need to
- Make a copy of the /var/www/postfixadmin/config.local.php file to your home
directory.
- Remove the PostfixAdmin web directory (sudo rm /var/www/postfixadmin/ -r)
- Go through step 2, step 3, step 5, and step 10 again in this tutorial. When
doing step 5, simply copy the config.local.php file from your home directory.
In step 10, the PostfixAdmin database schema will be automatically updated when
you visit the setup.php web page.
I once had a login loop problem in my PostfixAdmin installation and it’s fixed
by upgrading PostfixAdmin to the latest version.
Next Step
I hope this tutorial helped you install and use PostfixAdmin on Ubuntu to create
virtual mailboxes. In part 4, I will show you how to set up SPF and DKIM with
Postfix to improve email deliverability and in a future tutorial, I’m going to
show you how to host multiple domains with PostfixAdmin.
If you want to access emails from a web browser, then I recommend Roundcube,
which is a very popular and featured-rich open-source webmail client. As always,
if you found this post useful, subscribe to our free newsletter to get more
tips and tricks. Take care