Config Ubuntu 22.04: DHCP
From: https://www.linuxtechi.com/how-to-configure-dhcp-server-on-ubuntu/
How to Configure DHCP Server on Ubuntu 22.04 Step-by-Step
Published on: January 8, 2023 by Pradeep Kumar

Hello techies, in this post we will show you how to configure DHCP server on
Ubuntu 22.04 LTS step-by-step.

DHCP stands for Dynamic Host Configuration Protocol, it works on client -server
architecture. DHCP server assign IPv4 and IPv6 automatically to clients
(computers) on the network. DHCP Server offers a lease of IP address to client,
if the clients request IP address and DHCP acknowledge it then client will get
IP address for the lease time. If the lease time expires and clients wants to
se the same IP address, then it must request IP address to DHCP server again.


Prerequisites
- Pre-Installed Ubuntu 22.04 LTS
- Sudo User with admin rights
- Internet Connectivity or locally configured Repository
- Two Ethernet Cards (1st for access management & 2nd will used for DHCP
server)
Lab Setup:
I am using two VMs for Lab setup. 1st VM is Ubuntu 22.04 which will configured
as DHCP server and 2nd VM is RHEL 9, which will work as client and will get IP
address from DHCP server automatically.
Ubuntu 22.04 LTS has two Lan cards (NICs)
- eth0 (192.168.1.204) – It will used for access management and internet
connectivity
- eth1 (192.168.56.4)– It will be used for DHCP, we will expose the DHCP
subnet on this interface.
RHEL 9 VM has one NIC eth0 which will request for DHCP IP address. This NIC
should be mapped to DHCP subnet VLAN.
Without any further delay, let’s jump into the installation steps.
1 ) Update Package Index
Login to Ubuntu 22.04 system and run beneath apt command to update package index
$ sudo apt update
2) Install DHCP Server and its dependencies
Run following apt command to install DHCP server and its dependent packages.
$ sudo apt install isc-dhcp-server -y
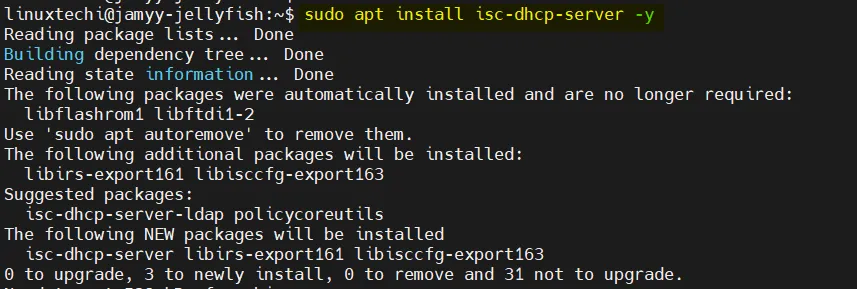 Install-DHCP-Server-apt-command
3) Configure DHCP Server
Edit /etc/default/isc-dhcp-server file and mention the interface on which DHCP
would be running. In my case it is eth1
$ sudo vi /etc/default/isc-dhcp-server
----
INTERFACESv4="eth1"
----
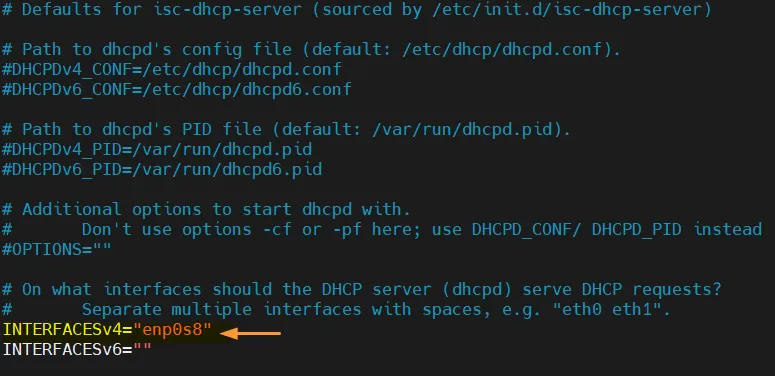 Interface-DHCP-Server-Ubuntu-Linux
Save and close the file.
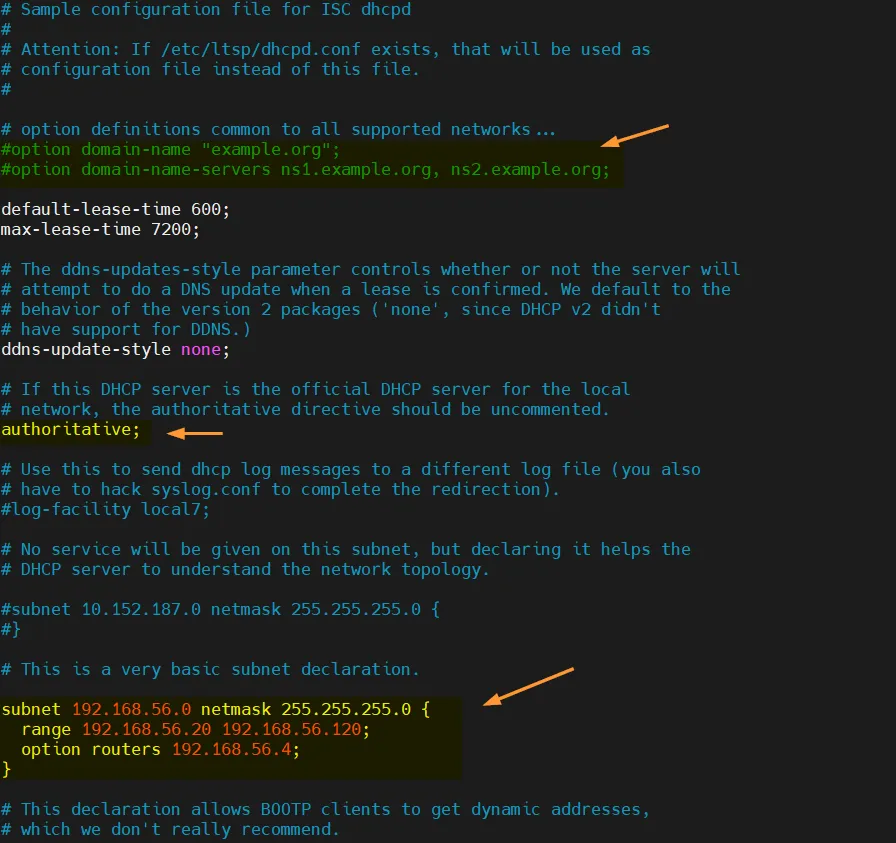
Now, edit main dhcp configuration file
Interface-DHCP-Server-Ubuntu-Linux
Save and close the file.
Now, edit main dhcp configuration file “/etc/dhcp/dhcpd.conf” and
uncomment & set the following parameters, Comment out the domain name server
parameters as we are not using any DNS server,
#option domain-name "example.org";
#option domain-name-servers ns1.example.org, ns2.example.org;
Uncomment
authoritative;
Add the subnet and IP address range to be used for DHCP Server. Also specify
the ip address of eth1 interface as routers.
subnet 192.168.56.0 netmask 255.255.255.0
{
range 192.168.56.20 192.168.56.120;
option routers 192.168.56.4;
}
Save and exit the file
 DHCP-Server-Config-File-Ubuntu
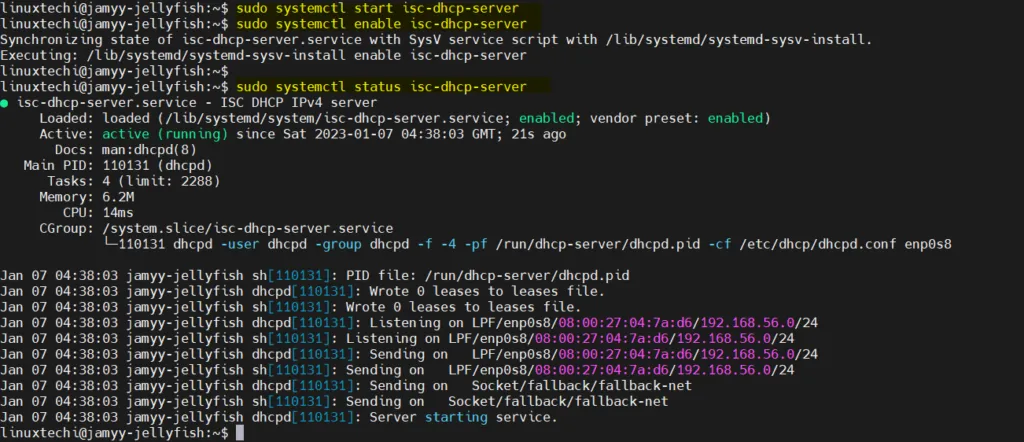
Start and enable dhcp server service using following commands,
$ sudo systemctl start isc-dhcp-server
$ sudo systemctl enable isc-dhcp-server
Verify dhcp server service status, run
$ sudo systemctl status isc-dhcp-server
DHCP-Server-Config-File-Ubuntu
Start and enable dhcp server service using following commands,
$ sudo systemctl start isc-dhcp-server
$ sudo systemctl enable isc-dhcp-server
Verify dhcp server service status, run
$ sudo systemctl status isc-dhcp-server
 DHCP-Server-Service-Ubuntu-Linux
Output above confirms that DHCP server service is up and running. Now, it’s time
to configure client so that it can get IP address from this DHCP server automatically.
DHCP-Server-Service-Ubuntu-Linux
Output above confirms that DHCP server service is up and running. Now, it’s time
to configure client so that it can get IP address from this DHCP server automatically.
4) Configure DHCP Client
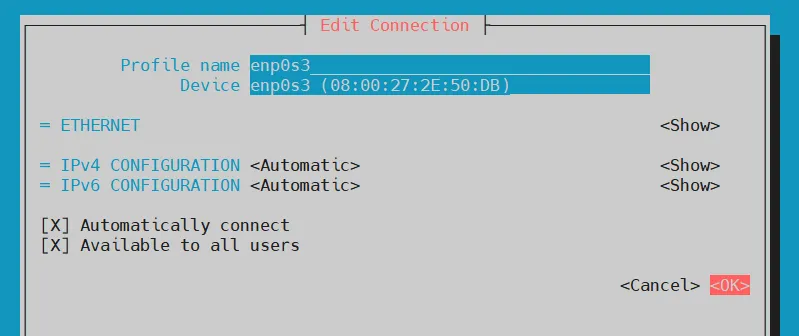
In our case, our DHCP client is a RHEL 9 machine, So login to it and configure
interface eth0 so that it requests for DHCP IP over network.
$ sudo nmtui
Edit eth0 interface and set IPv4 Configuration as “Automatic”
 Automatic-ipv4-nmtui-rhel
Click OK and then deactivate and activate the connection to make the changes
into effect.
Verify the IP address, run below ip command
$ ip add show eth0
Automatic-ipv4-nmtui-rhel
Click OK and then deactivate and activate the connection to make the changes
into effect.
Verify the IP address, run below ip command
$ ip add show eth0
 RHEL-DHCP-IP-Address-Interface
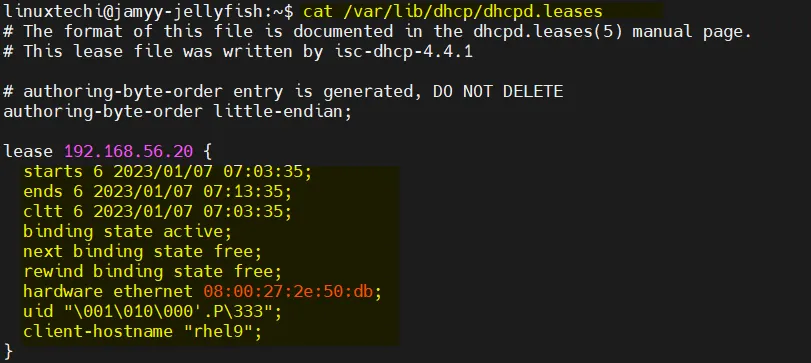
Head back to DHCP server and see the leased ip address, run following cat command
To get manufacturer names please download
http://standards.ieee.org/regauth/oui/oui.txt to /usr/local/etc/oui.txt
Reading leases from /var/lib/dhcp/dhcpd.leases
dhcp-lease-list
MAC IP hostname valid until
manufacturer
====================================================
========================
8c:49:62:02:c6:97 192.168.0.130 RokuUltra-Den 2023-04-03 18:00:11 -NA-
b8:2c:a0:0c:d6:1e 192.168.0.100 AlarmSys0CD61E 2023-04-03 18:00:06 -NA-
c8:f0:9e:9b:c4:d8 192.168.0.137 esp32-arduino 2023-04-03 17:57:37 -NA-
ec:8a:c4:cb:d5:25 192.168.0.109 -NA- 2023-04-03 17:56:40 -NA-
OR
$ cat /var/lib/dhcp/dhcpd.leases
RHEL-DHCP-IP-Address-Interface
Head back to DHCP server and see the leased ip address, run following cat command
To get manufacturer names please download
http://standards.ieee.org/regauth/oui/oui.txt to /usr/local/etc/oui.txt
Reading leases from /var/lib/dhcp/dhcpd.leases
dhcp-lease-list
MAC IP hostname valid until
manufacturer
====================================================
========================
8c:49:62:02:c6:97 192.168.0.130 RokuUltra-Den 2023-04-03 18:00:11 -NA-
b8:2c:a0:0c:d6:1e 192.168.0.100 AlarmSys0CD61E 2023-04-03 18:00:06 -NA-
c8:f0:9e:9b:c4:d8 192.168.0.137 esp32-arduino 2023-04-03 17:57:37 -NA-
ec:8a:c4:cb:d5:25 192.168.0.109 -NA- 2023-04-03 17:56:40 -NA-
OR
$ cat /var/lib/dhcp/dhcpd.leases
 DHCP-IP-Leasesd-Ubuntu
That’s all from this guide. I hope you have found it informative. Kindly do
post your queries and feedback in below comments section.
DHCP-IP-Leasesd-Ubuntu
That’s all from this guide. I hope you have found it informative. Kindly do
post your queries and feedback in below comments section.