Setup a DNS Server on Ubuntu 22.04
From: https://www.howtoforge.com/how-to-setup-dns-server-with-bind-on-ubuntu-22-04/
How to Setup DNS Server with BIND on Ubuntu 22.04

BIND or Berkeley Internet Name Domain is free and open-source DNS Server
software. It's one of the most popular DNS server software used by more than 70%
of DNS on the Internet. BIND has been around since the 1980s, it's well-known
for its flexibility, performance, and features. BIND can be used as both
authoritative DNS and caching DNS, supports load balancing, dynamic update,
split DNS, DNSSEC, IPv6, and many more.

The BIND DNS software is one of the most reliable DNS servers for Unix-like
operating systems. It's available on most Linux distributions and provides
additional tools for diagnostics and testing of the DNS server.

This guide will teach you how to install DNS Server with BIND on Ubuntu 22.04
server. This tutorial will show you how to set up Master-Slave BIND DNS server
installation using two Ubuntu servers.


Prerequisites

Before you begin with this guide, you should have the following requirements:
- Two Ubuntu 22.04 Servers.
- A non-root user with root/administrator privileges.
Setting Up FQDN (Fully Qualified Domain Name)
Before start installing BIND packages, you must ensure the hostname and FQDN of
your servers are correct. In this demonstration, we will two Ubuntu servers with
the following details:
Hostname IP Address FQDN Used As
---------------------------------------------------------
ns1 192.168.5.21 ns1.hwdomain.io BIND Master
ns2 192.168.5.22 ns2.hwdomain.io BIND Slave
Now log in to each server and run the following command to set up the FQDN
(Fully Qualified Domain Name).
Setup FQDN on the "ns1" server.
sudo hostnamectl set-hostname ns1.hwdomain.io
Setup FQDN on the "ns2" server.
sudo hostnamectl set-hostname ns2.hwdomain.io
Next, edit the file "/etc/hosts" using the following command.
sudo nano /etc/hosts
Add the following configuration to each server.
192.168.5.21 ns1.hwdomain.io ns1
192.168.5.22 ns2.hwdomain.io ns2
Save and close the file when you are done.
Lastly, check and verify the FQDN on each server using the following command. On
the "ns1" server you will get the FQDN as "ns1.hwdomain.io", and on the "ns2"
server you will get the output "ns2.hwdomain.io".
sudo hostname -f
Installing BIND Packages
Bind packages are available by default on the Ubuntu server repository. Now you
can easily install Bind using the apt command on both "ns1" and "ns2" servers.
Run the apt command below to update and refresh Ubuntu repositories.
sudo apt update
After that, install Bind packages using the following command. input Y to
confirm the installation and press ENTER to continue. And the installation will
begin.
sudo apt install bind9 bind9utils bind9-doc dnsutils
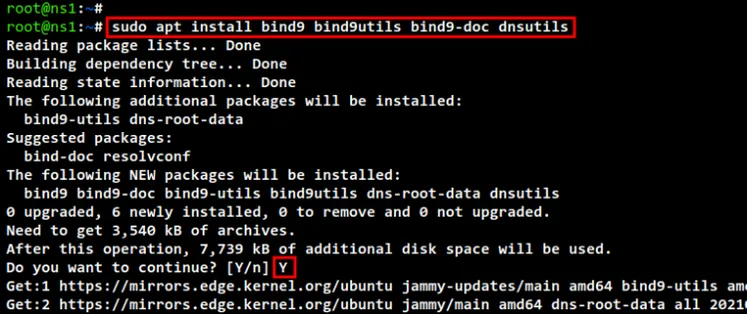 install bind
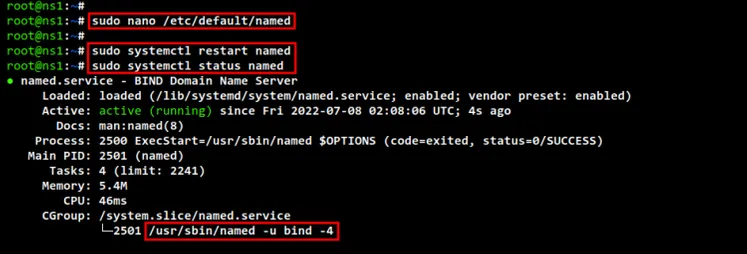
After Bind installation is finished, edit the configuration "/etc/default/named"
using the following command.
sudo nano /etc/default/named
The line "OPTIONS=" allows you to set up specific options when the BIND service
is running. In this demo, you will be running Bind only with IPv4, so you will
need to make the "OPTIONS" line as below.
OPTIONS="-u bind -4"
Save and close the file when you are done.
Now run the below command to restart the Bind service "named". Then, check and
verify the status of the BIND service. You should see the Bind service "named"
is running on both servers.Advertisement
sudo systemctl restart named
sudo systemctl status named
install bind
After Bind installation is finished, edit the configuration "/etc/default/named"
using the following command.
sudo nano /etc/default/named
The line "OPTIONS=" allows you to set up specific options when the BIND service
is running. In this demo, you will be running Bind only with IPv4, so you will
need to make the "OPTIONS" line as below.
OPTIONS="-u bind -4"
Save and close the file when you are done.
Now run the below command to restart the Bind service "named". Then, check and
verify the status of the BIND service. You should see the Bind service "named"
is running on both servers.Advertisement
sudo systemctl restart named
sudo systemctl status named
 setup bind
Setting Up BIND Master
After installing BIND packages on both "ns1" and "ns2" servers, you will be
setting up the BIND DNS server. you will be setting up the "ns1" server as the
Master of the BIND DNS server. You can run BIND on a single server, but it's
recommended to use multiple servers to set up the High-Availability DNS Server.
Back to the terminal session of the "ns1" server.
Run the command below to edit the configuration file
"/etc/bind/named.conf.options".
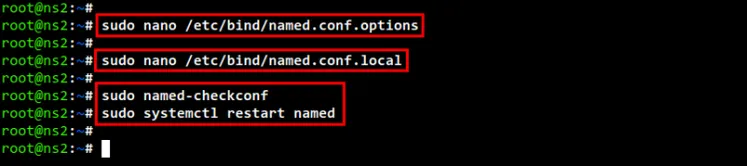
sudo nano /etc/bind/named.conf.options
Add the following configuration to the file at the top of the line, before the
"options {....};" line.
With this configuration, you will be creating an ACL (Access Control List) with
the name "trusted", which includes all trusted IP addresses and networks in your
environment. Also, be sure to add the local server IP address "ns1" and the IP
address of the "ns2" secondary DNS server.
acl "trusted" {
192.168.5.21; # ns1 - or you can use localhost for ns1
192.168.5.22; # ns2
192.168.5.0/24; # trusted networks
};
Now make changes to the "options {..};" section as below.
In the following example, we're disabling the support for IPv6 by commenting the
option "listen-on-v6", enabling and allowing recursion from the "trusted" ACL,
and running the BIND service on specific "ns1" IP address "192.168.5.21". Also,
we are disabling the default zone transfer and defining the specific forwarders
for the BIND DNS server to Google Public DNS "8.8.8.8" and "8.8.4.4".
options {
directory "/var/cache/bind";
//listen-on-v6 { any; }; # disable bind on IPv6
recursion yes; # enables resursive queries
allow-recursion { trusted; }; # allows recursive queries from
# "trusted" - referred to ACL
listen-on { 192.168.5.21; }; # ns1 IP address
allow-transfer { none; }; # disable zone transfers by default
forwarders {
8.8.8.8;
1.1.1.1;
};
};
Save and close the file when you are done.
Lastly, run the following command to check and verify the config file
"/etc/bind/named.conf.options". If there is no output message, then your
configuration is correct.
sudo named-checkconf /etc/bind/named.conf.options
Setting Up Zones
After setting up the basic configuration of BIND master, now you will be setting
up zones for your domain name. In the following example, we will use the domain
name "hwdomain.io" with the name server "ns1.hwdomain.io" and "ns2.hwdomain.io".
Edit the configuration file "/etc/bind/named.local" using the following command.
sudo nano /etc/bind/named.conf.local
In this configuration, you will be defining two zone files, forward and reverse
zone for your domain name. The Forward zone will contain the configuration of
where your domain names will be resolved to the IP address, while the reverse
zone will translate the IP address to which domain name.
In the following example, we will define the forward zone
"/etc/bind/zones/db.hwdomain.io" for domain "hwdomain.io" and the reverse zone
"/etc/bind/zones/db.192.168.5".
named.conf.local
zone "hwdomain.io" { ; FOREWARD ZONE
type master;
file "/etc/bind/zones/db.hwdomain.io"; # zone file path
allow-transfer { 192.168.5.22; }; # ns2 IP address - secondary DNS
};
zone "5.168.192.in-addr.arpa" { / REVERSE ONE
type master;
file "/etc/bind/zones/db.192.168.5"; # subnet 192.168.5.0/24
allow-transfer { 192.168.5.22; }; # ns2 private IP address - secondary DNS
};
Save and close the file when you are done.
Next, run the following command to create a new directory "/etc/bind/zones" that
will be used to store zone config files.
sudo mkdir -p /etc/bind/zones/
After that, copy the default forward zone configuration
"/etc/bind/zones/db.hwdomain.io" and edit the file using the following command.
sudo cp /etc/bind/db.local /etc/bind/zones/db.hwdomain.io
sudo nano /etc/bind/zones/db.hwdomain.io
Change the default SOA record with your domain name. Also, you will need to
change the "Serial" number inside the SOA records every time you make changes to
the file, and this must be the same "Serial" number with the secondary/slave DNS
server.
Then, you can define NS records and A records for your DNS server. In this
example, the name server will be "ns1.hwdomain.io" with the A record IP address
"192.168.5.21" and "ns2.hwdomain.io" with the A record of the secondary DNS
server IP address "192.168.5.22".
Lastly, you can define other domain names. In this example, we will define an MX
record (mail handler) for the domain "hwdomain.io" which will be handled by the
mail server "mail.hwdomain.io. Also, we will define the domain name
"hwdomain.io" that will be resolved to the server with IP address
"192.168.5.100" and the sub-domain for the mail server "mail.hwdomain.io" to the
server IP address "192.168.5.120".
LOOPBACK ZONE
;
; BIND data file for the local loopback interface
;
$TTL 604800
@ IN SOA ns1.hwdomain.io. admin.hwdomain.io. (
3 ; Serial
604800 ; Refresh
86400 ; Retry
2419200 ; Expire
604800 ) ; Negative Cache TTL
;
; NS records for name servers
IN NS ns1.hwdomain.io.
IN NS ns2.hwdomain.io.
; A records for name servers
ns1.hwdomain.io. IN A 192.168.5.21
ns2.hwdomain.io. IN A 192.168.5.22
; Mail handler or MX record for the domain hwdomain.io
hwdomain.io. IN MX 10 mail.hwdomain.io.
; A records for domain names
hwdomain.io. IN A 192.168.5.100
mail.hwdomain.io. IN A 192.168.5.120
Save and close the file when you are done.
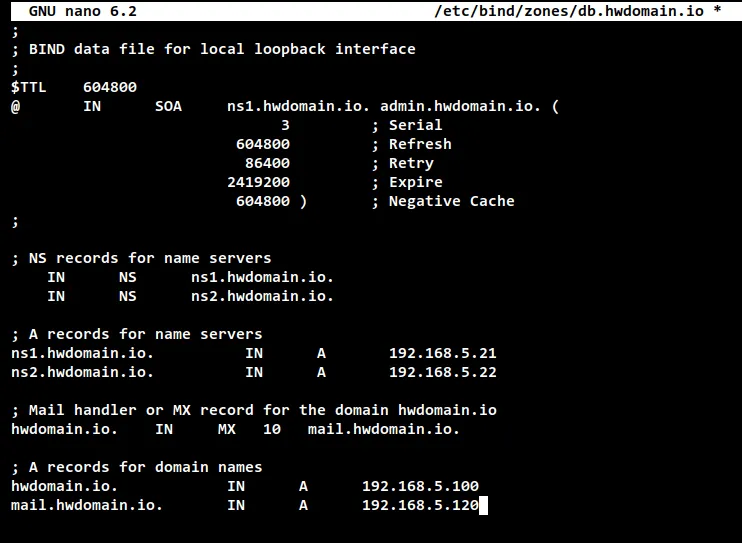
setup forward zone
Next, copy the default reverse zone config file to
"/etc/bind/zones/db.192.168.5" and edit the new file using the following command.
sudo cp /etc/bind/db.127 /etc/bind/zones/db.192.168.5
sudo nano /etc/bind/zones/db.192.168.5
Change the default SOA record using your domain name. Also, do not forget to
change the "Serial" number inside the SOA record.
Define NS records for your DNS servers. These are the same name servers that you
used in the forward zone.
Lastly, define the PTR records for your domain names. The number on the PTR
records is the last number of the IP address. In this example, the name server
"ns1.hwdomain.io" is resolved to the IP address "192.168.5.21", so now the PTR
record will be "21" and so on for other domain names.
;
; BIND reverse data file for the local loopback interface
;
$TTL 604800
@ IN SOA ns1.hwdomain.io. admin.hwdomain.io. (
3 ; Serial
604800 ; Refresh
86400 ; Retry
2419200 ; Expire
604800 ) ; Negative Cache TTL
;
; name servers - NS records
IN NS ns1.hwdomain.io.
IN NS ns2.hwdomain.io.
; PTR Records
21 IN PTR ns1.hwdomain.io. ; 192.168.5.21
22 IN PTR ns2.hwdomain.io. ; 192.168.5.22
100 IN PTR hwdomain.io. ; 192.168.5.100
120 IN PTR mail.hwdomain.io. ; 192.168.5.120
Save and close the file when you are done.
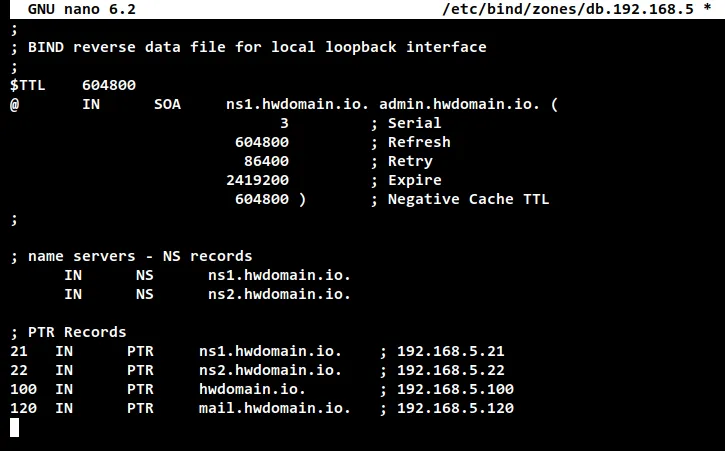 setup reverse zone
Now run the following command to check BIND configurations and be sure don't get
any error message.
sudo named-checkconf
Then, run the following command to check and verify each zone files that you
just created, the forward zone and reverse zone configuration file. If your zone
files have no error, you should see the output message such as "OK". If there is
no error, the command will show you which line of the file caused an error.
sudo named-checkzone hwdomain.io /etc/bind/zones/db.hwdomain.io
sudo named-checkzone 5.168.192.in-addr.arpa /etc/bind/zones/db.192.168.5
setup reverse zone
Now run the following command to check BIND configurations and be sure don't get
any error message.
sudo named-checkconf
Then, run the following command to check and verify each zone files that you
just created, the forward zone and reverse zone configuration file. If your zone
files have no error, you should see the output message such as "OK". If there is
no error, the command will show you which line of the file caused an error.
sudo named-checkzone hwdomain.io /etc/bind/zones/db.hwdomain.io
sudo named-checkzone 5.168.192.in-addr.arpa /etc/bind/zones/db.192.168.5
 check zone files
To finish up the BIND Master configuration, run the below command to restart the
BIND service and apply new changes to the configurations that you have made.
sudo systemctl restart named
check zone files
To finish up the BIND Master configuration, run the below command to restart the
BIND service and apply new changes to the configurations that you have made.
sudo systemctl restart named
Setting Up BIND Slave
Now you have finished the configuration of the Master BIND DNS Server. It's time
to set up the "ns2" server as the secondary or salve of the BIND DNS server.
The Master server stores zone files that contain the DNS configuration of your
domain and handle recursive or iterative queries. The secondary/slave DNS server
stores DNS records for a period of time temporarily, and these DNS records are
automatically transferred from the Master BIND server.
Now move to the "ns2" terminal session and start configuring the "ns2" server as
a Secondary/Slave of the BIND DNS server.
Run the following command to edit the configuration file
"/etc/bind/named.conf.options"
sudo nano /etc/bind/named.conf.options
On top of the line, add the following configuration. This will create the same
ACL (Access Control List) as on the Master server.
acl "trusted" {
192.168.5.21; # ns1
192.168.5.22; # ns2 - or you can use localhost for ns2
192.168.5.0/24; # trusted networks
};
Inside the "options {...};" line, you can change the configuration as below.
This configuration is still the same as on the Master BIND DNS server, and the
only difference here is the "listen-on" option which is specified to the "ns2"
server IP address.
options {
directory "/var/cache/bind";
//listen-on-v6 { any; }; # disable bind on IPv6
recursion yes; # enables resursive queries
allow-recursion { trusted; }; # allows recursive queries from
# "trusted" - referred to ACL
listen-on { 192.168.5.22; }; # ns2 IP address
allow-transfer { none; }; # disable zone transfers by default
forwarders {
8.8.8.8;
1.1.1.1;
};
};
Save and close the file when you are done.
Next, edit the config file "/etc/bind/named.conf.local" using the following
command to set up the "ns2" server as the secondary/slave DNS Server.
sudo nano /etc/bind/named.conf.local
Add the following configuration to the file. As you can see we're defining the
forward and reverse zones, but with the "type slave" and define the DNS Master
server "192.168.5.21". You do not need to create the zone file because DNS
records and data will be automatically transferred from the DNS Master server
and will be stored temporarily for a period of time on the secondary/slave DNS
server.
zone "hwdomain.io" {
type slave;
file "/etc/bind/zones/db.hwdomain.io";
masters { 192.168.5.21; }; # ns1 IP address - master DNS
};
zone "5.168.192.in-addr.arpa" {
type slave;
file "/etc/bind/zones/db.192.168.5";
masters { 192.168.5.21; }; # ns1 IP address - master DNS
};
Save and close the file when you are done.
Now run the following command to check and verify the BIND configuration and be
sure all configurations are correct. Then, you can restart the BIND service
"named" on the "ns2" server to apply new changes. And you have now finished the
configuration on the "ns2" server as a secondary/slave of the BIND DNS Server.
sudo named-checkconf
sudo systemctl restart named
 setup secondary dns
Lastly, run the following command to check and verify the BIND service "named"
on the "ns2" server. And be sure the "named" service is running.
sudo systemctl status named
setup secondary dns
Lastly, run the following command to check and verify the BIND service "named"
on the "ns2" server. And be sure the "named" service is running.
sudo systemctl status named
 check named status secondary dns
Verifying DNS Server from Client Machine
On the client machine, there are multiple ways to set up the DNS resolver. You
can set up the DNS resolver from the NetworkManager or from the netplan
configuration. But, the easiest way is to set up the DNS resolver manually
through the file "/etc/resolv.conf". This allows you to set up a static DNS
resolver for client machines.
Run the following command to remove the default link file "/etc/resolv.conf"
and create a new file using nano editor.
sudo unlink /etc/resolv.conf
sudo nano /etc/resolv.conf
Add the following configuration to the file. In the following configuration we
are defining three different resolvers, the BIND DNS Master, the Secondary BIND
DNS server, and the public Google DNS resolver. When the client machine requests
information about the domain name, the information will be taken from the DNS
resolver, from the top to the bottom.
nameserver 192.168.5.21
nameserver 192.168.5.22
nameserver 8.8.8.8
search hwdomain.io
Save and close the file when you are done.
Next, run the command below to install some DNS utility to your client machine.
In this example, the client machine is an Ubuntu system, so we are installing
DNS utility using the apt command as below.
sudo apt install dnsutils bind9-utils
After you have installed the DNS utility on your system, you can start checking
all DNS records from the client machine.
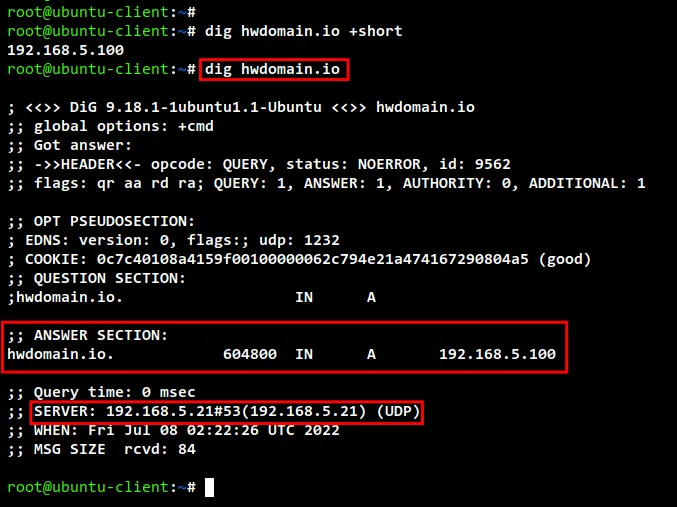
Run the dig command below to check the domain name "hwdomain.io" and
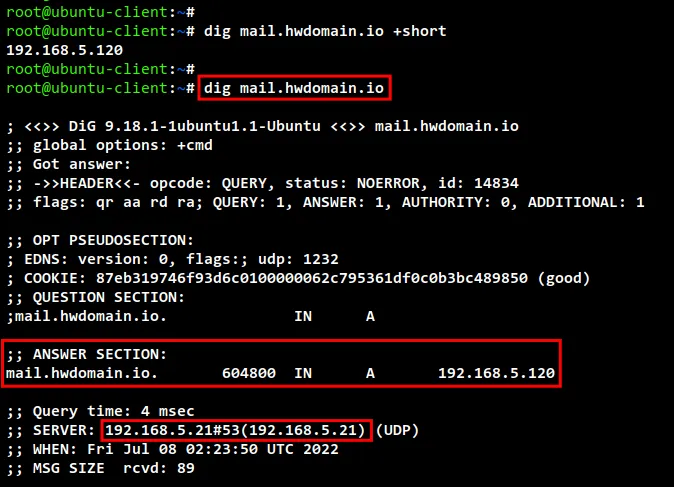
"mail.hwdomain.io". And you should see the "hwdomain.io" is resolved to the
server IP address "192.168.5.100", while the sub-domain "mail.hwdomain.io" is
handled by the server IP address "192.168.5.120".
dig hwdomain.io +short
dig hwdomain.io
 check dns records dig
dig mail.hwdomain.io +short
dig mail.hwdomain.io
check dns records dig
dig mail.hwdomain.io +short
dig mail.hwdomain.io
 check dns record using dig
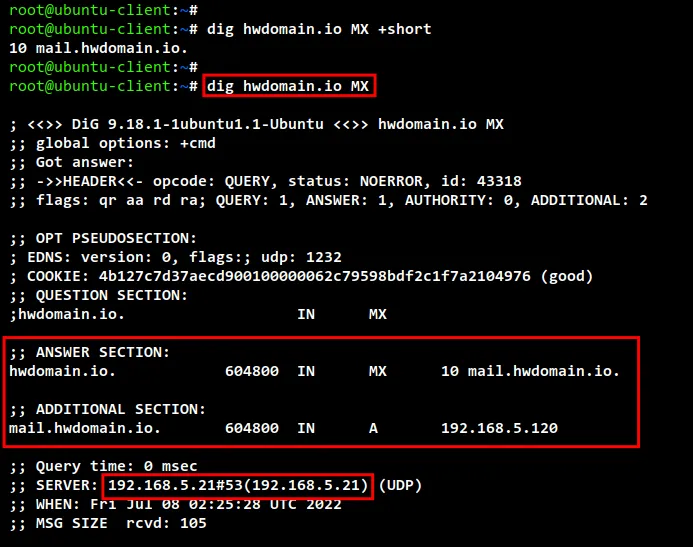
Next, run the dig command as below to check the mail handler for the domain name
"hwdomain.io". And you should get the output that the "mail.hwdomain.io" is
handled mail for the main domain "hwdomain.io".
dig hwdomain.io MX +short
dig hwdomain.io MX
check dns record using dig
Next, run the dig command as below to check the mail handler for the domain name
"hwdomain.io". And you should get the output that the "mail.hwdomain.io" is
handled mail for the main domain "hwdomain.io".
dig hwdomain.io MX +short
dig hwdomain.io MX
 check mx records
Now you can also verify the reverse zone configuration for your domain name
using the nslookup command.
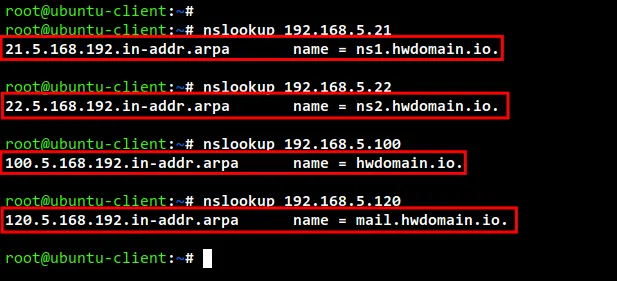
Run the nslookup command below to check and verify the reverse DNS for some IP
addresses.
Now you should see that the IP address "192.168.5.21" is reversed to the name
server "ns1.hwdomain.io", the IP address "192.168.5.22" is reversed to the name
server "ns2.hwdomain.io", and the IP address "192.168.5.100" is reversed to the
main domain name "hwdomain.io", and lastly the IP address "192.168.5.120" is
reversed to the sub-domain "mail.hwdomain.io.
nslookup 192.168.5.21
nslookup 192.168.5.22
nslookup 192.168.5.100
nslookup 192.168.5.120
check mx records
Now you can also verify the reverse zone configuration for your domain name
using the nslookup command.
Run the nslookup command below to check and verify the reverse DNS for some IP
addresses.
Now you should see that the IP address "192.168.5.21" is reversed to the name
server "ns1.hwdomain.io", the IP address "192.168.5.22" is reversed to the name
server "ns2.hwdomain.io", and the IP address "192.168.5.100" is reversed to the
main domain name "hwdomain.io", and lastly the IP address "192.168.5.120" is
reversed to the sub-domain "mail.hwdomain.io.
nslookup 192.168.5.21
nslookup 192.168.5.22
nslookup 192.168.5.100
nslookup 192.168.5.120
 check reverse dns
Conclusion
Congratulation! throughout this tutorial you have learned the installation and
configuration BIND DNS Server on Ubuntu 22.04 servers. You have successfully
configured the Master-Slave BIND DNS Server using two different Ubuntu servers.
Also, you have learned the basic command of Dig and Nslookup for checking and
verifying DNS records and configuration.