Local DNS Resolver Ubuntu 22.04
From: https://www.linuxbabe.com/ubuntu/set-up-local-dns-resolver-ubuntu-20-04-bind9
Set Up Local DNS Resolver
on Ubuntu 22.04/20.04 with BIND9

Last Updated: December 2nd, 2022 Xiao Guoan (Admin) 44 Comments

This tutorial will be showing you how to set up a local DNS resolver on Ubuntu
22.04/20.04, with the widely-used BIND9 DNS software. A DNS resolver is known by
many names, some of which are listed below. They all refer to the same thing.
- full resolver (in contrast to stub resolver)
- DNS recursor
- recursive DNS server
- recursive resolver
Also, be aware that A DNS server can also be called a name server. Examples of
DNS resolver are 8.8.8.8 (Google public DNS server) and 1.1.1.1 (Cloudflare
public DNS server). The OS on your computer also has a resolver, although it’s
called stub resolver due to its limited capability. A stub resolver is a small
DNS client on the end user’s computer that receives DNS requests from
applications such as Firefox and forward requests to a recursive resolver.
Almost every resolver can cache DNS response to improve performance, so they are
also called caching DNS server.
 Set Up Local DNS Resolver on Ubuntu 20.04 with BIND9
Why Run Your Own Local DNS Resolver
Normally, your computer or router uses your ISP’s DNS resolver to query DNS
names, so why run a local DNS resolver?
- It can speed up DNS lookups, because the local DNS resolver only listens to
your DNS requests and does not answer other people’s DNS requests, so you have a
much higher chance of getting DNS answers directly from the cache on the
resolver. The network latency between your computer and DNS resolver is
eliminated (almost zero), so DNS queries can be sent to root DNS servers more
quickly.
- If you run a mail server and use DNS blacklists (DNSBL) to block spam, then
you should run your own DNS resolver, because some DNS blacklists such as URIBL
refuse requests from public DNS resolvers.
- If you run your own VPN server on a VPS (Virtual Private Server), it’s also
a good practice to install a DNS resolver on the same VPS.
- You may also want to run your own DNS resolver if you don’t like your
Internet browsing history being stored on a third-party server.
If you own a website and want your own DNS server to handle name resolution for
your domain name instead of using your domain registrar’s DNS server, then you
will need to set up an authoritative DNS server, which is different from a DNS
resolver. BIND can act as an authoritative DNS server and a DNS resolver at the
same time, but it’s a good practice to separate the two roles on different boxes.
This tutorial shows how to set up a local DNS resolver and because it will be
used on localhost/local network, no encryption (DNS over TLS or DNS over HTTPS)
is needed. Setting up a DoT resolver or DoH resolver will be discussed in a
future article.
Hint: Local doesn’t mean your home computer. Rather, it means the DNS resolver
runs on the same box as the DNS client. You can install BIND DNS resolver on
your home computer. It’s local to your home computer. You can install BIND DNS
resolver on a cloud server, and it’s local to the cloud server.
Set Up Local DNS Resolver on Ubuntu 22.04/20.04 with BIND9
BIND (Berkeley Internet Name Domain) is an open-source DNS server software
widely used on Unix/Linux due to it’s stability and high quality. It’s
originally developed by UC Berkeley, and later in 1994 its development was moved
to Internet Systems Consortium, Inc (ISC).
Run the following command to install BIND 9 on Ubuntu 22.04/20.04, from the
default repository. BIND 9 is the current version and BIND 10 is a dead project.
sudo apt update
sudo apt install bind9 bind9utils bind9-dnsutils bind9-doc bind9-host
Check version.
named -v
Sample output:
BIND 9.16.1-Ubuntu (Stable Release)
To check the version number and build options, run
named -V
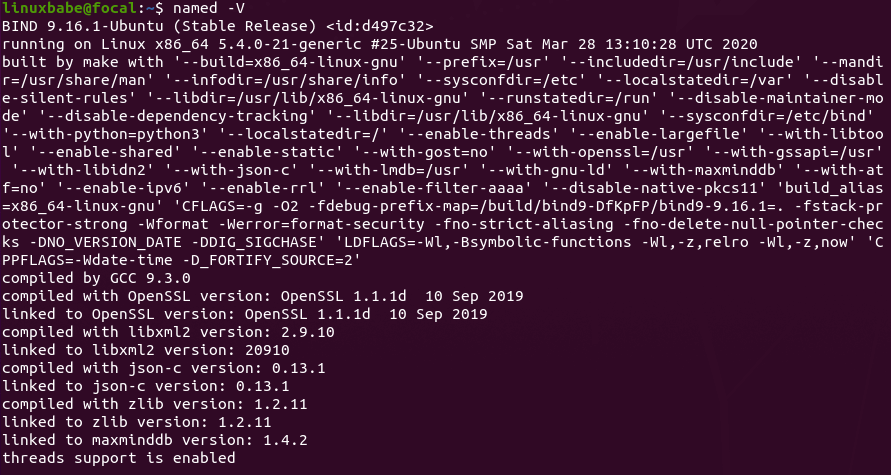 BIND-version-number-and-build-option-ubuntu-20.04
By default, BIND automatically starts after installation.You check its status
with:
systemctl status named
If it’s not running, then start it with:
sudo systemctl start named
And enable auto start at boot time:
sudo systemctl enable named
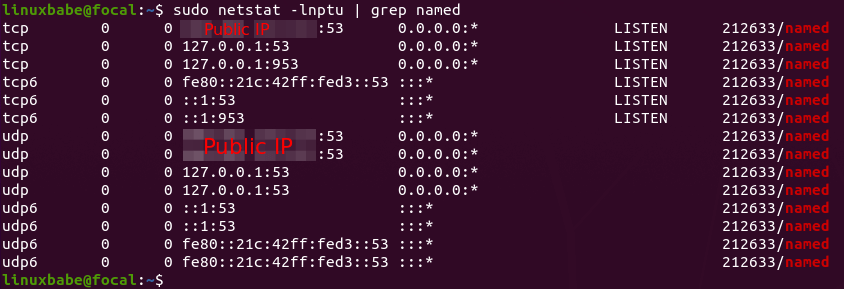
The BIND server will run as the bind user, which is created during installation,
and listens on TCP and UDP port 53, as can be seen by running the following
command:
sudo ss -lnptu | grep named
BIND-version-number-and-build-option-ubuntu-20.04
By default, BIND automatically starts after installation.You check its status
with:
systemctl status named
If it’s not running, then start it with:
sudo systemctl start named
And enable auto start at boot time:
sudo systemctl enable named
The BIND server will run as the bind user, which is created during installation,
and listens on TCP and UDP port 53, as can be seen by running the following
command:
sudo ss -lnptu | grep named
 ubuntu 20.04 bind9 setup
Usually, DNS queries are sent to UDP port 53. The TCP port 53 is for response
sizes larger than 512 bytes.
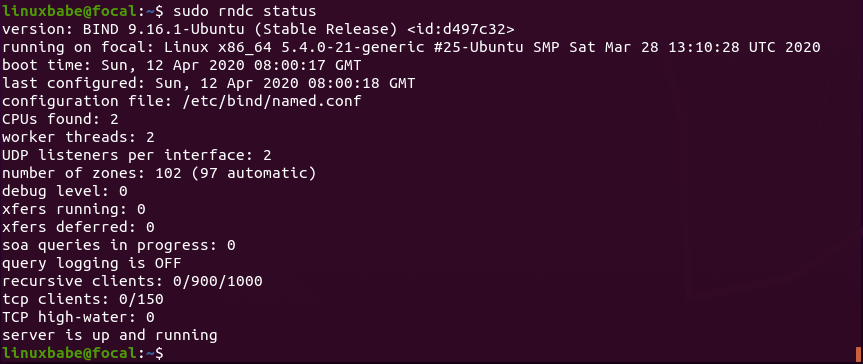
The BIND daemon is called named. (A daemon is a piece of software that runs in
the background.) The named binary is installed by the bind9 package and there’s
another important binary: rndc, the remote name daemon controller, which is
installed by the bind9utils package. The rndc binary is used to reload/stop and
control other aspects of the BIND daemon. Communication is done over TCP
port 953.
For example, we can check the status of the BIND name server.
sudo rndc status
ubuntu 20.04 bind9 setup
Usually, DNS queries are sent to UDP port 53. The TCP port 53 is for response
sizes larger than 512 bytes.
The BIND daemon is called named. (A daemon is a piece of software that runs in
the background.) The named binary is installed by the bind9 package and there’s
another important binary: rndc, the remote name daemon controller, which is
installed by the bind9utils package. The rndc binary is used to reload/stop and
control other aspects of the BIND daemon. Communication is done over TCP
port 953.
For example, we can check the status of the BIND name server.
sudo rndc status
 rndc the remote name daemon controller ubuntu 20.04
Configurations for a Local DNS Resolver
/etc/bind/ is the directory that contains configurations for BIND.
- named.conf: the primary config file which includes configs of three other files.
- db.127: localhost IPv4 reverse mapping zone file.
- db.local: localhost forward IPv4 and IPv6 mapping zone file.
- db.empty: an empty zone file
The bind9 package on Ubuntu 22.04/20.04 doesn’t ship with a db.root file, it now
uses the root hints file at /usr/share/dns/root.hints. The root hints file is
used by DNS resolvers to query root DNS servers. There are 13 groups of root DNS
servers, from a.root-servers.net to m.root-servers.net.
Out of the box, the BIND9 server on Ubuntu provides recursive service for
localhost and local network clients only. Outside queries will be denied. So
you don’t have to edit the configuration files. To get you familiar with BIND 9
configurations, I will show you how to enable recursion service anyway.
The main BIND configuration file /etc/bind/named.conf sources the settings from
3 other files.
- /etc/bind/named.conf.options
- /etc/bind/named.conf.local
- /etc/bind/named.conf.default-zones
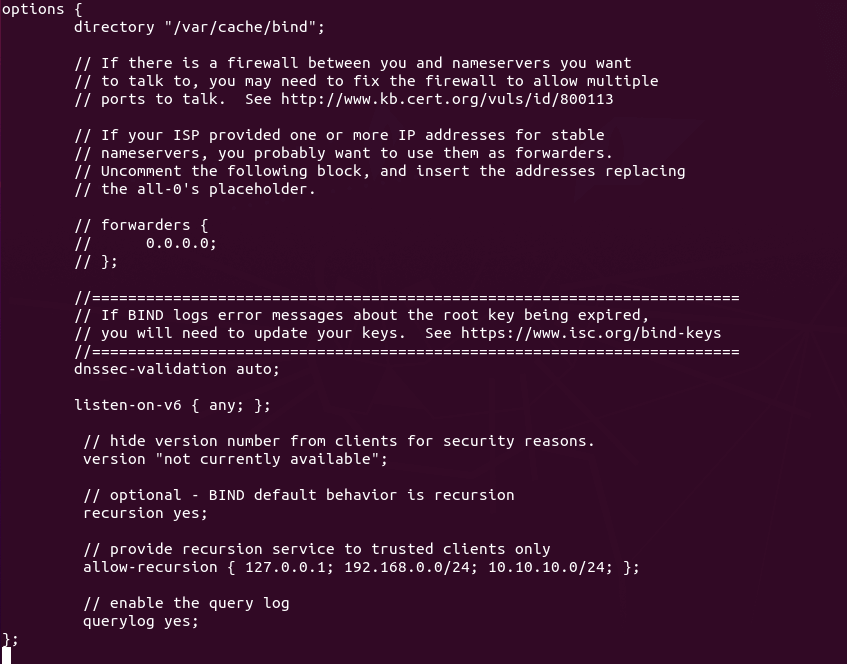
To enable recursion service, edit the first file.
sudo nano /etc/bind/named.conf.options
In the options clause, add the following lines. Replace IP addresses in the
allow-recursion statement with your own local network addresses.
// hide version number from clients for security reasons.
version "not currently available";
// optional - BIND default behavior is recursion
recursion yes;
// provide recursion service to trusted clients only
allow-recursion { 127.0.0.1; 192.168.0.0/24; 10.10.10.0/24; };
// enable the query log
querylog yes;
 enable-recursion-service-in-bind9-ubuntu 20.04
Save and close the file. Then test the config file syntax.
sudo named-checkconf
If the test is successful (indicated by a silent output), then restart BIND9.
sudo systemctl restart named
If you have UFW firewall running on the BIND server, then you need to open port
53 to allow LAN clients to send DNS queries.
sudo ufw allow in from 192.168.0.0/24 to any port 53
This will open TCP and UDP port 53 to the private network 192.168.0.0/24. Then
from another computer in the same LAN, we can run the following command to query
the A record of google.com. Replace 192.168.0.102 with the IP address of your
BIND resolver.
dig A google.com @192.168.0.102
Now on the BIND resolver, check the query log with the following command.
sudo journalctl -eu named
This will show the latest log message of the bind9 service unit. I found the
following line in the log, which indicates that a DNS query for google.com’s A
record has been received from port 57806 of 192.168.0.103.
named[1162]: client @0x7f4d2406f0f0 192.168.0.103#57806 (google.com): query:
google.com IN A +E(0)K (192.168.0.102)
enable-recursion-service-in-bind9-ubuntu 20.04
Save and close the file. Then test the config file syntax.
sudo named-checkconf
If the test is successful (indicated by a silent output), then restart BIND9.
sudo systemctl restart named
If you have UFW firewall running on the BIND server, then you need to open port
53 to allow LAN clients to send DNS queries.
sudo ufw allow in from 192.168.0.0/24 to any port 53
This will open TCP and UDP port 53 to the private network 192.168.0.0/24. Then
from another computer in the same LAN, we can run the following command to query
the A record of google.com. Replace 192.168.0.102 with the IP address of your
BIND resolver.
dig A google.com @192.168.0.102
Now on the BIND resolver, check the query log with the following command.
sudo journalctl -eu named
This will show the latest log message of the bind9 service unit. I found the
following line in the log, which indicates that a DNS query for google.com’s A
record has been received from port 57806 of 192.168.0.103.
named[1162]: client @0x7f4d2406f0f0 192.168.0.103#57806 (google.com): query:
google.com IN A +E(0)K (192.168.0.102)
Setting the Default DNS Resolver on Ubuntu 22.04/20.04 Server
Systemd-resolved provides the stub resolver on Ubuntu 22.04/20.04. As mentioned
in the beginning of this article, a stub resolver is a small DNS client on the
end-user’s computer that receives DNS requests from applications such as Firefox
and forward requests to a recursive resolver.
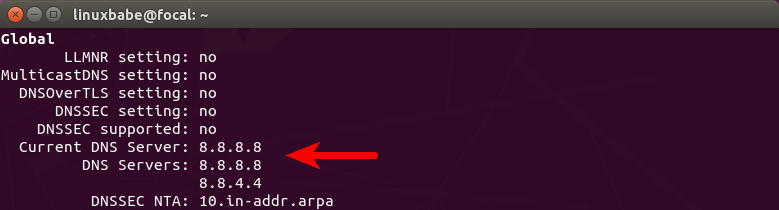
The default recursive resolver can be seen with this command.
resolvectl status
or on an old version of Ubuntu:
systemd-resolve --status
 local-dns-resolver-ubuntu-20.04
Hint: If the above command doesn’t quit immediately, you can make it quit by
pressing the Q key.
As you can see, BIND isn’t the default. If you run the following command on the
BIND server,
dig A facebook.com
This DNS query can’t be found in BIND log. Instead, you need to explicitly tell
dig to use BIND.
dig A facebook.com @127.0.0.1
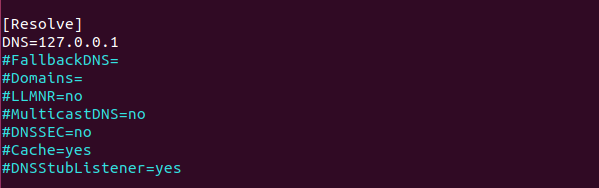
To set BIND as the default resolver, open the systemd-resolved configuration
file.
sudo nano /etc/systemd/resolved.conf
In the [Resolve] section, add the following line. This will set a global DNS
server for your server.
DNS=127.0.0.1
local-dns-resolver-ubuntu-20.04
Hint: If the above command doesn’t quit immediately, you can make it quit by
pressing the Q key.
As you can see, BIND isn’t the default. If you run the following command on the
BIND server,
dig A facebook.com
This DNS query can’t be found in BIND log. Instead, you need to explicitly tell
dig to use BIND.
dig A facebook.com @127.0.0.1
To set BIND as the default resolver, open the systemd-resolved configuration
file.
sudo nano /etc/systemd/resolved.conf
In the [Resolve] section, add the following line. This will set a global DNS
server for your server.
DNS=127.0.0.1
 bind dns resolver
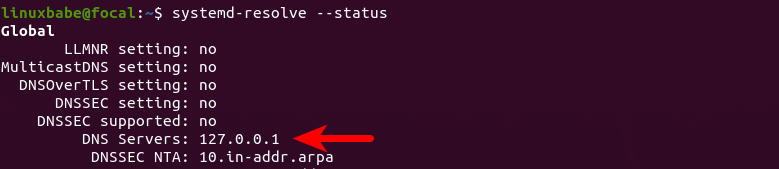
Save and close the file. Then restart systemd-resolved service.
sudo systemctl restart systemd-resolved
Now run the following command to check the default DNS resolver.
systemd-resolve --status
bind dns resolver
Save and close the file. Then restart systemd-resolved service.
sudo systemctl restart systemd-resolved
Now run the following command to check the default DNS resolver.
systemd-resolve --status
 bind9-recursive-resolver-ubuntu-20.04
Now perform a DNS query without specifying 127.0.0.1.
dig A facebook.com
You will see the DNS query in BIND log, which means BIND is now the default
recursive resolver. If you don’t see any queries in the BIND log, you might need
to configure per-link DNS server.
bind9-recursive-resolver-ubuntu-20.04
Now perform a DNS query without specifying 127.0.0.1.
dig A facebook.com
You will see the DNS query in BIND log, which means BIND is now the default
recursive resolver. If you don’t see any queries in the BIND log, you might need
to configure per-link DNS server.
Configure Per-Link DNS Server on Ubuntu 22.04/20.04
You can also configure per-link DNS server, which will override the global DNS
server. There are two ways to configure per-link DNS servers:
- via systemd-resolved
- via netplan
systemd-resolved
List files under /etc/systemd/network/ directory.
ls /etc/systemd/network/
Sample output:
05-eth0.network 99-default.link
As you can see, I have two link configuration files. The 05-eth0.network file is
for my main network interface, so I edit this file.
sudo nano /etc/systemd/network/05-eth0.network
Your filename might be different. If there are no files under this directory,
then your per-link DNS configuration is not controlled by systemd-resolved.
Comment out the default DNS and Domain entry, and add your own DNS entry.
DNS=127.0.0.1
Save and close the file. Then restart systemd-resolved and systemd-networkd
service.
sudo systemctl restart systemd-resolved systemd-networkd
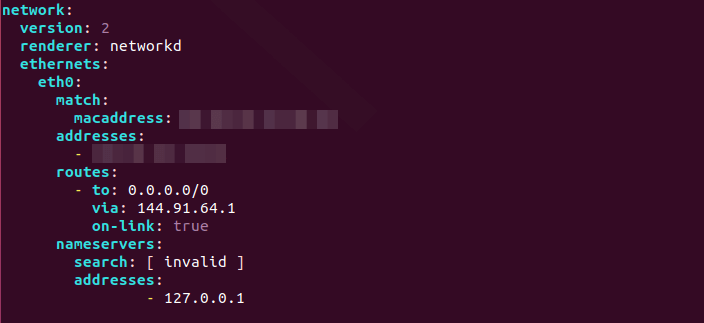
netplan
Some Ubuntu servers might be using netplan to configure per-link networking. In
this case, you need to configure DNS server in the .yaml file under
/etc/netplan/ directory. List files in this directory.
ls /etc/netplan/
Sample output:
01-netcfg.yaml
So I edit this file.
sudo nano /etc/netplan/01-netcfg.yaml
Set the DNS server address in the nameservers section.
nameservers:
search: [ invalid ]
addresses:
- 127.0.0.1
 Configure Per-Link DNS Server on Ubuntu
You can specify multiple DNS resolvers like below, which can reduce the chance
of DNS failure.
nameservers:
search: [ invalid ]
addresses:
- 127.0.0.1
- 8.8.8.8
- 1.1.1.1
Save and close the file. Then apply the change.
sudo netplan apply
Note: If you see the following error message, then netplan can’t process the
configuration file.
Invalid YAML at /etc/netplan/01-netcfg.yaml inconsistent indentation
You should fix the inconsistent indentation and run sudo netplan apply command
again.
Configure Per-Link DNS Server on Ubuntu
You can specify multiple DNS resolvers like below, which can reduce the chance
of DNS failure.
nameservers:
search: [ invalid ]
addresses:
- 127.0.0.1
- 8.8.8.8
- 1.1.1.1
Save and close the file. Then apply the change.
sudo netplan apply
Note: If you see the following error message, then netplan can’t process the
configuration file.
Invalid YAML at /etc/netplan/01-netcfg.yaml inconsistent indentation
You should fix the inconsistent indentation and run sudo netplan apply command
again.
Troubleshooting
Check the content of /etc/resolv.conf.
cat /etc/resolv.conf
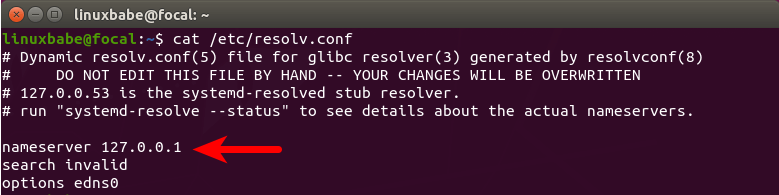 resolvconf set default dns resolver Ubuntu 20.04
As you can see, 127.0.0.1 (BIND) is default DNS resolver. If you see a different
value, that means BIND is still not your default DNS resolver. You can use the
resolveconf utility to set BIND as default resolver.
Install the resolvconf package
sudo apt install resolvconf
Then start the named-resolvconf service.
sudo systemctl start named-resolvconf.service
Enable auto-start at boot time.
sudo systemctl enable named-resolvconf.service
Now check the /etc/resolv.conf file again. BIND should be the default DNS
resolver on your Ubuntu server now.
cat /etc/resolv.conf
Note that some hosting providers like Linode may use a network helper to
auto-generate the /etc/resolv.conf file. To change the default DNS resolver, you
need to disable that network helper in the hosting control panel.
If this method still doesn’t work, perhaps it’s due to the fact the
/etc/resolv.conf file on your Ubuntu server is not a symbolic link to
/run/resolvconf/resolv.conf. You need to delete the /etc/resolv.conf file and
create a symbolic link.
sudo rm /etc/resolv.conf
sudo ln -s /run/resolvconf/resolv.conf /etc/resolv.conf
You can also manually create this file and make it read-only to prevent
overwritten by other applications on the same server.
sudo rm /etc/resolv.conf
echo "nameserver 127.0.0.1" | sudo tee /etc/resolv.conf
sudo chmod 444 /etc/resolv.conf
resolvconf set default dns resolver Ubuntu 20.04
As you can see, 127.0.0.1 (BIND) is default DNS resolver. If you see a different
value, that means BIND is still not your default DNS resolver. You can use the
resolveconf utility to set BIND as default resolver.
Install the resolvconf package
sudo apt install resolvconf
Then start the named-resolvconf service.
sudo systemctl start named-resolvconf.service
Enable auto-start at boot time.
sudo systemctl enable named-resolvconf.service
Now check the /etc/resolv.conf file again. BIND should be the default DNS
resolver on your Ubuntu server now.
cat /etc/resolv.conf
Note that some hosting providers like Linode may use a network helper to
auto-generate the /etc/resolv.conf file. To change the default DNS resolver, you
need to disable that network helper in the hosting control panel.
If this method still doesn’t work, perhaps it’s due to the fact the
/etc/resolv.conf file on your Ubuntu server is not a symbolic link to
/run/resolvconf/resolv.conf. You need to delete the /etc/resolv.conf file and
create a symbolic link.
sudo rm /etc/resolv.conf
sudo ln -s /run/resolvconf/resolv.conf /etc/resolv.conf
You can also manually create this file and make it read-only to prevent
overwritten by other applications on the same server.
sudo rm /etc/resolv.conf
echo "nameserver 127.0.0.1" | sudo tee /etc/resolv.conf
sudo chmod 444 /etc/resolv.conf
systemd-resolved isn’t running
If you see the following error after executing the
systemd-resolve --status command,
Failed to get global data: Unit dbus-org.freedesktop.resolve1.service not found.
It might be systemd-resolved isn’t running. Start it with:
sudo systemctl status systemd-resolved
Enable auto-start.
sudo systemctl enable systemd-resolved
Setting Default DNS Resolver on Client Computers
On Ubuntu desktop, you can follow the above instructions to set the default DNS
resolver, but remember to replace 127.0.0.1 with the IP address of BIND server.
The steps of setting default DNS resolver on MacOS and Windows can be found on
the Internet.
How to Disable IPv6 in BIND
If you don’t use IPv6 in your network, then it’s a good idea to turn off IPv6 in
BIND, otherwise, there will be a lot of errors about IPv6 in BIND log like below.
network unreachable resolving 'mirrors.fedoraproject.org/A/IN':
2001:4178:2:1269:dead:beef:cafe:fed5#53
network unreachable resolving 'mirrors.fedoraproject.org/AAAA/IN':
2001:4178:2:1269:dead:beef:cafe:fed5#53
network unreachable resolving 'mirrors.fedoraproject.org/A/IN':
2610:28:3090:3001:dead:beef:cafe:fed5#53
network unreachable resolving 'mirrors.fedoraproject.org/AAAA/IN':
2610:28:3090:3001:dead:beef:cafe:fed5#53
To disable IPv6 in BIND on Ubuntu, simply open the /etc/default/named file
sudo nano /etc/default/named
Add -4 to the OPTIONS.
OPTIONS="-u bind -4"
Save and close the file. Then restart BIND and you are done.
sudo systemctl restart named
BIND SERVFAIL
If your BIND resolver can’t answer DNS queries (SERVFAIL), and you see the
following line in the BIND log.
dnssec: warning: managed-keys-zone: Unable to fetch DNSKEY set '.': timed out
It’s probably because your server doesn’t have a working IPv6 connectivity. This
happened to one of my servers. I thought IPv6 connectivity is working as usual,
but it’s suddenly broken for reasons I didn’t know. Once I disabled IPv6 in
BIND, DNS resolution is working again.
BIND DNSSEC Failure
If you can find the following errors in the BIND logs, it means BIND has a
problem trusting the DNSSEC keys.
named[2194196]: managed-keys-zone: DNSKEY set for zone '.' could not be verified
with current keys
named[2194196]: validating ./NS: no valid signature found
named[2194196]: no valid RRSIG resolving './NS/IN': 192.36.148.17#53
named[2194196]: validating ./NS: no valid signature found
named[2194196]: no valid RRSIG resolving './NS/IN': 198.97.190.53#53
named[2194196]: validating ./NS: no valid signature found
named[2194196]: no valid RRSIG resolving './NS/IN': 199.9.14.201#53
named[2194196]: validating ./NS: no valid signature found
named[2194196]: no valid RRSIG resolving './NS/IN': 192.5.5.241#53
named[2194196]: validating ./NS: no valid signature found
To make it work properly, we can rebuild the managed key database with the
following commands.
sudo rndc managed-keys destroy
sudo rdnc reconfig
Named Automatic Restart
If for any reason your Named process is killed, you need to run the following
command to restart it.
sudo systemctl restart named
Instead of manually typing this command, we can make Named automatically restart
by editing the named.service systemd service unit. To override the default
systemd service configuration, we create a separate directory.
sudo mkdir -p /etc/systemd/system/named.service.d/
Then create a file under this directory.
sudo nano /etc/systemd/system/named.service.d/restart.conf
Add the following lines in the file, which will make Named automatically restart
5 seconds after a failure is detected.
[Service]
Restart=always
RestartSec=5s
Save and close the file. Then reload systemd.
sudo systemctl daemon-reload
To check if this would work, kill Named with:
sudo pkill named
Then check Named status. You will find Named automatically restarted.
systemctl status named
BIND max-cache-size
BIND can cache DNS results on the server to speed up DNS lookup for clients.
BIND assumes you are running a dedicated DNS resolver, i.e, no other web
services are running on the same host, so the default cache size (defined by
max-cache-size) is set to 90% of the total RAM to achieve best performance. You
can see a line like below in the BIND log (sudo journalctl -eu named) when BIND
starts.
none:100: 'max-cache-size 90%' - setting to 7165MB (out of 7961MB)
Note that BIND will not use 90% of your RAM immediately. If there are only a
few DNS requests, BIND uses only a small amount of RAM, because there’s not many
DNS results to cache. If there are lots of DNS requests, then it will use lots
of RAM to store the DNS cache.
If your RAM is limited, you might not want BIND to use 90% of your RAM for
cache. Edit the BIND configuration file /etc/bind/named.conf.options.
sudo nano /etc/bind/named.conf.options
Add the following directive in the options clause. Change 50% to your preferred
value.
max-cache-size 50%;
Restart BIND for the change to take effect.
sudo systemctl restart named
Note: When you restart BIND, its entire cache will be flushed.
No servers could be reached
If you see the following error when using the dig command on client computers
;; connection timed out; no servers could be reached
It could be that
- Your firewall rule is wrong. Check your firewall log.
- The BIND resolver isn’t running.
- BIND isn’t listening on a network interface.
- Can you ping from the DNS client to the DNS resolver?
Conclusion
I hope this tutorial helped you set up a local DNS resolver on Ubuntu
22.04/20.04 with BIND9. As always, if you found this post useful, then subscribe
to our free newsletter to get more tips and tricks. Take care 🙂