Install DKIM
From: https://tecadmin.net/setup-dkim-with-postfix-on-ubuntu
-debian/
A Step-by-Step Guide to Installing OpenDKIM

with Postfix on Ubuntu – Unleash the Power of DKIM!
By RahulDecember 19, 20227 Mins Read

DKIM or DomainKeys Identified Mail is an authentication protocol used to
validate the identity of a sender. It’s an important tool for preventing
email spoofing, which is when a person impersonates another user and sends
emails with their name and address. DKIM Key works by using an OpenDKIM or
Domain Key to sign each message sent. The key is an encrypted string of
characters unique to the sender and is used to verify the message comes from
the sender’s domain. This makes it harder for malicious actors to send
forged messages. DKIM Key also allows receivers to reject messages that fail
authentication. This provides added protection against spoofing and other
email-based attacks. It’s a crucial safety measure for any email server
and one that can help protect your business and its customers.

This tutorial will provide you with a quick and easy way to setup DKIM
(DomainKeys) with the Postfix Mail server running on Ubuntu and Debian-based
systems.

Setup DKIM (Domain Keys) with Postfix


Prerequisites


Before we install and configure OpenDKIM for Postfix, we need to make sure
that we have the necessary prerequisites in place.
- First and foremost, you will need a working Ubuntu system with root
access.
- You will also need to have Postfix installed and configured.
- The last prerequisite is that you should have a valid domain name with DNS
access.
Without these prerequisites in place, you will not be able to install and
configure OpenDKIM on your server.
Step 1: Install Opendkim Package
Once you have all the prerequisites in place, you can start installing
OpenDKIM. We will be using the apt package manager to install OpenDKIM on
Ubuntu. To install OpenDKIM, you will need to run the following command:
sudo apt update
sudo apt install opendkim opendkim-tools
Then add the postfix user to the opendkim group.
sudo usermod -G opendkim postfix
Step 2: Generate Public and Private DKIM Keys
The next step is to create a proper directory structure to keep the Key
files secure. Run the following commands to create a directory and set
permissions.
sudo mkdir -p /etc/opendkim/keys
sudo chown -R opendkim:opendkim /etc/opendkim
sudo chmod 744 /etc/opendkim/keys
Now, generate your public and private DKIM keys using opendkim-genkey
command line utility. All the commands are using “example.com” as a
domain name. Replace it with your real domain name. We also need to choose a
selector name, This can be any unique string, that helps Mail servers to
identify the correct DKIM key from the DNS record. Below command will use
default as selector key:
sudo mkdir /etc/opendkim/keys/example.com
sudo opendkim-genkey -b 2048 -d example.com -D /etc/
opendkim/keys/example.com -s default -v
This command will generate a public and private key pair for you. The
private key will be stored in the file “selector.private”, and the
public key will be stored in the file “selector.txt”. In our case, The
filenames are “default.private” and “default.txt”.
Once you have generated the keys, you will need to set appropriate
permissions on the private key file:
sudo chown opendkim:opendkim /etc/opendkim/keys/example.com/default.private
Step 3: Setup DKIM Keys to Your DNS Record
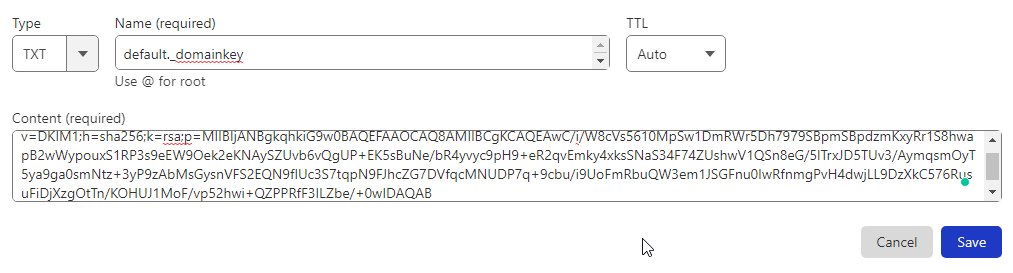
Once you have generated the public and private DKIM keys, you will need to
add them to your DNS record. To do this, you will need to add the TXT record
to your DNS zone file. This record detail can be found under the default.txt
file, generate with the private key:
sudo cat /etc/opendkim/keys/example.com/default.txt
You will see the output below:
default._domainkey IN TXT ( "v=DKIM1; h=sha256; k=rsa; "
"p=MIIBIjANBgkqhkiG9w0BAQEFAAOCAQ8AMIIBCgK
CAQEAwC/i/W8cVs5610MpSw1DmRWr5Dh7979SBpmSBpdzmKxyRr1
S8hwapB2wWypouxS1RP3s9eEW9Oek2eKNAySZUvb6vQgUP+EK5sB
uNe/bR4yvyc9pH9+eR2qvEmky4xksSNaS34F74ZUshwV1QSn8eG/
5lTrxJD5TUv3/AymqsmOyT5ya9ga0smNtz+3yP9zAbMsGysnVFS2EQN"
"9fIUc3S7tqpN9FJhcZG7DVfqcMNUDP7q+9cbu/i9U
oFmRbuQW3em1JSGFnu0IwRfnmgPvH4dwjLL9DzXkC576RusuFiDj
XzgOtTn/KOHUJ1MoF/vp52hwi+QZPPRfF3ILZbe/+0wIDAQAB" ) ; ----- DKIM key
default for tecadmin.net
Remove all the quotes (“) and blank spaces from the record value, then
publish it to the DNS zone. See the below screenshot:
 Setup DKIM with Postfix on Ubuntu
You can verify the DNS record by running the following command.
sudo opendkim-testkey -d example.com -s default -vvv
Setup DKIM with Postfix on Ubuntu
You can verify the DNS record by running the following command.
sudo opendkim-testkey -d example.com -s default -vvv
 Configure OpenDKIM with Postfix on Ubuntu
Step 4: Confiugring OpenDKIM
Configure OpenDKIM with Postfix on Ubuntu
Step 4: Confiugring OpenDKIM
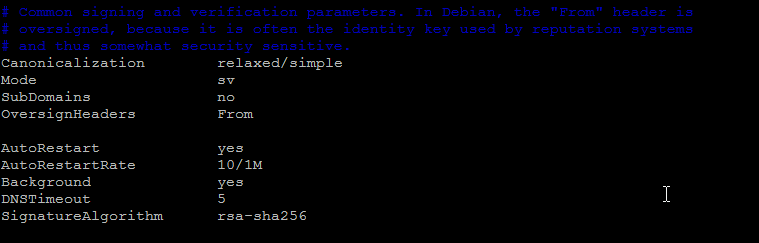
Once OpenDKIM has been installed and you have generated the DKIM public
-private keys. you will need to configure it. To do this, you will need to
edit the configuration file located at /etc/opendkim.conf. In this file, you
will need to set the following parameters:
- Edit the main configuration file in your favorite text editor:
sudo nano /etc/opendkim.conf
- Uncomment these values and configure as below:
Syslog yes
LogWhy yes
Canonicalization relaxed/simple
Mode sv
SubDomains no
OversignHeaders From
The LogWhy option enables the more detailed logs for troubleshooting:
- Now add the following values
AutoRestart yes
AutoRestartRate 10/1M
Background yes
DNSTimeout 5
SignatureAlgorithm rsa-sha256
 Configure OpenDKIM with Postfix on Ubuntu
- Next make sure that UserID is set to opendkim:
# Remember to add user postfix to group opendkim
UserID opendkim
- Now, append the following entries to the end of the file.
KeyTable refile:/etc/opendkim/key.table
SigningTable refile:/etc/opendkim/signing.table
ExternalIgnoreList /etc/opendkim/trusted.hosts
InternalHosts /etc/opendkim/trusted.hosts
- Save and close /etc/opendkim.conf configuration file.
- Now, edit the SigningTable in text editor.
sudo nano /etc/opendkim/signing.table
Add the following entries.
*@example.com default._domainkey.example.com
*@*.example.com default._domainkey.example.com
Save and close the file.
- Next, edit the KeyTable file:
sudo nano /etc/opendkim/key.table
Add the following entry.
default._domainkey.example.com example.com:defa
ult:/etc/opendkim/keys/example.com/default.private
Save the file and close it.
- Next, edit the trusted.hosts file:
sudo nano /etc/opendkim/trusted.hosts
Add your domain name and localhost entries to the newly created file.
This tells OpenDKIM that if an email is coming from localhost or from the
same domain, then OpenDKIM should only sign the email but ignore the DKIM
verification.
127.0.0.1
localhost
.example.com
Save and close the file.
- Restart OpenDKIM Service
sudo systemctl restart opendkim
Step 5: Configure Postfix With OpenDKIM
The next step is to configure Postfix to use OpenDKIM.
- First we will change OpenDKIM socket file location. Lets create a new
directory with the following commands:
sudo mkdir /var/spool/postfix/opendkim
sudo chown opendkim:postfix /var/spool/postfix/opendkim
- Now edit the OpenDKIM configuration file in a text editor:
sudo nano /etc/opendkim.conf
Search for the Socket entry and update it as following:
Socket local:/var/spool/postfix/opendkim/opendkim.sock
Next edit the /etc/default/opendkim file:
sudo nano /etc/default/opendkim
And set the SOCKET entry as below:
SOCKET="local:/var/spool/postfix/opendkim/opendkim.sock"
- Next, you will need to edit the configuration file located at
/etc/postfix/main.cf. In this file, you will need to add the following
parameters:
- milter_default_action – This is the default action to be taken when a
message is received.
- milter_protocol – This is the protocol to be used when communicating with
OpenDKIM.
- smtpd_milters – This is the list of milters that Postfix will use.
sudo nano /etc/postfix/main.cf
Add the following lines at the end of this file, so Postfix will be able
to call OpenDKIM via the milter protocol.
# Milter configuration
milter_default_action = accept
milter_protocol = 6
smtpd_milters = local:opendkim/opendkim.sock
non_smtpd_milters = $smtpd_milters
- Once you have added the parameters, you will need to restart the OpenDKIm
and Postfix services. To do this, you will need to run the following
command:
sudo systemctl restart opendkim
sudo systemctl restart postfix
This command will restart the both service, and you will be ready to
send emails using OpenDKIM.
Step 6: Test DKIM
Send an email from system terminal as below:
mail -s "Welcome home" your_email@example.com
cc:
Your email content goes here
Press CTRL+D to sent the email and get the terminal back. Watch the log
files, On successful setup, you will see an log entry
Configure OpenDKIM with Postfix on Ubuntu
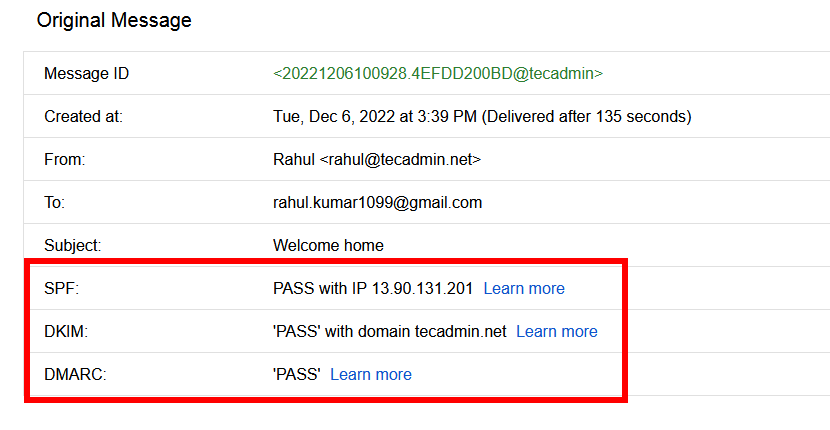
 Check the email source. I have used my personal Gmail account to test this
setup. I have received emails with the following header.
Check the email source. I have used my personal Gmail account to test this
setup. I have received emails with the following header.
 Configure OpenDKIM with Postfix on Ubuntu
You can follow our next article, to create a DMARC record for your domain.
Conclusion
Configure OpenDKIM with Postfix on Ubuntu
You can follow our next article, to create a DMARC record for your domain.
Conclusion
In this step-by-step guide, I have shown you how to install and configure
OpenDKIM with Postfix on Ubuntu. I have also shown you how to generate the
necessary public and private DKIM keys, and add them to your DNS record.
Finally, I have shown you how to configure Postfix to use OpenDKIM. So, if
you are looking to secure and protect your email traffic, DKIM is a great
tool to use. Give it a try, and unleash the power of DKIM!
If this article helped you out and you want to know more about OpenDKIM, you
should check out our other articles on the topic. We have detailed guides on
how to install and configure OpenDKIM on various platforms, as well as
troubleshooting tips and best practices. So, make sure to check them out!