Bind9 Authoritative Server
From: https://www.linuxbabe.com/ubuntu/set-up-authoritative-dns-server-ubuntu-18-04-bind9
Set Up BIND Authoritative DNS Server
on Ubuntu 22.04/20.04
Last Updated: July 18th, 2022 Xiao Guoan (Admin) 64 Comments
Ubuntu

This tutorial will be showing you how to set up and run your own authoritative
name server on Ubuntu 22.04/20.04 with the widely-used BIND 9 software.

Note: This tutorial shows the command-line method. If you want to edit DNS
records from a web GUI, I recommend setting up authoritative DNS servers with
Webmin, which is a free and open-source server control panel.


What’s An Authoritative DNS Server?

If you own a domain name and want your own DNS server to handle name resolution
for your domain name instead of using your domain registrar’s DNS server, then
you will need to set up an authoritative DNS server.

An authoritative DNS server is used by domain name owners to store DNS records.
It provides authoritative answers to DNS resolvers (like 8.8.8.8 or 1.1.1.1),
which query DNS records on behalf of end users on PC, smartphone or tablet.


About BIND

BIND (Berkeley Internet Name Domain) is an open-source, flexible and
full-featured DNS software widely used on Unix/Linux due to it’s stability and
high quality. It’s originally developed by UC Berkeley, and later in 1994 its
development was moved to Internet Systems Consortium, Inc (ISC).

BIND can act as an authoritative DNS server for a zone and a DNS resolver at the
same time. A DNS resolver can also be called a recursive name server because it
performs recursive lookups for local clients. However, taking two roles at the
same time isn’t advantageous. It’s a good practice to separate the two roles on
two different machines.

In a previous article, I explained the steps of setting up a local DNS resolver
on Ubuntu 22.04/20.04. This tutorial will show you how to set up BIND9 on
Ubuntu 22.04/20.04 as an authoritative-only DNS server with recursion disabled.


Prerequisites

To follow this tutorial, you should have already bought a domain name. I
registered my domain name at NameCheap because the price is low and they give
whois privacy protection free for life.

You also need two servers. One server is for the master DNS server and the other
is for the slave DNS server. Ideally the two servers should be at different
physical locations. If one DNS server is offline, the other DNS server can still
response to DNS queries for your domain name.

Each server needs only 512MB RAM and here are the hosting providers that I
recommend. I have used all of them.
- Vultr: Start at $2.5/month. Credit card required. You can create an account
at Vultr via my referral link to get $50 free credit.
- DigitalOcean: Start at $5/month. No credit card is required. You can use
Paypal. You can create an account at DigitalOcean via my referral link to get
$50 free credit.
Once you have bought two servers, install Ubuntu on them and follow the
instructions below.
Set up Authoritative DNS Server on
Ubuntu 22.04/20.04 with BIND9
You need to run commands in this section on both servers.
Log into the two servers via SSH and run the following commands to install
BIND 9 on Ubuntu 22.04/20.04 from the default repository. BIND 9 is the current
version and BIND 10 is a dead project.
sudo apt update
sudo apt install bind9 bind9utils bind9-doc
Check version number.
named -v
Sample output:
BIND 9.11.3-1ubuntu1.3-Ubuntu (Extended Support Version)
To check the version number and build options, run
named -V
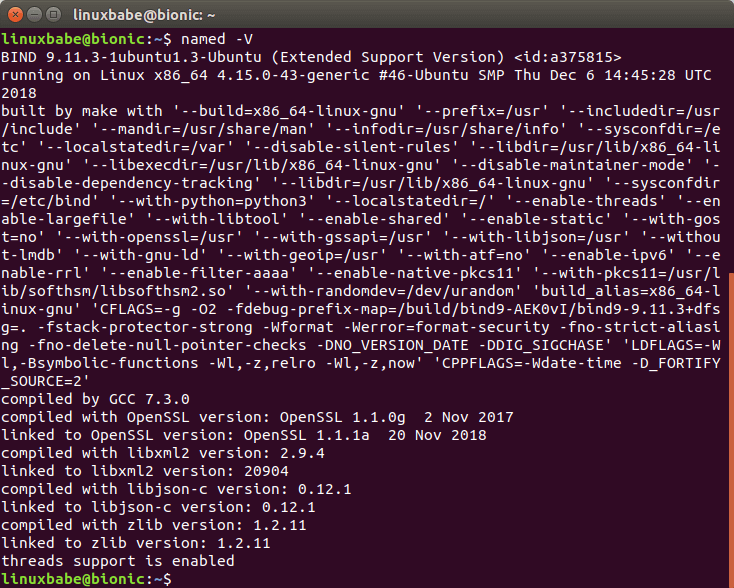 BIND version number and build option
By default, BIND automatically starts after installation.You check its status
with:
systemctl status bind9
 bind 9 ubuntu 18.04 server
If it’s not running, then start it with:
sudo systemctl start bind9
And enable auto start at boot time:
sudo systemctl enable named
The BIND server will run as the bind user, which is created during installation,
and listens on TCP and UDP port 53, as can be seen by running the following
command:
sudo netstat -lnptu | grep named
 ubuntu 18.04 bind9 setup
The BIND daemon is called named. (A daemon is a piece of software that runs in
the background.) The named binary is installed by the bind9 package and there’s
another important binary: rndc, the remote name daemon controller, which is
installed by the bind9utils package. The rndc binary is used to reload/stop and
control other aspects of the BIND daemon. Communication is done over
TCP port 953.
For example, we can check the status of the BIND name server.
sudo rndc status
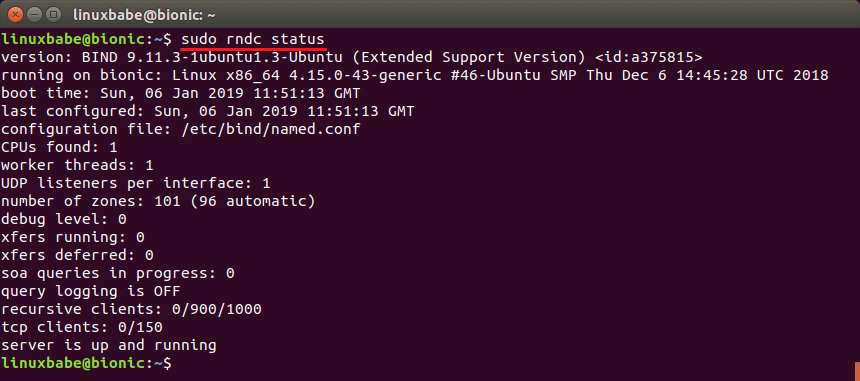 remote name daemon controller
The main BIND configuration file /etc/bind/named.conf sources the settings from
3 other files.
- /etc/bind/named.conf.options
- /etc/bind/named.conf.local
- /etc/bind/named.conf.default-zones
Out of the box, the BIND9 server on Ubuntu provides recursive service for
localhost and local network clients. Since we are setting up an authoritative
DNS server, we need to disable recursion. Edit the /etc/bind/named.conf.options
file.
sudo nano /etc/bind/named.conf.options
Add the following lines in the options {...}; clause.
// hide version number from clients for security reasons.
version "not currently available";
// disable recursion on authoritative DNS server.
recursion no;
// enable the query log
querylog yes;
// disallow zone transfer
allow-transfer { none; };
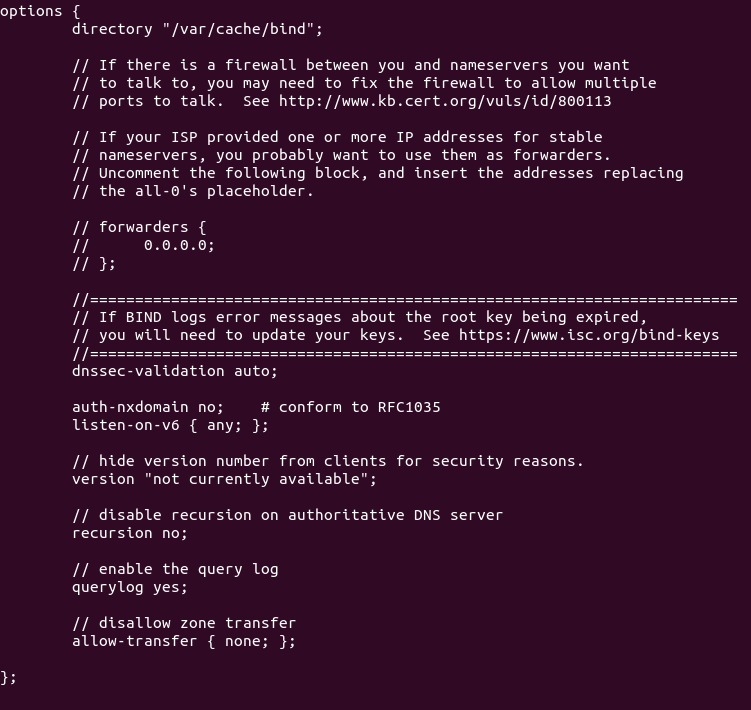 bind9 authoritative dns server ubuntu 18.04 LTS
Technically speaking, you only need to add recursion no; to disable recursion,
but it’s a good practice to add the other 3 directives. Save and close the file.
Then restart BIND.
sudo systemctl restart bind9
Master DNS Server Configuration
Pick one of the two servers as the master DNS server. We will name it
ns1.example.com.
The master DNS server holds the master copy of the zone file. Changes of DNS
records are made on this server. A domain can have one or more DNS zones. Each
DNS zone has a zone file which contains every DNS record in that zone. For
simplicity’s sake, this article assumes that you want to use a single DNS zone
to manage all DNS records for your domain name.
The /etc/bind/named.conf.default-zones file defines the root zone and localhost
zone. To add a zone for your domain name, edit /etc/bind/named.conf.local file.
sudo nano /etc/bind/named.conf.local
Add the following lines to this file. Replace example.com with your own domain
name. Replace 12.34.56.78 with the IP address of slave DNS server.
zone "example.com" {
type master;
file "/etc/bind/db.example.com";
allow-query { any; };
allow-transfer { 12.34.56.78; };
};
In the above configuration, we created a new zone with the zone clause and we
specified that this is the master zone. The zone file is
/etc/bind/db.example.com, where we will add DNS records. Zone transfer will be
only allowed for the slave DNS server. Save and close the file.
Instead of creating a zone file from scratch, we can use a zone template file.
Copy the content of db.empty to a new file.
sudo cp /etc/bind/db.empty /etc/bind/db.example.com
A zone file can contain 3 types of entries:
- Comments: start with a semicolon (;)
- Directives: start with a dollar sign ($)
- Resource Records: aka DNS records
A zone file typically consists of the following types of DNS records.
- The SOA (Start of Authority) record: defines the key characteristics of a
zone. It’s the first DNS record in the zone file and is mandatory.
- NS (Name Server) record: specifies which servers are used to store DNS
records and answer DNS queries for a domain name. There must be at least two NS
record in a zone file.
- MX (Mail Exchanger) record: specifies which hosts are responsible for email
delivery for a domain name.
- A (Address) record: Converts DNS names into IPv4 addresses.
- AAAA (Quad A) record: Converts DNS names into IPv6 addresses.
- CNAME record (Canonical Name): It’s used to create alias for a DNS name.
- TXT record: SPF, DKIM, DMARC, etc.
Now let’s edit the zone file.
sudo nano /etc/bind/db.example.com
By default, it looks like this:
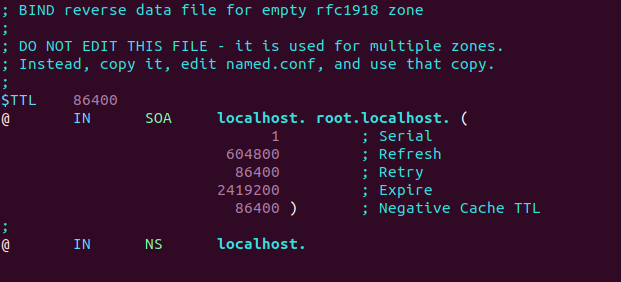 BIND9 zone transfer ubuntu
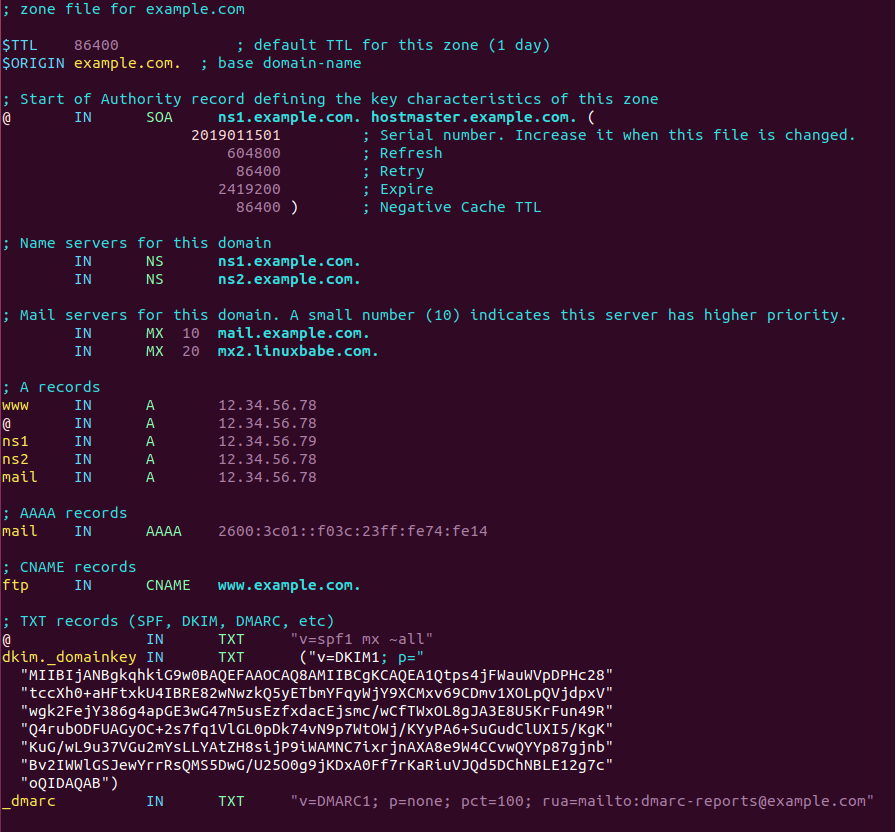
You can change it to this instead.
 bind9 master zone file
Where
- The $TTL directive defines the default Time to Live value for the zone,
which is the time a DNS record can be cached on a DNS resolver. This
directive is mandatory. The time is specified in seconds.
- The $ORIGIN directive defines the base domain.
- Domain names must end with a dot (.), which is the root domain. When a
domain name ends with a dot, it is a fully qualified domain name (FQDN).
- The @ symbol references to the base domain.
- IN is the DNS class. It stands for Internet. Other DNS classes exist but
are rarely used.
The first record in a zone file is the SOA (Start of Authority) record. This
record contains the following information:
- The master DNS server.
- Email address of the zone administrator. RFC 2142 recommends the email
address hostmaster@example.com. In the zone file, this email address takes
this form: hostmaster.example.com because the @ symbol has special meaning
in zone file.
- Zone serial number. The serial number is a way of tracking changes in zone
by the slave DNS server. By convention, the serial number takes a date
format: yyyymmddss, where yyyy is the four-digit year number, mm is the
month, dd is the day, and ss is the sequence number for the day. You must
update the serial number when changes are made to the zone file.
- Refresh value. When the refresh value is reached, the slave DNS server will
try to read the SOA record from the master DNS server. If the serial number
becomes higher, a zone transfer is initiated.
- Retry value. Defines the retry interval in seconds if the slave DNS server
fails to connect to the master DNS server.
- Expiry: If the slave DNS server has been failing to make contact with
master DNS server for this amount of time, the slave will stop responding to
DNS queries for this zone.
- Negative cache TTL: Defines the time to live value of DNS responses for
non-existent DNS names (NXDOMAIN).
TXT records are usually enclosed in double quotes. If you add DKIM record, you
also need to enclose the value with parentheses.
Note:
As of 11/19/23, AT&T does my reverse @ "uvs.rcsntx.sbcglobal.net"
To set up my AT&T reverse PTR send mail to: prov-dns@att.com
Include IP, mail server name "mail.ary.com" and AT&T account #
Save and close the file. Then run the following command to check if there are
syntax errors in the main configuration file. A silent output indicates no
errors are found.
sudo named-checkconf
Then check the syntax of zone files.
sudo named-checkzone example.com /etc/bind/db.example.com
If there are syntax errors in the zone file, you need to fix it, or this zone
won’t be loaded. The following message indicates there are no syntax errors.
zone example.com/IN: loaded serial 2019011503
OK
Then restart BIND9.
sudo systemctl restart bind9
If you are using the uncomplicated firewall (UFW), then open TCP and
UDP port 53.
sudo ufw allow 53/tcp
sudo ufw allow 53/udp
If you are using iptables firewall directly, then run the following command.
sudo iptables -A INPUT -p tcp --dport 53 -j ACCEPT
sudo iptables -A INPUT -p udp --dprot 53 -j ACCEPT
Slave DNS Server Configuration
Now we use the other server as the slave DNS server, which
will be named ns2.example.com.
First, edit the named.conf.local file.
sudo nano /etc/bind/named.conf.local
Add a zone like below. Replace 12.34.56.78 with the IP address of the master
DNS server.
zone "example.com" {
type slave;
file "db.example.com";
allow-query { any; };
masters { 12.34.56.78; };
};
In the above configuration, we specified that this is a slave DNS server for the
example.com zone and it will accept zone transfers only from a trusted IP
address.
Save and close the file. Then run the following command to check if there are
syntax errors in the main configuration file.
sudo named-checkconf
If no errors are found, restart BIND9.
sudo systemctl restart bind9
The zone file on slave DNS server are loaded from a zone transfer, which is used
to synchronize DNS record changes from master DNS server to slave DNS server.
After BIND9 restarts, zone tranfer will start immediately. Check the BIND9 log
with the following command.
sudo journalctl -eu bind9
You can see messages like below, which indicates the zone transfer is successful.
named[31518]: transfer of 'example.com/IN' from 12.34.56.78#53: Transfer
completed: 1 messages, 16 records, 886 bytes, 0.004 secs (221500 bytes/sec)
The zone file will be save as /var/cache/bind/db.example.com.
If you are using the uncomplicated firewall (UFW), then open TCP and UDP port 53.
sudo ufw allow 53/tcp
sudo ufw allow 53/udp
If you are using iptables firewall directly, then run the following command.
sudo iptables -A INPUT -p tcp --dport 53 -j ACCEPT
sudo iptables -A INPUT -p udp --dport 53 -j ACCEPT
More about Zone Transfer
The slave DNS server will contact the master again when the refresh time in SOA
record is reached and if the serial number on the master is greater than that
on the slave, a zone transfer will be initiated. There are two types of zone
transfers:
 namecheap personal name servers
 namecheap advanced dns
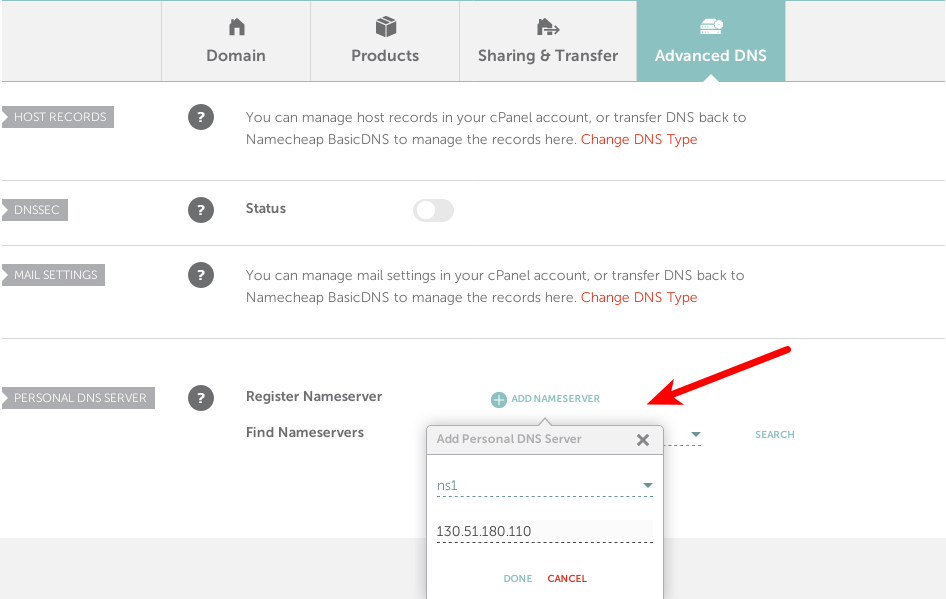
Scroll to the bottom of the page, you will find the personal DNS server section.
Click the Add NameServer button to add your own name servers: ns1.example.com
and ns2.example.com. You need to enter the IP addresses of your name servers.
 namecheap glue records
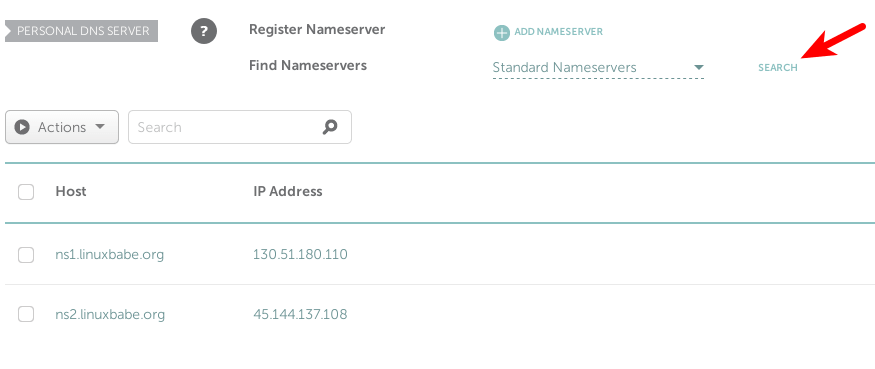
After adding your two name servers, click the search button to check if they are
added successfully. If so, the glue records will appear at the bottom of this
page.
 namecheap custom DNS record
Now click the Domain tab, and use your custom DNS server.
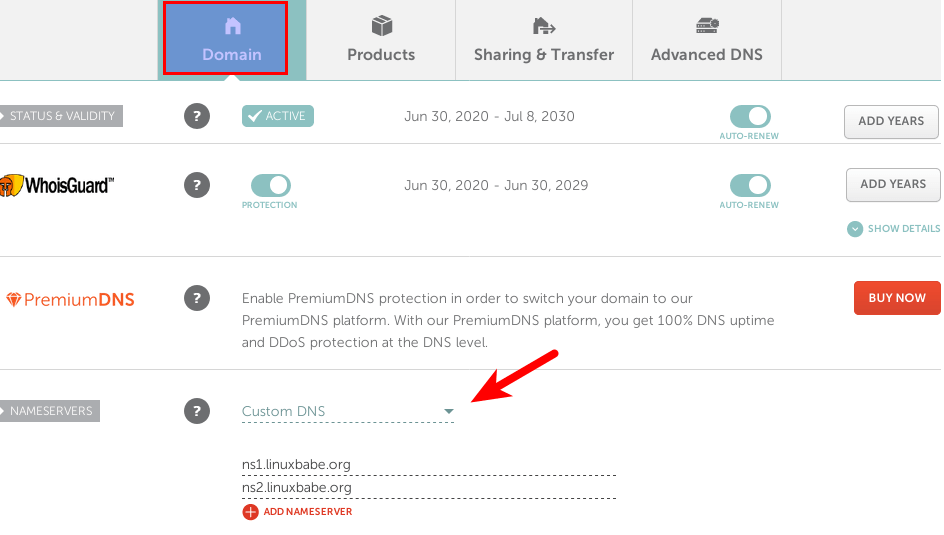 Depending on the domain registrar you use, your NS record might be propagated
instantly, or it might take up to 24 hours to propagate. You can go to
https://dnsmap.io to check if your new NS record is active.
After the NS record and glue record have been propagated to the Internet, your
DNS servers would be responding to DNS queries for your domain name. You can
check the query log with:
sudo journalctl -eu bind9
You can also use the dig utility to check the NS record of your domain name.
dig NS example.com
If the NS record and glue record have been propagated to the Internet, you
should see your name servers in the answer section. If you see the SERVFAIL
error, it’s probably because you didn’t open UDP port 53 on your name servers.
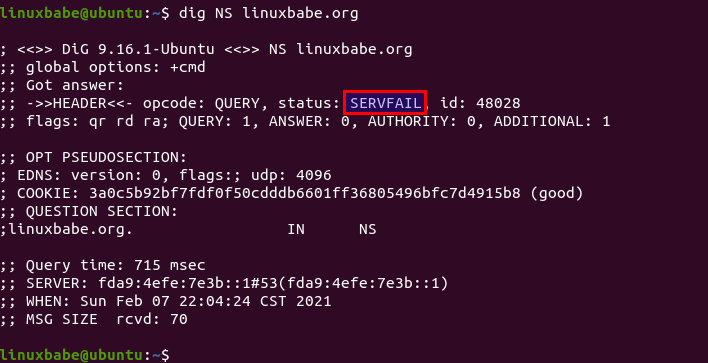 BIND NS record servfail
 BIND version number and build option
By default, BIND automatically starts after installation.You check its status
with:
 bind 9 ubuntu 18.04 server
If it’s not running, then start it with:
 ubuntu 18.04 bind9 setup
The BIND daemon is called named. (A daemon is a piece of software that runs in
the background.) The named binary is installed by the bind9 package and there’s
another important binary: rndc, the remote name daemon controller, which is
installed by the bind9utils package. The rndc binary is used to reload/stop and
control other aspects of the BIND daemon. Communication is done over
TCP port 953.
For example, we can check the status of the BIND name server.
 remote name daemon controller
The main BIND configuration file /etc/bind/named.conf sources the settings from
3 other files.
 bind9 authoritative dns server ubuntu 18.04 LTS
Technically speaking, you only need to add recursion no; to disable recursion,
but it’s a good practice to add the other 3 directives. Save and close the file.
Then restart BIND.
 BIND9 zone transfer ubuntu
You can change it to this instead.
 bind9 master zone file
Where