Ubuntu CD Welcome Page Options When the Ubuntu CD is started and not interrupted the CD will boot to a welcome screen which gives the user the option to install or try Ubuntu. This screen will remain visible until a selection is made. http://pix.toile-libre.org/upload/original/1354179916.png
- Try Ubuntu
- The CD will boot to the Ubuntu Desktop. The user may use the system, install applications and drivers, connect to the Internet, access other partitions, and use many of Ubuntu's features.
- Changes made during the session are not persistent. Any changes made will be lost when the user exits Ubuntu.
- Install Ubuntu
- Clicking on the install button or double-clicking a language selection will start the installation process.
- For more information on the installing Ubuntu, refer to ....
Ubuntu CD Advanced Welcome Page Options As the CD boots, the user can gain access to the advanced page and its options by pressing any key when the small logo appears at the bottom of your screen: Here is the advanced welcome page:
 Here is a brief explanation of each main option:
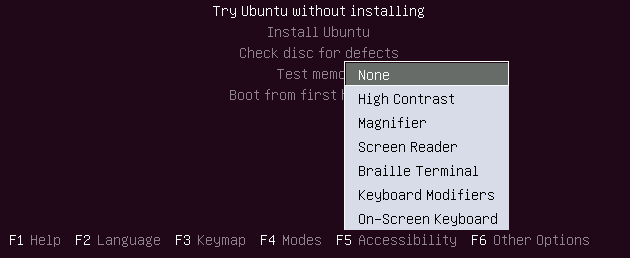
- Try Ubuntu without installing. As indicated, selecting this option will boot to the Ubuntu desktop. Ubuntu will attempt to identify and use system hardware and allow the user to connect to the Internet. Default software such as OpenOffice and Firefox are available and the user can install additional software via Internet download. An "Install" icon is available on the Desktop should the user wish to begin the standard installation without rebooting. At the end of a LiveCd session, unless a installation is completed, none of the changes you have made will be retained.
- Install Ubuntu Begin the standard Ubuntu installation on the user's computer or external drive.
- Check disc for defects
- Test memory
- Initiates a Memtest86+ test.
- Pressing ESC terminates the test.
- Boot from first hard disk
Changing the CD's Default Boot Options
 To supplement the main boot options, the F1-F6 keys provide additional
information and boot options for special circumstances. These options are
accessed by pressing any key before the Welcome screen appears. Pressing the
ESC key or selecting a language will display the main screen.
Although they are not normally needed, these options provide additional
assistance in getting the CD to boot for a variety of issues. Any changes
made will affect the current boot only and must be made each time the CD is
booted.
To supplement the main boot options, the F1-F6 keys provide additional
information and boot options for special circumstances. These options are
accessed by pressing any key before the Welcome screen appears. Pressing the
ESC key or selecting a language will display the main screen.
Although they are not normally needed, these options provide additional
assistance in getting the CD to boot for a variety of issues. Any changes
made will affect the current boot only and must be made each time the CD is
booted.
- F1. Help index presenting information regarding prerequisites for running
Ubuntu, boot methods and special boot parameters.
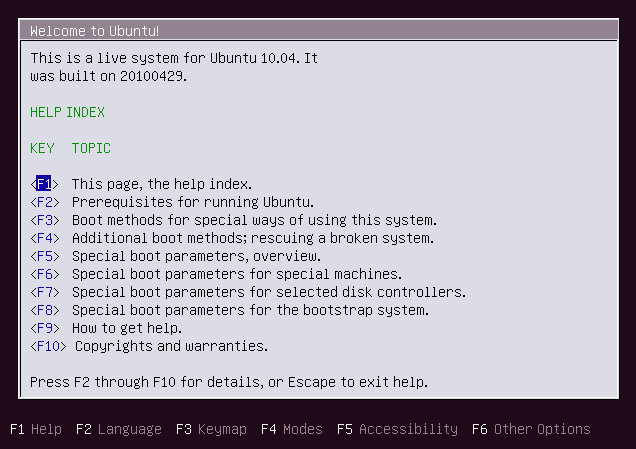
- Special Information: F1 > F6 & F7
- After pressing F1, pressing the F6 or F7 key provides additional information which might be useful for users having problems booting the CD.
- F1, then F6: Kernel parameters for booting IBM PS1, disabling USB ports, computers locking up during boot, and more.
- F1, then F7: Kernel parameters for Adaptec, BusLogic and certain Dell hardware.
- F2. Language selection. This displays the same screen as is presented initially.
- F3. Keymap selections by country.
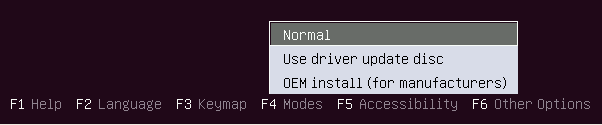
- F4. Modes. Use this option when a specific driver must be loaded to allow
installation or booting to the LiveCD Desktop. Once Ubuntu is installed or
booted, the user can permanently install the required drivers.
- F5. Accessibility Options. Various options to assist users with visual impairment,
as well as an onscreen keyboard option and keyboard modifiers. To employ these
features use the arrow keys to highlight the option and press ENTER. Repeat this
for each additional option desired. To remove all options, highlight "None" and
press ENTER. Selected options will be loaded during boot. Accessibility options
may also be added after installation. Look for Assistive Technologies and
at-spi in Synaptic.
- F6. Other Options. ACPI (Advanced Configuration and Power Interface) and EDD
(Enhanced Disk Drive) options which may help if your computer does not support
or has problems with these systems. Highlight the selection and press the ENTER
key or SPACE key to select it. An "X" will appear, indicating selection.
Multiple items can be selected from this popup menu. Hit ESC to leave the popup
menu. The selections are retained at the time the user presses the ESC key.

- In addition to displaying preset boot options, pressing the F6 key also opens the "Boot Options" line for manual editing once the popup window is closed. (See next section).
Changing the CD Boot Option Configuration Line In addition to displaying a popup menu, the F6 key also activates in-line editing of the boot command. Pressing F6 brings up the popup menu. Pressing ESC, whether selections were made or not, removes the popup window but opens the boot command for editing. The phrase "Boot Options" is fixed on the left side of the screen. The command scrolls off to the left to leave the right end available for appending. The user may add additional inputs before or after the "-- ". Allow one space between each additional input. The "-- " entry defines the boundary between options which are specific to the installer and ones that are copied to the target system. Often you would like to copy the boot option to the target system, so add the option at the very end of the line, after the "-- ". This link describes a new way to use a boot option. Sometimes it must be entered twice, before and after the delimiter "-- ". We find it in Ubuntu Server 14.04.2 and when testing future versions, and we expect it to come into the Ubuntu mini. iso file with the version 15.04.
- Editing the boot command line.

- Press the F6 key.
- If desired, select one or more options with the arrow keys, then press ENTER or the SPACE key to select them.
- Any popup menu option enabled when ESC is pressed is retained.
- Press ESC to remove the popup screen. The boot command line is now available for editing and will remain so as long as no popup menu is visible.
- Leave a space following the "--" and add the desired option (A list of Common Boot Options which can be added to the command line is presented later on this page.). If entering multiple options leave a space between each entry.
- The command will be executed when ENTER is pressed and the boot sequence will begin.
- The F1-F6 keys will still respond and the user can make additional menu selections.
- The command line will be accessible for appending until ENTER is pressed.
- Pressing ENTER will start the boot sequence.
- Example Entry.
- Above is an example of adding the vga=771 option to the end of the Boot Options line.
- Note there is a space following "--" and before the added option.
- Ubuntu now uses Grub 2 as its bootloader. The "vga=" option shown in the example is deprecated in Grub 2 but will still work. After Ubuntu is installed on a system the user should make the appropriate graphics mode entries in the Grub 2 configuration files.
- Press the F6 key.
Changing boot options Temporarily for an Existing Installation See the Grub2 page.
Changing boot options Permanently for an Existing Installation This can be done by :
- manually editing GRUB2 configuration file then updating GRUB
- or using the "GRUB options" tab of Boot-Repair. In this tab, you can either add an option from the "Add a kernel option" list, or click the "Edit GRUB configuration file" button then add/remove any option in the GRUB_CMDLINE_LINUX_DEFAULT line then save the file. Then click Apply.
Common Kernel Options This list is not comprehensive but it contains some common boot options which may be added to the end of the boot command.