ESP32 touch sensor – How to use touch pins as a button
In this tutorial, You will be learning how to use ESP32 development board touch
sensor and how to use esp32 touch sensor as a push button without any need to
connect an external push button. ESP32 chip provides ten touch sensor. These
touch sensors are built in with ESP32 chip. These touch sensors are the
capacitive type. These touch sensors are shared with GPIO pins of ESP32.
Capacitive sensor can detect electrical changes on respective GPIO pins. For
example, if you touch any of these pins, GPIO pin will produce output according
to electrical charge on your finger. Because the human body also holds some
electrical charge. Therefore these touch sensors are also known as capacitive
sensors. So now let’s see which GPIO pins mapped to these sensors and after
that, we will see how to use them to measure electrical variations and at the
end of the article, I will give you an example of how to use these sensors as a
button or push button. you can check our project on real push button interfacing
with ESP32 development board.
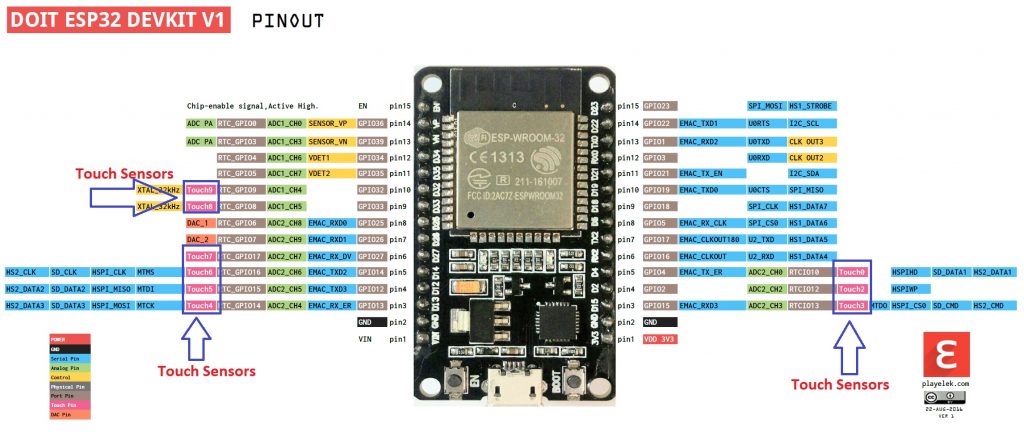
Pin mapping of ESP32 GPIO pins with Touch sensors in Devkit
Pin mapping of touch pins with GPIO pins is shown below. This pin mapping is for
ESP32 Devkit DOIT. But you can check the pinout image of other types of ESP32
development boards. Devkit supports 9 touch pins out of total 10 touch pins
available on ESP32 WROOM chip. Touch1 is not available on this version of ESP32.
Because Touch1 is shared with GPIO0 and it is not available on Devkit DOIT
board. Rest of the pin mapping is given below and also shown in the image
below. In image blue color rectangles are showing a touch sensor on both sides
of the development board.
Touch0 >> GPIO4
Touch1 >> Not available on Devkit 30 pin version but available on Devkit 36 pin version
Touch2 >> GPIO2
Touch3 >> GPIO15
Touch4 >> GPIO13
Touch5 >> GPIO12
Touch6 >> GPIO14
Touch7 >> GPIO27
Touch8 >> GPIO33
Touch9 >> GPIO32
ESP32 touch sensors pinout with Devkit DOIT
 So now let’s see how to program touch sensor pin and read electrical changes on
these pins. But before starting this tutorial, the following are the
prerequisites for this tutorial:
processing of installing of ESP32 library in Arduino IDE
How to use GPIO pins of ESP32 as digital output
How to use digital input pins of ESP32
How to use analog to digital converter with ESP32 devkit board
So now let’s see how to program touch sensor pin and read electrical changes on
these pins. But before starting this tutorial, the following are the
prerequisites for this tutorial:
processing of installing of ESP32 library in Arduino IDE
How to use GPIO pins of ESP32 as digital output
How to use digital input pins of ESP32
How to use analog to digital converter with ESP32 devkit board
Now make this circuit diagram on the breadboard.
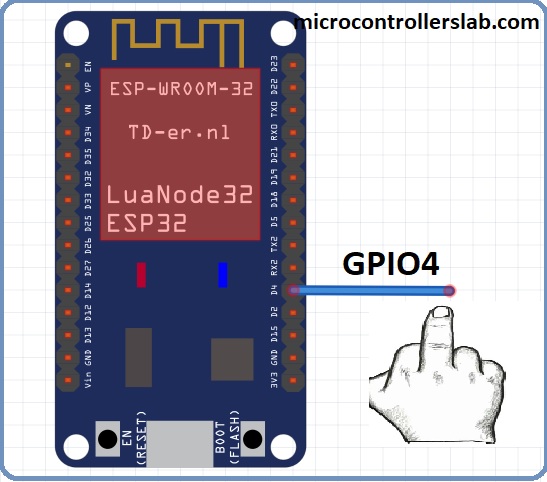 Touch sensor of ESP32
In the above circuit diagram touch0 is used which is mapped with GPIO4. Now
let’s see how to write code to measure touch sensor value and send this value on
the serial monitor of Arduino IDE.
Touch sensor of ESP32
In the above circuit diagram touch0 is used which is mapped with GPIO4. Now
let’s see how to write code to measure touch sensor value and send this value on
the serial monitor of Arduino IDE.
Program of touch sensor ESP32
To write code for the touch sensor, we need to touchRead function of Arduino.
It is very easy to use the touchRead function.
touchRead(touch_sensor_pin_number) :
This function is used to read the value of touch sensor value associated with
the touch pin. you only need to pass the name of touch pin to this function. For
example, if you want to use touch pin zero, you will simply use this function
like this touchRead(T0) .
Now, let’s move to working part of this function. Below is a simple code for
this tutorial.
/*H********************************************************************
*
**********************************************************************/
int touch_sensor_value=0;
/*F********************************************************************
*
**********************************************************************/
void
setup()
{
Serial.begin( 115200 );
Serial.println( "Touch sensor tutorial ESP32");
}
/*F********************************************************************
*
**********************************************************************/
void
loop()
{
touch_sensor_value = touchRead( T0 );
Serial.print( "Touch0 value is = ");
Serial.println( touch_sensor_value );
delay( 1000 );
}
In this code, variable touch_sensor_value is used to store the output of
touchRead function.
int touch_sensor_value=0;
In the setup function, uart communication is initialized with a baud rate of
115200 and after that Serial.println() function is used to transmit string
“Touch sensor tutorial ESP32” to serial monitor of Arduino IDE.
Serial.begin( 115200 );
Serial.println( "Touch sensor tutorial ESP32" );
Now comes the main part of this tutorial loop, in the loop part, touchRead(T0)
function will read the value of the touch sensor on GPIO4 and will save its
value in variable touch_sensor_value. So now the reading part has done. After
that serial library function first sends a string “Touch0 value is = ” to serial
monitor and after that, the value of the touch sensor will be sent. This process
will repeat itself after every one second.
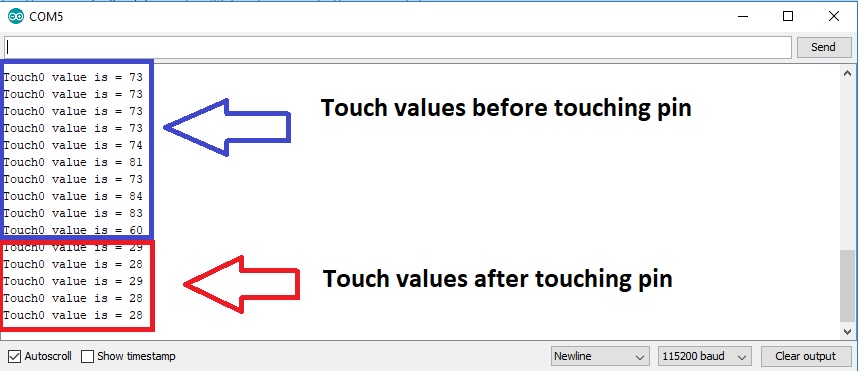
Without touching the pin with a finger, you will see higher values of touch
sensor output on a serial monitor.
After you touch the wire connected with GPIO four, you will notice that the
values will start decreasing.
Now you need to upload this code to ESP32 board and you will see the output
like this:Touch pins output ESP32
How to use the touch sensor as a button in ESP32
Now, we will see an example of using ESP32 touch pins as a digital button.
Instead of using an external button, you can use any touch pin as a digital
input pin for button.. But to do so, you need to find the threshold of touch pin.
By threshold, I mean what is the value without touching the wire and what is the
highest value of the touch sensor after touching the wire. just note down this
value and we will use it in our code to use touch pins as a digital button. You
can find the threshold by simply uploading the same code given above. Just
measure these values on the serial monitor of Arduino IDE and note down the
threshold value.
For example in our case threshold is between 20-30.
Without touching the wire, the output is around 60-80
After touching the wire the output is between 20-30.
So we can use a threshold of less than 30.
we will turn on the LED if the threshold is less than or equal to 30.
If the threshold is greater than 30, light emitting diode will remain off.
Following is a circuit diagram used to control LED with a touch pin as a button.
Wire this circuit with required components:
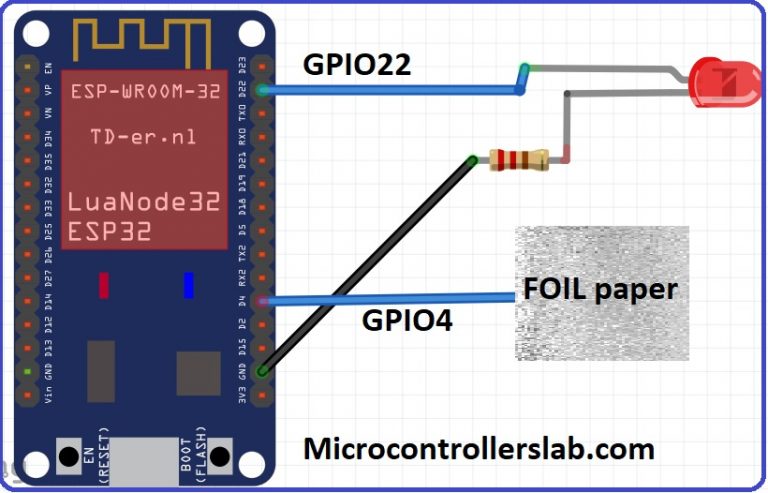 ESP32 touch sensor as button with Arduino IDE
In this circuit diagram, the touch sensor zero touch0 is used. You can use a
silver color aluminum foil paper with a touch pin for better connection and
output as shown in the picture.
LED is connected with general purpose input output pin 22 through the 330ohm
resistor.
When we touch the foil, LED will glow otherwise LED will remain in the off
state.
Program for this tutorial is given below.
First three lines define a name to touch pin, led pin and define integer
variables to store sensor value and threshold.
VALUE_THRESHOLD variable is defined as a constant type because we do want to
modify it in our program.
Rest of the code is the same as above code except if else condition which
checks threshold value and makes LED on and off
/*H********************************************************************
*
**********************************************************************/
#define touch_pin_numer T0
const int LED_PIN_NUMBER = 22;
const int VALUE_THRESHOLD = 30;
int TOUCH_SENSOR_VALUE;
/*F********************************************************************
*
**********************************************************************/
void
setup()
{
delay( 1000 );
pinMode( LED_PIN_NUMBER, OUTPUT );
}
/*F********************************************************************
*
**********************************************************************/
void
loop()
{
TOUCH_SENSOR_VALUE = touchRead( touch_pin_numer );
Serial.print( TOUCH_SENSOR_VALUE );
if( TOUCH_SENSOR_VALUE < VALUE_THRESHOLD)
digitalWrite( LED_PIN_NUMBER, HIGH );
else
digitalWrite( LED_PIN_NUMBER, LOW );
}
Code for this example is the same as we used in the first example. except for
the threshold variable and LED blinking part. I have already talked about LED
blinking in previous tutorials.
ESP32 touch sensor as button with Arduino IDE
In this circuit diagram, the touch sensor zero touch0 is used. You can use a
silver color aluminum foil paper with a touch pin for better connection and
output as shown in the picture.
LED is connected with general purpose input output pin 22 through the 330ohm
resistor.
When we touch the foil, LED will glow otherwise LED will remain in the off
state.
Program for this tutorial is given below.
First three lines define a name to touch pin, led pin and define integer
variables to store sensor value and threshold.
VALUE_THRESHOLD variable is defined as a constant type because we do want to
modify it in our program.
Rest of the code is the same as above code except if else condition which
checks threshold value and makes LED on and off
/*H********************************************************************
*
**********************************************************************/
#define touch_pin_numer T0
const int LED_PIN_NUMBER = 22;
const int VALUE_THRESHOLD = 30;
int TOUCH_SENSOR_VALUE;
/*F********************************************************************
*
**********************************************************************/
void
setup()
{
delay( 1000 );
pinMode( LED_PIN_NUMBER, OUTPUT );
}
/*F********************************************************************
*
**********************************************************************/
void
loop()
{
TOUCH_SENSOR_VALUE = touchRead( touch_pin_numer );
Serial.print( TOUCH_SENSOR_VALUE );
if( TOUCH_SENSOR_VALUE < VALUE_THRESHOLD)
digitalWrite( LED_PIN_NUMBER, HIGH );
else
digitalWrite( LED_PIN_NUMBER, LOW );
}
Code for this example is the same as we used in the first example. except for
the threshold variable and LED blinking part. I have already talked about LED
blinking in previous tutorials.