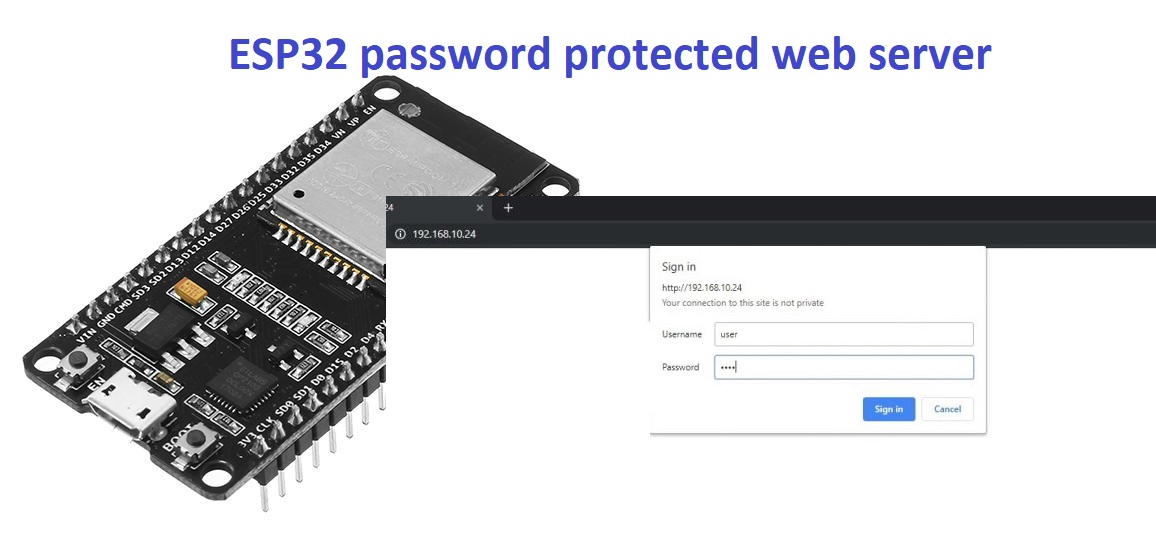
Password Protected Web Server
Fromp; https://microcontrollerslab.com/esp32-password-protected-web-server-in-arduino-ide/
ESP32 Password protected web server in Arduino IDE

In this tutorial, we will be designing a password-protected web server with
ESP32 and Arduino IDE. If you have made the home automation project using ESP32
and you are accessing all information on the web server, and you want to make
your web server confidential by adding a password login information, this
tutorial will help you to add the password to your web server. It will make your
web server protected and will be accessible through a password and user name
only. When you try to access it, you will see a window to enter ‘password’ and
‘user name”.  So now let’s get started with this tutorial. ESP32 password
protected web server in Arduino IDE with examples


Prerequisites for this tutorial
- You should know how to upload code to ESP32 in Arduino IDE: installing ESP32
library in Arduino IDE and upload code.
You should know how to make the Web server with ESP32. You can check these two
ESP32 based projects:
- Create simple ESP32 web server to control LEDs from the web page
- Displaying DHT11 temperature and humidity values on the web page using ESP32
Now first we will create a simple web server which will display text using HTML
on the web page like this: HTML file ESP32 web server password protected
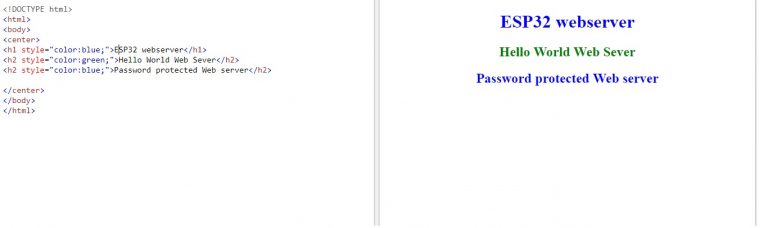 On the right-hand side is an HTML code and on the left side is what you will see
on the web page.
Simple ESP32 Web Server
On the right-hand side is an HTML code and on the left side is what you will see
on the web page.
Simple ESP32 Web Server
Code for the simple ESP32 web server is given below. Copy this code and upload
it to the ESP32 development board.
/*F********************************************************************
*
**********************************************************************/
#include
//************************* DEFINES ************************************
#define BAUD 9600
const char* ssid = "PTCL-BB"; // make sure to change it with your Wifi name
const char* password = "5387c614"; // change this with your WiFi password
//************************* PROTOTYPES ************************************
//************************* VARIABLES ************************************
WiFiServer server( 80 );
String header;
/*F********************************************************************
*
**********************************************************************/
void
setup()
{
Serial.begin( BAUD );
Serial.print( "Connecting to ");
Serial.println( ssid );
WiFi.begin( ssid, password );
while( WiFi.status() != WL_CONNECTED)
{
delay( 500 );
Serial.print( "." );
}
// Print local IP address and start web server
Serial.println( "" );
Serial.println( "WiFi connected." );
Serial.println( "IP address: " );
Serial.println( WiFi.localIP() );
server.begin();
}
/*F********************************************************************
*
**********************************************************************/
void
loop()
{
WiFiClient client = server.available(); // Listen for incoming clients
if( client )
{ // If a new client connects,
Serial.println( "New Client." ); // print a message out in the serial port
String currentLine = ""; // STRING TO HOLD INCOMING DATA FROM CLIENT
while( client.connected() )
{ // LOOP WHILE CLIENT'S CONNECTED
if( client.available() )
{ // IF THERE'S BYTES TO READ FROM THE CLIENT,
char c = client.read(); // READ A BYTE, THEN
Serial.write( c ); // PRINT ON SERIAL MONITOR
header += c;
if( c == '\n' )
{ // IF BYTE IS A NEWLINE CHARACTER
// IF CURRENT LINE BLANK, GOT TWO NEWLINE CHARS IN A ROW
// THAT'S END OF CLIENT HTTP REQUEST, SO RESPOND
if( currentLine.length() == 0 )
{
client.println( "HTTP/1.1 200 OK" );
client.println( "Content-type:text/html" );
client.println( "Connection: close" );
client.println();
client.println( "<!DOCTYPE html>\n" );
client.println( "<html>\n" );
client.println( "<body>\n" );
client.println( "<center>\n" );
client.println( "<h1 style=\"color:blue;\">"
"ESP32 webserver</h1>\n" );
client.println( "<h2 style=\"color:green;\">"
"Hello World Web Sever</h2>\n" );
client.println( "<h2 style=\"color:blue;\">"
"Password protected Web server</h2>\n" );
client.println( "</center>\n" );
client.println( "</body>\n" );
client.println( "</html>" );
break;
}
else
{ // IF YOU GOT A NEWLINE, THEN CLEAR CURRENTlINE
currentLine = "";
}
}
else
if( c != '\r' )
{ // IF RVC'D ANYTHING ELSE BUT A CARRIAGE RETURN CHARACTER,
currentLine += c; // ADD IT TO END OF CURRENTlINE
}
}
}
header = ""; // CLEAR HEADER VARIABLE
client.stop(); // CLOSE CONNECTION
Serial.println( "Client disconnected." );
Serial.println( "" );
}
}
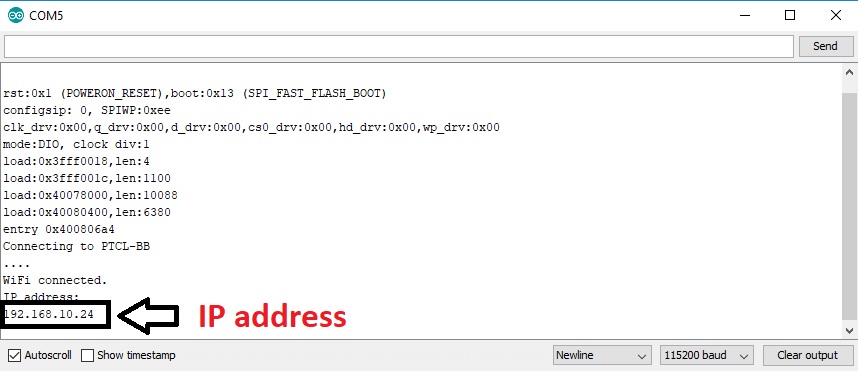
- After uploading the code, click on serial monitor and get the IP address as
shown below: ESP32 password protected web server IP address
- Now paste this IP address in any web browser and hit the enter button. You
will see this web page displaying in the web browser. ESP32 password protected
web server display page
- You will see that you will be able to access this web page by using the IP
address which is assigned to ESP32 board.
- Anyone who has this IP address can access this web page.
- Now if you want to make it password protected, we need to add authentication
code in the above code.
- I am not explaining the above code in this tutorial. Because it is similar
to the codes discussed in create ESP32 web server tutorial and displaying
sensors values on the web server using ESP32.
- I recommend you to check these articles for more information on how this
code works? Like how to connect with WiFi and how to serve web pages with ESP32.
Now let’s move to the main part of this tutorial.
Password protected web page
/*F********************************************************************
This is a complete code on password protected web server using ESP32.
This code is same as the above code except the authentication part
which I will discuss in code working part.
Load Wi-Fi library
**********************************************************************/
#include
//************************* DEFINES ************************************
//************************* PROTOTYPES ************************************
//************************* VARIABLES ************************************
// Replace with your network credentials
const char* ssid = "PTCL-BB";
const char* password = "5387c614";
// Set web server port number to 80
WiFiServer server(80);
String header;
// Variable to store the HTTP request
/*F********************************************************************
*
**********************************************************************/
void
setup()
{
Serial.begin( 115200 );
Serial.print( "Connecting to " );// Connect to Wi-Fi net with SSID and password
Serial.println( ssid );
WiFi.begin( ssid, password );
while( WiFi.status() != WL_CONNECTED )
{
delay( 500 );
Serial.print( "." );
}
// Print local IP address and start web server
Serial.println( "" );
Serial.println( "WiFi connected." );
Serial.println( "IP address: " );
Serial.println( WiFi.localIP() );
server.begin();
}
/*F********************************************************************
*
**********************************************************************/
void
loop()
{
WiFiClient client = server.available(); // Listen for incoming clients
if( client )
{ // If a new client connects,
Serial.println( "New Client." ); // print a message out in the serial port
String currentLine = ""; // make a String to hold incoming data from the client
while( client.connected() )
{ // loop while the client's connected
if( client.available() )
{ // if there's bytes to read from the client,
char c = client.read(); // read a byte, then
Serial.write( c ); // print it out the serial monitor
header += c;
if( c == '\n' )
{ // if the byte is a newline character
// if the current line is blank, you got two newline characters in a row.
// that's the end of the client HTTP request, so send a response:
if( currentLine.length() == 0 )
{ // checking if header is valid
// dXNlcjpwYXNz = 'user:pass' ( user:pass ) base64 encode
// Finding the right credential string, then loads web page
if( header.indexOf( "dXNlcjpwYXNz" ) >= 0 )
{
client.println( "HTTP/1.1 200 OK" );
client.println( "Content-type:text/html" );
client.println( "Connection: close" );
client.println();
client.println( "<!DOCTYPE html>\n" );
client.println( "<html>\n" );
client.println( "<body>\n" );
client.println( "<center>\n" );
client.println( "<h1 style=\"color:blue;\">ESP32 webserver</h1>\n" );
client.println( "<h2 style=\"color:green;\">Hello World Web Sever</h2>\n" );
client.println( "<h2 style=\"color:blue;\">Password protected Web server</h2>\n" );
client.println( "</center>\n" );
client.println( "</body>\n" );
client.println( "</html>" );
break;
}
// Wrong user or password, so HTTP request fails...
else {
client.println( "HTTP/1.1 401 Unauthorized" );
client.println( "WWW-Authenticate: Basic realm=\"Secure\"" );
client.println( "Content-Type: text/html" );
client.println();
client.println( "Authentication failed" );
break;
}
}
else
{ // if you got a newline, then clear currentLine
currentLine = "";
}
} else if( c != '\r' )
{ // if you got anything else but a carriage return character,
currentLine += c; // add it to the end of the currentLine
}
}
}
// Clear the header variable
header = "";
// Close the connection
client.stop();
Serial.println( "Client disconnected." );
Serial.println( "" );
}
}
This is the new code added to the above code which adds password protection.
if( header.indexOf( "dXNlcjpwYXNz" ) >= 0)
{
// Your web server HTML and css files
}
Here ‘if’ condition checks if password and username are found in the string
header which is used to store all incoming HTTP requests from the web client.
Here this string “dXNlcjpwYXNz” contains both user name and password in base64
encoded. if password and user name is correct, it will display the HTML and CSS
files inside this condition.
These lines add the password protected feature to the web server. If the entered
password and user name are not correct. You will see the message “Authentication
failed” in the web browser.
else
{
client.println( "HTTP/1.1 401 Unauthorized" );
client.println( "WWW-Authenticate: Basic realm=\"Secure\"" );
client.println( "Content-Type: text/html" );
client.println();
client.println( "<html>Authentication failed<html> );
}
So the default password which I have used in this example is:
user name: 'user'
password = 'pass'
I will shortly tell you how to change the password and user name. If you upload
this code to ESP32 and try to access the web page through the IP address, you
will see this in the web browser:
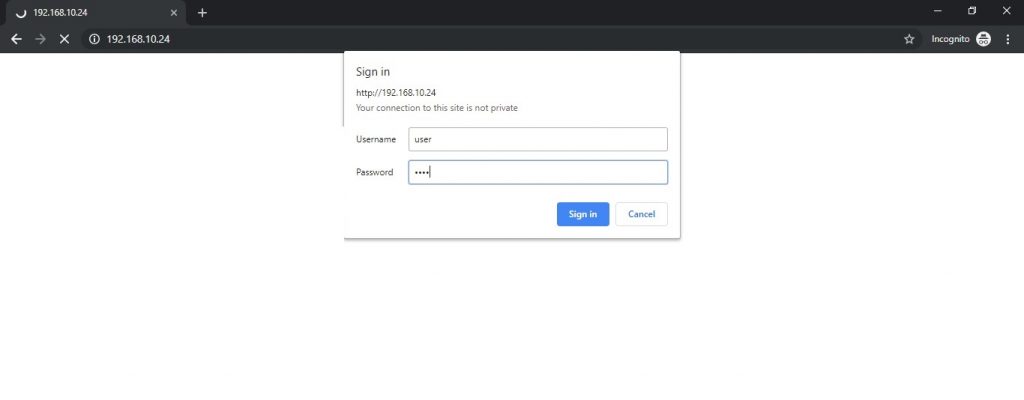 ESP32 password protected web server in Arduino IDE
- Now you need to enter the user name and password and press on the sign in
button.
- You will be able to see the web page as shown below. Otherwise, if the
entered details are not correct, you will see “Authentication failed” message in
the web browser. ESP32 password protected web server display page
- Now if you want to change the user name and password, go to this link
https://www.base64encode.org/
- In the Encode to Base64 format types, enter your ‘user name: password’.
Separate the user name and password with ‘:’.changing user name and password
ESP32
- After that press the ‘ENCODE button’. You will see the encoded message in
string format. Encoded message ESP32 password protected web server
- As you can see for ‘user: pass’ the encoded string is dXNlcjpwYXNz. Copy
this string to the if condition in the code as shown below:
if( header.indexOf("dXNlcjpwYXNz") >= 0 )
This how you can change user name and password very quickly. This is all about
this password protected web server tutorial. Check our fuhrer ESP32 related
project:
ESP32 Web server to control LED from web page
ESP32 Web server to control Servo motor
Display pressure and temperature on web page
Accessing Web server from anywhere in the world
Soft access point ESP32 Web server