ESP32 Http GET POST
From: https://randomnerdtutorials.com/esp8266-nodemcu-http-get-post
-arduino/
ESP8266 NodeMCU HTTP GET and HTTP POST
with Arduino IDE (JSON, URL
Encoded, Text)

In this guide, you’ll learn how to make HTTP GET and HTTP POST requests
with the ESP8266 NodeMCU board with Arduino IDE. We’ll cover examples on
how to get values, post JSON objects, URL encoded requests, and more.


ESP8266 NodeMCU HTTP GET and HTTP POST with Arduino IDE JSON URL Encoded
Text

Recommended: ESP32 HTTP GET and HTTP POST with Arduino IDE (JSON, URL
Encoded, Text)


HTTP Request Methods: GET vs POST

The Hypertext Transfer Protocol (HTTP) works as a request-response protocol
between a client and server. Here’s an example:
- The ESP8266 (client) submits an HTTP request to a Raspberry Pi running
Node-RED (server);
- The server returns a response to the ESP8266 (client);
- Finally, the response contains status information about the request and
may also contain the requested content.
HTTP GET
GET is used to request data from a specified resource. It is often used to
get values from APIs.
For example, you can have:
GET /update-sensor?temperature=value1
Note that the query string (name = temperature and value = value1) is sent
in the URL of the HTTP GET request.
Or you can use a simple request to return a value or JSON object, for example:
GET /get-sensor
(With HTTP GET, data is visible to everyone in the URL request.)
HTTP POST
POST is used to send data to a server to create/update a resource. For example,
publish sensor readings to a server.
The data sent to the server with POST is stored in the request body of the HTTP
request:
POST /update-sensor HTTP/1.1
Host: example.com
api_key=api&sensor_name=name&temperature=value1&humidity
=value2&pressure=value3
Content-Type: application/x-www-form-urlencoded
In the body request, you can also send a JSON object:
POST /update-sensor HTTP/1.1
Host: example.com
{api_key: "api", sensor_name: "name", temperature: value1, humidity:
value2,pressure: value3}
Content-Type: application/json
(With HTTP POST, data is not visible in the URL request. However, if it’s
not encrypted, it’s still visible in the request body.)
HTTP GET/POST with ESP8266
In this guide, we’ll explore the following scenarios:
- ESP8266 HTTP GET: Value or Query in URL
- ESP8266 HTTP GET: JSON Data Object or Plain Text
- ESP8266 HTTP POST: URL Encoded, JSON Data Object, Plain Text
Prerequisites
Before proceeding with this tutorial, make sure you complete the following
prerequisites.
Arduino IDE
We’ll program the ESP8266 NodeMCU board using Arduino IDE, so make sure
you have the ESP8266 add-on installed.
Installing the ESP8266 Board in Arduino IDE (Windows, Mac OS X, Linux)
Arduino_JSON Library
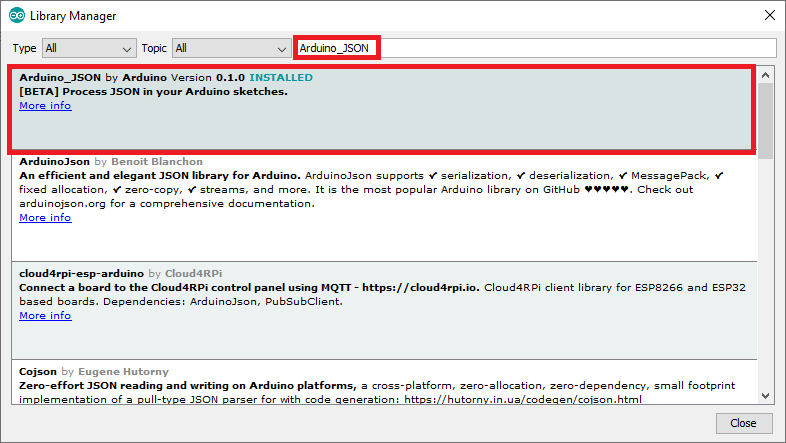
You also need to install the Arduino_JSON library. You can install this
library in the Arduino IDE Library Manager. Just go to Sketch > Include
Library > Manage Libraries and search for the library name as follows:
 Install Arduino JSON library Arduino IDE
Parts Required
For this tutorial you need the following parts:
- ESP8266 (read Best ESP8266 development boards)
- Raspberry Pi board (read Best Raspberry Pi Starter Kits)
- MicroSD Card – 16GB Class10
- Raspberry Pi Power Supply (5V 2.5A)
- Jumper wires
- Breadboard
You can use the preceding links or go directly to MakerAdvisor.com/tools to
find all the parts for your projects at the best price!
Preparing Node-RED (optional)
As an example, we’ll create a web service with a Raspberry Pi and Node-RED
to act as a web service (like an API). Basically, you’ll make HTTP GET and
HTTP POST requests to your Raspberry Pi to get values or update them. You can
use any other web service.
If you don’t have Node-RED installed, follow the next tutorials:
- Getting Started with Node-RED on Raspberry Pi
- Installing and Getting Started with Node-RED Dashboard
Having Node-RED running on your Raspberry Pi, go to your Raspberry Pi IP
address followed by :1880.
http://raspberry-pi-ip-address:1880
The Node-RED interface should open. You can simply import the final flow:
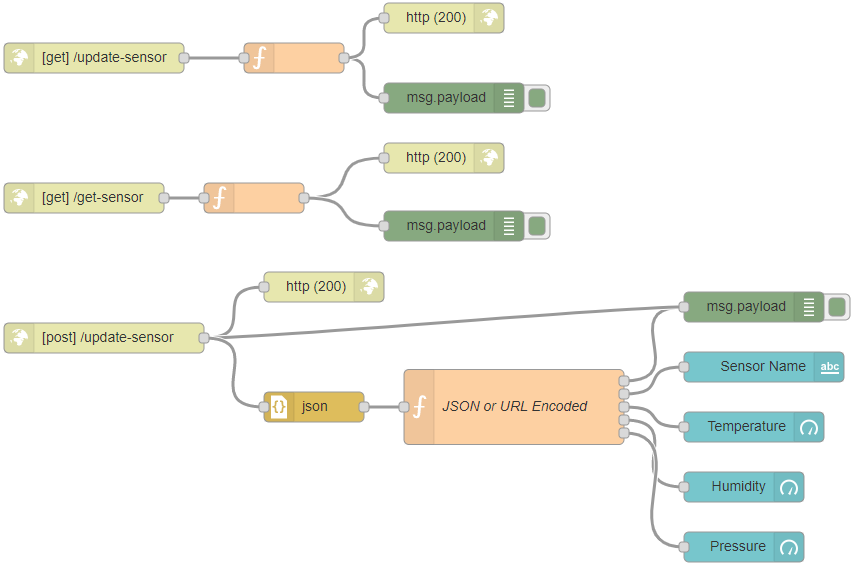 Node-RED-Flow-HTTP-GET-POST-Request-Methods-ESP32-ESP8266-Arduino
Go to Menu > Import and copy the following to your Clipboard to create your
Node-RED flow.
[{"id":"599740b7.efde9","type":"http response","z":"
b01416d3.f69f38","name":"","statusCode":"200","heade
rs":{},"x":420,"y":689,"wires":[]},{"id":"1618a829.7
6f638","type":"json","z":"b01416d3.f69f38","name":""
,"property":"payload","action":"obj","pretty":true,"
x":410,"y":809,"wires":[["d0089cc7.d25ac"]]},{"id":"
c7410fa2.1c2fa","type":"debug","z":"b01416d3.f69f38"
,"name":"","active":true,"tosidebar":true,"console":
false,"tostatus":false,"complete":"false","x":850,"y
":709,"wires":[]},{"id":"75a22f74.f1aba","type":"ui_
text","z":"b01416d3.f69f38","group":"2b7ac01b.fc984"
,"order":1,"width":0,"height":0,"name":"","label":"Sensor
Name","format":"{{msg.payload}}","layout":"row-sprea
d","x":860,"y":769,"wires":[]},{"id":"1c8f9093.8bc2b
f","type":"ui_gauge","z":"b01416d3.f69f38","name":""
,"group":"2b7ac01b.fc984","order":2,"width":0,"heigh
t":0,"gtype":"gage","title":"Temperature","label":"�
�C","format":"{{value}}","min":0,"max":"38","colors"
:["#00b500","#e6e600","#ca3838"],"seg1":"","seg2":""
,"x":850,"y":829,"wires":[]},{"id":"a5bd2706.54e108"
,"type":"ui_gauge","z":"b01416d3.f69f38","name":"","
group":"2b7ac01b.fc984","order":3,"width":0,"height"
:0,"gtype":"gage","title":"Humidity","label":"%","fo
rmat":"{{value}}","min":0,"max":"100","colors":["#00
80ff","#0062c4","#002f5e"],"seg1":"","seg2":"","x":8
40,"y":889,"wires":[]},{"id":"105ac2cc.7b3cfd","type
":"ui_gauge","z":"b01416d3.f69f38","name":"","group"
:"2b7ac01b.fc984","order":4,"width":0,"height":0,"gt
ype":"gage","title":"Pressure","label":"hPa","format
":"{{value}}","min":0,"max":"1200","colors":["#b366f
f","#8000ff","#440088"],"seg1":"","seg2":"","x":840,
"y":949,"wires":[]},{"id":"d0089cc7.d25ac","type":"f
unction","z":"b01416d3.f69f38","name":"JSON or URL Encoded","func":"var
msg0
= { payload: msg.payload.api_key };\nvar msg1 = { payload:
msg.payload.sensor };\nvar msg2 = { payload: msg.payload.value1 };\nvar
msg3
= { payload: msg.payload.value2 };\nvar msg4 = { payload:
msg.payload.value3
};\n\nreturn [msg0, msg1, msg2,
msg3, msg4];","outputs":5,"noerr":0,"x":610,"y":809,
"wires":[["c7410fa2.1c2fa"],["75a22f74.f1aba"],["1c8
f9093.8bc2bf"],["a5bd2706.54e108"],["105ac2cc.7b3cfd
"]]},{"id":"5d9ab0d2.66b92","type":"http in","z":"b0
1416d3.f69f38","name":"","url":"update-sensor","meth
od":"post","upload":false,"swaggerDoc":"","x":200,"y
":740,"wires":[["599740b7.efde9","c7410fa2.1c2fa","1
618a829.76f638"]]},{"id":"7f5cf345.63f56c","type":"http
response","z":"b01416d3.f69f38","name":"","statusCod
e":"200","headers":{},"x":540,"y":420,"wires":[]},{"
id":"6530621.95b429c","type":"http in","z":"b01416d3
.f69f38","name":"","url":"/get-sensor","method":"get
","upload":false,"swaggerDoc":"","x":180,"y":600,"wi
res":[["9471d1a0.68588"]]},{"id":"5ddc9f47.4b555","type":"http
response","z":"b01416d3.f69f38","name":"","statusCod
e":"200","headers":{},"x":540,"y":560,"wires":[]},{"
id":"9471d1a0.68588","type":"function","z":"b01416d3
.f69f38","name":"","func":"msg.payload = {\"value1\":24.25,
\"value2\":49.54, \"value3\":1005.14};\nreturn msg;"
,"outputs":1,"noerr":0,"x":350,"y":600,"wires":[["5d
dc9f47.4b555","13aea59.7430e5a"]]},{"id":"13aea59.74
30e5a","type":"debug","z":"b01416d3.f69f38","name":"
","active":true,"tosidebar":true,"console":false,"to
status":false,"complete":"false","x":550,"y":628,"wi
res":[]},{"id":"e71c7a7d.e7c598","type":"debug","z":
"b01416d3.f69f38","name":"","active":true,"tosidebar
":true,"console":false,"tostatus":false,"complete":"
false","x":550,"y":500,"wires":[]},{"id":"c7807102.3f433","type":"http
in","z":"b01416d3.f69f38","name":"","url":"/update-s
ensor","method":"get","upload":false,"swaggerDoc":""
,"x":190,"y":460,"wires":[["60410cde.562a34"]]},{"id
":"60410cde.562a34","type":"function","z":"b01416d3.
f69f38","name":"","func":"msg.payload = msg.payload.temperature;\nreturn
msg;","outputs":1,"noerr":0,"x":390,"y":460,"wires":
[["e71c7a7d.e7c598","7f5cf345.63f56c"]]},{"id":"2b7a
c01b.fc984","type":"ui_group","z":"","name":"SENSORS
","tab":"99ab8dc5.f435c","disp":true,"width":"6","co
llapse":false},{"id":"99ab8dc5.f435c","type":"ui_tab
","z":"","name":"HTTP","icon":"dashboard","order":1,
"disabled":false,"hidden":false}]
View raw code
Other Web Services or APIs
In this guide, the ESP8266 performs HTTP requests to Node-RED, but you can
use these examples with other services like ThingSpeak, IFTTT.com (Web Hooks
service), OpenWeatherMap.org, PHP server, etc… All examples presented in
this guide will also work with other APIs.
In summary, to make this guide compatible with any service, you need to
search for the service API documentation. Then, you need the server name
(URL or IP address), and parameters to send in the request (URL path or
request body). Finally, modify our examples to integrate with any API you
want to use.
1. ESP8266 HTTP GET: Value or Query in URL
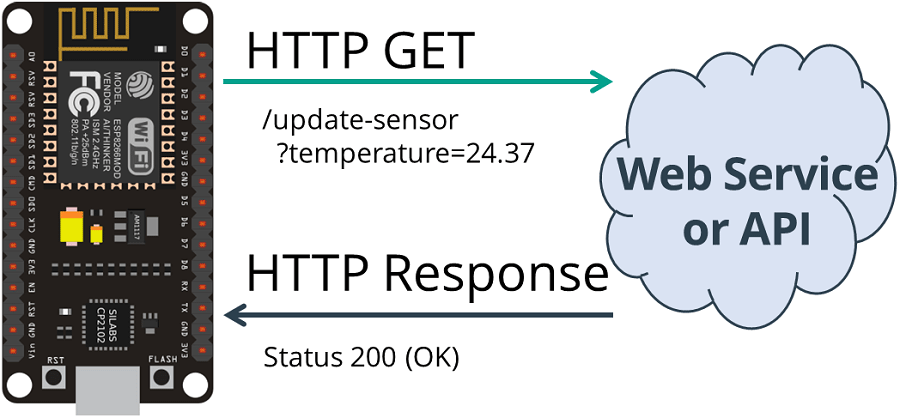
In the first example, the ESP8266 will make an HTTP GET request to update a
reading in a service. This type of request could also be used to filter a
value, request a value or return a JSON object.
 HTTP GET ESP8266 NodeMCU Get Sensor Value Plain Text Status 200 OK
Code ESP8266 HTTP GET with Arduino IDE
After installing the necessary board add-ons and libraries, copy the
following code to your Arduino IDE, but don’t upload it yet. You need to
make some changes to make it work for you.
/*H*******************************************************
Rui Santos
Complete project details at Complete project details at
https://RandomNerdTutorials.com/esp8266-nodemcu-http-get-post-arduino/
Permission is hereby granted, free of charge, to any person obtaining a copy of
this software and associated documentation files.
The above copyright notice and this permission notice shall be included in all
copies or substantial portions of the Software.
Code compatible with ESP8266 Boards Version 3.0.0 or above
(see in Tools > Boards > Boards Manager > ESP8266)
********************************************************/
#include <ESP8266WiFi.h>
#include <ESP8266HTTPClient.h>
#include <WiFiClient.h>
//************************* DEFINES ************************************
//************************* PROTOTYPES ************************************
//************************* VARIABLES ************************************
const char* ssid = "REPLACE_WITH_YOUR_SSID";
const char* password = "REPLACE_WITH_YOUR_PASSWORD";
//Your Domain name with URL path or IP address with path
String serverName = "http://192.168.1.106:1880/update-sensor";
// the following variables are unsigned longs because the time, measured in
// milliseconds, will quickly become a bigger number than can be stored in
an int.
unsigned long lastTime = 0;
// Timer set to 10 minutes (600000)
//unsigned long timerDelay = 600000;
// Set timer to 5 seconds (5000)
unsigned long timerDelay = 5000;
/*F********************************************************************
*
**********************************************************************/
void
setup()
{
Serial.begin( BAUD );
WiFi.begin( ssid, password);
Serial.println( "Connecting" );
while( WiFi.status() != WL_CONNECTED)
{
delay( 500 );
Serial.print( "." );
}
Serial.println( "" );
Serial.print( "Connected to WiFi network with IP Address: ");
Serial.println( WiFi.localIP() );
Serial.println( "Timer set to 5 seconds (timerDelay variable), it will "
"take 5 seconds before publishing the first reading.");
}
/*F*******************************************************
*
********************************************************/
loop()
{
// Send an HTTP POST request depending on timerDelay
if( (millis() - lastTime ) > timerDelay )
{
if( WiFi.status()== WL_CONNECTED ) //Check WiFi connection status
{
WiFiClient client;
HTTPClient http;
String serverPath = serverName + "?temperature=24.37";
// Your Domain name with URL path or IP address with path
http.begin( client, serverPath.c_str() );
// If you need Node-RED/server authentication, insert user and password
below
//http.setAuthorization("REPLACE_WITH_SERVER_USERNAME",
"REPLACE_WITH_SERVER_PASSWORD");
// Send HTTP GET request
int httpResponseCode = http.GET();
if( httpResponseCode > 0 )
{
Serial.print( "HTTP Response code: " );
Serial.println( httpResponseCode );
String payload = http.getString();
Serial.println( payload );
}
else
{
Serial.print( "Error code: " );
Serial.println( httpResponseCode );
}
// Free resources
http.end();
}
else
{
Serial.println( "WiFi Disconnected" );
}
lastTime = millis();
}
}
Setting your network credentials
Modify the next lines with your network credentials: SSID and password. The
code is well commented on where you should make the changes.
// Replace with your network credentials
const char* ssid = "REPLACE_WITH_YOUR_SSID";
const char* password = "REPLACE_WITH_YOUR_PASSWORD";
Setting your serverName
You also need to type your domain name or Node-RED IP address, so the ESP
publishes the readings to your own server.
String serverName = "http://192.168.1.106:1880/update-sensor";
Now, upload the code to your board and it should work straight away.
Read the next section, if you want to learn how to make the HTTP GET
request.
HTTP GET Request
In the loop() is where you actually make the HTTP GET request every 5 seconds
with sample data:
/*H*******************************************************
*
********************************************************/
String serverPath = serverName + "?temperature=24.37";
// Your Domain name with URL path or IP address with path
http.begin(client, serverPath.c_str());
// If you need Node-RED/server authentication, insert user and password
below
//http.setAuthorization("REPLACE_WITH_SERVER_USERNAME",
"REPLACE_WITH_SERVER_PASSWORD");
// Send HTTP GET request
int httpResponseCode = http.GET();
Note: if Node-RED requires authentication, uncomment the following line and
insert the Node-RED username and password.
// If you need Node-RED/server authentication, insert user and password
below
//http.setAuthorization("REPLACE_WITH_SERVER_USERNAME",
"REPLACE_WITH_SERVER_PASSWORD");
The ESP8266 makes a new request in the following URL to update the sensor
field with a new temperature.
http://192.168.1.106:1880/update-sensor?temperature=24.37
Then, the following lines of code save the HTTP response from the server.
/*F*******************************************************
*
********************************************************/
if( httpResponseCode > 0 )
{
Serial.print( "HTTP Response code: " );
Serial.println( httpResponseCode );
String payload = http.getString();
Serial.println( payload );
}
else
{
Serial.print( "Error code: " );
Serial.println( httpResponseCode );
}
Demonstration
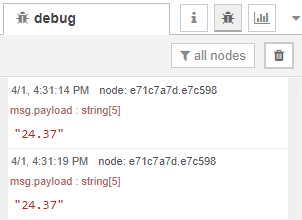
With your board running the new sketch, open the Node-RED debug window.
You’ll see that the sample values are being printed successfully (24.37).
 2. ESP8266 HTTP GET: JSON Data Object or Plain Text
This next example shows how to make an HTTP GET request to get a JSON object
and decode it with the ESP8266. Many APIs return data in JSON format.
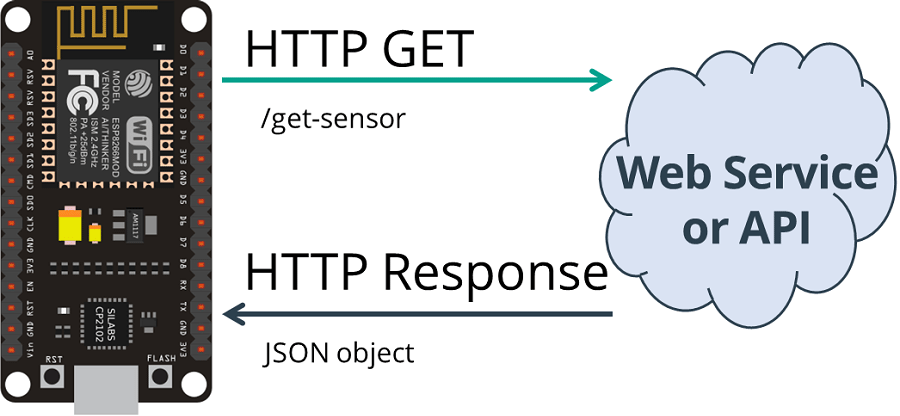 HTTP GET ESP8266 NodeMCU Get Sensor JSON Data
European Wax Center
Copy the next sketch to your Arduino IDE (type your SSID and password):
/*H*******************************************************
Rui Santos
Complete project details at Complete project details at
https://RandomNerdTutorials.com/esp8266-nodemcu-http-get-post-arduino/
Permission is hereby granted, free of charge, to any person obtaining a
copy of this software and associated documentation files.
above copyright notice and this permission notice shall be included in all
copies or substantial portions of the Software.
Code compatible with ESP8266 Boards Version 3.0.0 or above
(see in Tools > Boards > Boards Manager > ESP8266)
********************************************************/
#include <ESP8266WiFi.h>
#include <ESP8266HTTPClient.h>
#include <WiFiClient.h>
#include <Arduino_JSON.h>
//************************* DEFINES ************************************
//************************* PROTOTYPES ************************************
String httpGETRequest( const char* serverName );
//************************* VARIABLES ************************************
const char* ssid = "REPLACE_WITH_YOUR_SSID";
const char* password = "REPLACE_WITH_YOUR_PASSWORD";
//Your Domain name with URL path or IP address with path
const char* serverName = "http://192.168.1.106:1880/get-sensor";
// following variables are unsigned longs because the time, measured in
// milliseconds, will quickly become a bigger number than an int will hold
unsigned long lastTime = 0;
// Timer set to 10 minutes (600000)
//unsigned long timerDelay = 600000;
// Set timer to 5 seconds (5000)
unsigned long timerDelay = 5000;
String sensorReadings;
float sensorReadingsArr[3];
/*F********************************************************************
*
**********************************************************************/
void
setup()
{
Serial.begin( BAUD );
WiFi.begin( ssid, password );
Serial.println( "Connecting" );
while( WiFi.status() != WL_CONNECTED)
{
delay( 500 );
Serial.print( "." );
}
Serial.println( "" );
Serial.print( "Connected to WiFi network with IP Address: ");
Serial.println( WiFi.localIP() );
Serial.println( "Timer set to 5 seconds (timerDelay variable), it will "
"take 5 seconds before publishing the first reading.");
}
/*F*******************************************************
*
********************************************************/
void
loop()
{
// Send an HTTP POST request depending on timerDelay
if( (millis() - lastTime) > timerDelay )
{
//Check WiFi connection status
if(WiFi.status()== WL_CONNECTED )
{
sensorReadings = httpGETRequest( serverName );
Serial.println( sensorReadings );
JSONVar myObject = JSON.parse( sensorReadings );
// JSON.typeof( jsonVar) can be used to get the type of the var
if( JSON.typeof( myObject) == "undefined")
{
Serial.println("Parsing input failed!");
return;
}
Serial.print("JSON object = ");
Serial.println(myObject);
// myObject.keys() can be used to get an array of all the keys in the object
JSONVar keys = myObject.keys();
for( int i = 0; i < keys.length(); i++)
{
JSONVar value = myObject[keys[i]];
Serial.print( keys[i]);
Serial.print( " = ");
Serial.println( value );
sensorReadingsArr[i] = double(value);
}
Serial.print("1 = ");
Serial.println(sensorReadingsArr[0]);
Serial.print("2 = ");
Serial.println(sensorReadingsArr[1]);
Serial.print("3 = ");
Serial.println(sensorReadingsArr[2]);
}
else
{
Serial.println("WiFi Disconnected");
}
lastTime = millis();
}
}
/*F*******************************************************
*
********************************************************/
String
httpGETRequest( const char* serverName )
{
WiFiClient client;
HTTPClient http;
// YOUR IP ADDRESS WITH PATH OR DOMAIN NAME WITH URL PATH
http.begin( client, serverName );
// IF YOU NEED Node-RED/SERVER AUTHENTICATION, INSERT USER AND PASSWORD BELOW
//http.setAuthorization("REPLACE_WITH_SERVER_USERNAME", "REPLACE_WITH_SERVER_PASSWORD");
int httpResponseCode = http.GET(); // SEND HTTP POST REQUEST
String payload = "{}";
if( httpResponseCode > 0 )
{
Serial.print( "HTTP Response code: ");
Serial.println( httpResponseCode);
payload = http.getString();
}
else
{
Serial.print( "Error code: ");
Serial.println( httpResponseCode );
}
// Free resources
http.end();
return payload;
}
Setting your serverName
Enter your domain name or Node-RED IP address, so the ESP requests the
sensor readings that will be retrieved in a JSON object.
String serverName = "http://192.168.1.106:1880/get-sensor";
Now, upload the code to your board.
HTTP GET Request (JSON Object)
In the loop(), call the httpGETRequest() function to make the HTTP GET
request:
sensorReadings = httpGETRequest(serverName);
The httpGETRequest() function makes a request to Node-RED address
http://192.168.1.106:1880/get-sensor and it retrieves a string with a JSON
object.
/*F*******************************************************
*
********************************************************/
String
httpGETRequest( const char* serverName )
{
WiFiClient client;
HTTPClient http;
// Your IP address with path or Domain name with URL path
http.begin( client, serverName );
// If you need Node-RED/server authentication, insert user and password
below
//http.setAuthorization( "REPLACE_WITH_SERVER_USERNAME",
"REPLACE_WITH_SERVER_PASSWORD");
// Send HTTP POST request
int httpResponseCode = http.GET();
String payload = "{}";
if( httpResponseCode > 0 )
{
Serial.print( "HTTP Response code: ");
Serial.println( httpResponseCode);
payload = http.getString();
}
else
{
Serial.print( "Error code: ");
Serial.println( httpResponseCode);
}
// Free resources
http.end();
return payload;
}
Note: if Node-RED requires authentication, uncomment the following line and
insert the Node-RED username and password.
// If you need Node-RED/server authentication, insert user and password
below
//http.setAuthorization("REPLACE_WITH_SERVER_USERNAME",
"REPLACE_WITH_SERVER_PASSWORD");
Decoding JSON Object
To get access to the values, decode the JSON object and store all values in
the sensorReadingsArr array.
JSONVar myObject = JSON.parse( sensorReadings );
// JSON.typeof( jsonVar ) can be used to get the type of the var
if( JSON.typeof( myObject ) == "undefined" )
{
Serial.println( "Parsing input failed!" );
return;
}
Serial.print( "JSON object = " );
Serial.println( myObject );
// myObject.keys() can be used to get an array of all the keys in the
object
JSONVar keys = myObject.keys();
for( int i = 0; i < keys.length(); i++ )
{
JSONVar value = myObject[keys[i]];
Serial.print(keys[i]);
Serial.print(" = ");
Serial.println(value);
sensorReadingsArr[i] = double(value);
}
Serial.print( "1 = ");
Serial.println( sensorReadingsArr[0]);
Serial.print( "2 = ");
Serial.println( sensorReadingsArr[1]);
Serial.print( "3 = ");
Serial.println( sensorReadingsArr[2]);
HTTP GET Demonstration
After uploading the code, open the Arduino IDE and you’ll see that it’s
receiving the following JSON data:
{"value1":24.25,"value2":49.54,"value3":1005.14}
Then, you print the decoded JSON object in the Arduino IDE Serial Monitor.
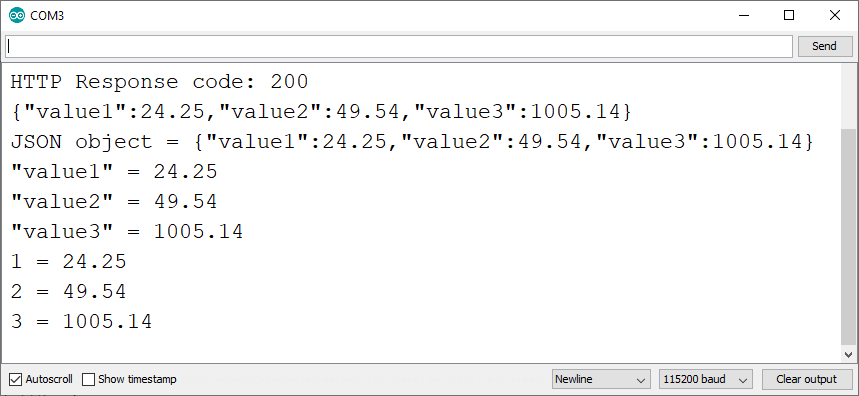 For debugging purposes, the requested information is also printed in the
Node-RED debug window.
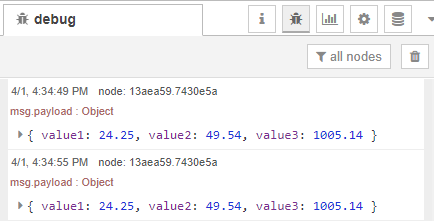 3. ESP8266 HTTP POST: URL Encoded, JSON Data Object, Plain Text
Finally, you’ll learn how to make an HTTP POST request with an ESP8266.
With this example, your ESP8266 can make HTTP POST requests using three
different types of body requests: URL encoded, JSON object or plain text.
These are the most common methods and should integrate with most APIs or web
services.
HTTP POST ESP8266 NodeMCU URL Encoded JSON Object Data Plain Text
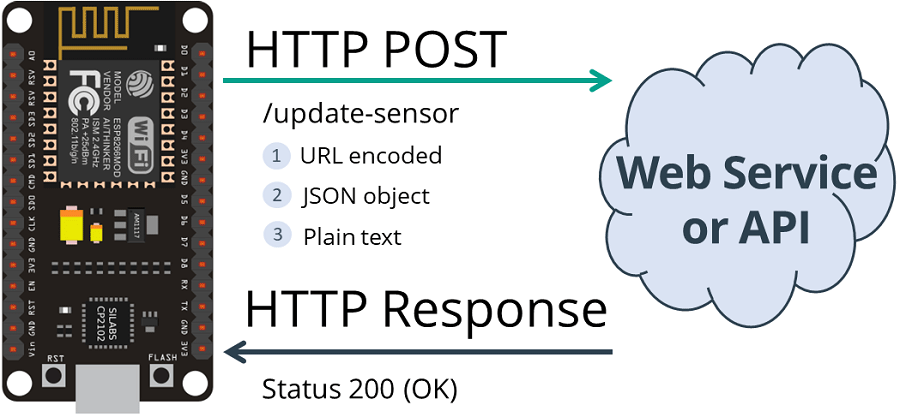 Copy the next sketch to your Arduino IDE (type your SSID and password):
/*F*******************************************************
Rui Santos
Complete project details at Complete project details at
https://RandomNerdTutorials.com/esp8266-nodemcu-http-get-post-arduino/
Permission is hereby granted, free of charge, to any person obtaining a copy
of this software and associated documentation files.
The above copyright notice and this permission notice shall be included in
all copies or substantial portions of the Software.
Code compatible with ESP8266 Boards Version 3.0.0 or above
(see in Tools > Boards > Boards Manager > ESP8266)
********************************************************/
#include <ESP8266WiFi.h>
#include <ESP8266HTTPClient.h>
#include <WiFiClient.h>
//************************* DEFINES ************************************
//************************* PROTOTYPES ************************************
//************************* VARIABLES ************************************
const char *ssid = "REPLACE_WITH_YOUR_SSID";
const char *password = "REPLACE_WITH_YOUR_PASSWORD";
// YOUR DOMAIN NAME WITH URL PATH OR IP ADDRESS WITH PATH
const char *serverName = "http://192.168.1.106:1880/update-sensor";
// FOLLOWING VARIABLES ARE UNSIGNED LONGS BECAUSE TIME, MEASURED
IN
// MILLISECONDS, WILL QUICKLY BECOME A BIGGER NUMBER THAN AN INT CAN
HOLD
unsigned long lastTime = 0;
//unsigned long timerDelay = 600000; // Timer set to 10 minutes
(600000)
unsigned long timerDelay = 5000; // Set timer to 5 seconds
(5000)
/*F********************************************************************
*
**********************************************************************/
void
setup()
{
Serial.begin( BAUD );
WiFi.begin( ssid, password );
Serial.println( "Connecting" );
while( WiFi.status() != WL_CONNECTED)
{
delay( 500 );
Serial.print( "." );
}
Serial.println( "" );
Serial.print("Connected to WiFi network with IP Address: ");
Serial.println( WiFi.localIP());
Serial.println("Timer set to 5 seconds (timerDelay variable), it will "
"take 5 seconds before publishing the first reading.");
}
/*F*******************************************************
*
********************************************************/
void
loop()
{
//Send an HTTP POST request every 10 minutes
if( (millis() - lastTime) > timerDelay)
{
//Check WiFi connection status
if( WiFi.status()== WL_CONNECTED)
{
WiFiClient client;
HTTPClient http;
// Your Domain name with URL path or IP address with path
http.begin( client, serverName);
// If you need Node-RED/server authentication, insert user and password
below
//http.setAuthorization("REPLACE_WITH_SERVER_USERNAME",
"REPLACE_WITH_SERVER_PASSWORD");
// Specify content-type header
http.addHeader( "Content-Type", "application/x-www-form-urlencoded");
// Data to send with HTTP POST
String httpRequestData =
"api_key=tPmAT5Ab3j7F9&sensor=BME280&value1=24.25&val
ue2=49.54&value3=1005.14";
// Send HTTP POST request
int httpResponseCode = http.POST( httpRequestData );
// If you need an HTTP request with a content type: application/json, use
the following:
//http.addHeader("Content-Type", "application/json");
//int httpResponseCode = http.POST("{\"api_key\":
\"tPmAT5Ab3j7F9\",\"sensor\":\"BME280\",\"value1\":\
"24.25\",\"value2\":\"49.54\",\"value3\":\"1005.14\"}");
// If you need an HTTP request with a content type: text/plain
//http.addHeader("Content-Type", "text/plain");
//int httpResponseCode = http.POST("Hello, World!");
Serial.print("HTTP Response code: ");
Serial.println(httpResponseCode);
// Free resources
http.end();
}
else
{
Serial.println("WiFi Disconnected");
}
lastTime = millis();
}
}
Setting your serverName
Enter your domain name or Node-RED IP address, so the ESP posts sample
sensor readings.
String serverName = "http://192.168.1.106:1880/update-sensor";
Now, upload the code to your board.
HTTP POST URL Encoded
To make an HTTP POST request of type URL encoded, like this
POST /update-sensor HTTP/1.1
Host: 192.168.1.106:1880
api_key=tPmAT5Ab3j7F9&sensor=BME280&value1=24.25&value2=
49.54&value3=1005.14
Content-Type: application/x-www-form-urlencoded
You need to run the following in your Arduino code:
/*F*******************************************************
*
********************************************************/
// Your Domain name with URL path or IP address with path
http.begin( client, serverName );
// If you need Node-RED/server authentication, insert user and password
below
//http.setAuthorization( "REPLACE_WITH_SERVER_USERNAME",
"REPLACE_WITH_SERVER_PASSWORD");
// Specify content-type header
http.addHeader( "Content-Type", "application/x-www-form-urlencoded");
// Data to send with HTTP POST
String httpRequestData = "api_key=tPmAT5Ab3j7F9&sensor=BME28
0&value1=24.25&value2=49.54&value3=1005.14";
// Send HTTP POST request
int httpResponseCode = http.POST( httpRequestData );
Note: if Node-RED requires authentication, uncomment the following line and
insert the Node-RED username and password.
// If you need Node-RED/server authentication, insert user and password
below
//http.setAuthorization("REPLACE_WITH_SERVER_USERNAME",
"REPLACE_WITH_SERVER_PASSWORD");
HTTP POST JSON Object
Or if you prefer to make an HTTP POST request with a JSON object:
POST /update-sensor HTTP/1.1
Host: example.com
{api_key: "tPmAT5Ab3j7F9", sensor_name: "BME280", temperature: 24.25;
humidity: 49.54; pressure: 1005.14}
Content-Type: application/json
Use the next snippet:
http.addHeader("Content-Type", "application/json");
int httpResponseCode = http.POST("{\"api_key\":\"tPm
AT5Ab3j7F9\",\"sensor\":\"BME280\",\"value1\":\"24.2
5\",\"value2\":\"49.54\",\"value3\":\"1005.14\"}");
HTTP Plain Text
If you want to send plain text or a value, use the following:
http.addHeader("Content-Type", "text/plain");
int httpResponseCode = http.POST("Hello, World!");
Note: the Node-RED flow we’re using (web service) is not setup to receive
plain text, but if the API that you plan to integrate only accepts plain
text or a value, you can use the previous snippet.
HTTP POST Demonstration
In the Node-RED debug window, you can view that your ESP is making an HTTP
POST request every 5 seconds.
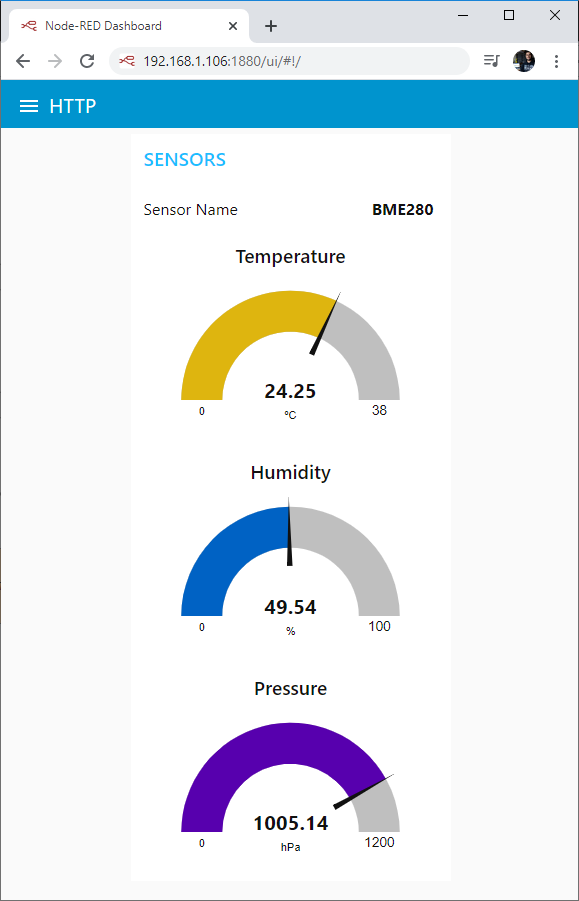
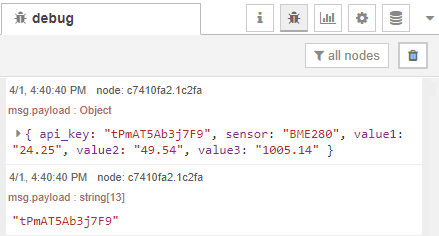 And in this example, those values are also sent to 3 Gauges and are
displayed in Node-RED Dashboard:
http://raspberry-pi-ip-address:1880/ui
 Wrapping Up
In this tutorial you’ve learned how to integrate your ESP8266 with online
services using HTTP GET and HTTP POST requests.
HTTP GET and HTTP POST are commonly used in most web services and APIs.
These can be useful in your projects to: publish your sensor readings to a
web service like IFTTT, ThingSpeak; to an ESP8266 or Raspberry Pi web
server
or to your own server; to request data from the internet or from your
database, and much more.
If you’re using an ESP32 board, read: Guide for ESP32 HTTP GET and HTTP
Post Requests.
 ESP8266 NodeMCU HTTP GET and HTTP POST with Arduino IDE JSON URL Encoded
Text
Recommended: ESP32 HTTP GET and HTTP POST with Arduino IDE (JSON, URL
Encoded, Text)
 Install Arduino JSON library Arduino IDE
 Node-RED-Flow-HTTP-GET-POST-Request-Methods-ESP32-ESP8266-Arduino
Go to Menu > Import and copy the following to your Clipboard to create your
Node-RED flow.
[{"id":"599740b7.efde9","type":"http response","z":"
b01416d3.f69f38","name":"","statusCode":"200","heade
rs":{},"x":420,"y":689,"wires":[]},{"id":"1618a829.7
6f638","type":"json","z":"b01416d3.f69f38","name":""
,"property":"payload","action":"obj","pretty":true,"
x":410,"y":809,"wires":[["d0089cc7.d25ac"]]},{"id":"
c7410fa2.1c2fa","type":"debug","z":"b01416d3.f69f38"
,"name":"","active":true,"tosidebar":true,"console":
false,"tostatus":false,"complete":"false","x":850,"y
":709,"wires":[]},{"id":"75a22f74.f1aba","type":"ui_
text","z":"b01416d3.f69f38","group":"2b7ac01b.fc984"
,"order":1,"width":0,"height":0,"name":"","label":"Sensor
Name","format":"{{msg.payload}}","layout":"row-sprea
d","x":860,"y":769,"wires":[]},{"id":"1c8f9093.8bc2b
f","type":"ui_gauge","z":"b01416d3.f69f38","name":""
,"group":"2b7ac01b.fc984","order":2,"width":0,"heigh
t":0,"gtype":"gage","title":"Temperature","label":"�
�C","format":"{{value}}","min":0,"max":"38","colors"
:["#00b500","#e6e600","#ca3838"],"seg1":"","seg2":""
,"x":850,"y":829,"wires":[]},{"id":"a5bd2706.54e108"
,"type":"ui_gauge","z":"b01416d3.f69f38","name":"","
group":"2b7ac01b.fc984","order":3,"width":0,"height"
:0,"gtype":"gage","title":"Humidity","label":"%","fo
rmat":"{{value}}","min":0,"max":"100","colors":["#00
80ff","#0062c4","#002f5e"],"seg1":"","seg2":"","x":8
40,"y":889,"wires":[]},{"id":"105ac2cc.7b3cfd","type
":"ui_gauge","z":"b01416d3.f69f38","name":"","group"
:"2b7ac01b.fc984","order":4,"width":0,"height":0,"gt
ype":"gage","title":"Pressure","label":"hPa","format
":"{{value}}","min":0,"max":"1200","colors":["#b366f
f","#8000ff","#440088"],"seg1":"","seg2":"","x":840,
"y":949,"wires":[]},{"id":"d0089cc7.d25ac","type":"f
unction","z":"b01416d3.f69f38","name":"JSON or URL Encoded","func":"var
msg0
= { payload: msg.payload.api_key };\nvar msg1 = { payload:
msg.payload.sensor };\nvar msg2 = { payload: msg.payload.value1 };\nvar
msg3
= { payload: msg.payload.value2 };\nvar msg4 = { payload:
msg.payload.value3
};\n\nreturn [msg0, msg1, msg2,
msg3, msg4];","outputs":5,"noerr":0,"x":610,"y":809,
"wires":[["c7410fa2.1c2fa"],["75a22f74.f1aba"],["1c8
f9093.8bc2bf"],["a5bd2706.54e108"],["105ac2cc.7b3cfd
"]]},{"id":"5d9ab0d2.66b92","type":"http in","z":"b0
1416d3.f69f38","name":"","url":"update-sensor","meth
od":"post","upload":false,"swaggerDoc":"","x":200,"y
":740,"wires":[["599740b7.efde9","c7410fa2.1c2fa","1
618a829.76f638"]]},{"id":"7f5cf345.63f56c","type":"http
response","z":"b01416d3.f69f38","name":"","statusCod
e":"200","headers":{},"x":540,"y":420,"wires":[]},{"
id":"6530621.95b429c","type":"http in","z":"b01416d3
.f69f38","name":"","url":"/get-sensor","method":"get
","upload":false,"swaggerDoc":"","x":180,"y":600,"wi
res":[["9471d1a0.68588"]]},{"id":"5ddc9f47.4b555","type":"http
response","z":"b01416d3.f69f38","name":"","statusCod
e":"200","headers":{},"x":540,"y":560,"wires":[]},{"
id":"9471d1a0.68588","type":"function","z":"b01416d3
.f69f38","name":"","func":"msg.payload = {\"value1\":24.25,
\"value2\":49.54, \"value3\":1005.14};\nreturn msg;"
,"outputs":1,"noerr":0,"x":350,"y":600,"wires":[["5d
dc9f47.4b555","13aea59.7430e5a"]]},{"id":"13aea59.74
30e5a","type":"debug","z":"b01416d3.f69f38","name":"
","active":true,"tosidebar":true,"console":false,"to
status":false,"complete":"false","x":550,"y":628,"wi
res":[]},{"id":"e71c7a7d.e7c598","type":"debug","z":
"b01416d3.f69f38","name":"","active":true,"tosidebar
":true,"console":false,"tostatus":false,"complete":"
false","x":550,"y":500,"wires":[]},{"id":"c7807102.3f433","type":"http
in","z":"b01416d3.f69f38","name":"","url":"/update-s
ensor","method":"get","upload":false,"swaggerDoc":""
,"x":190,"y":460,"wires":[["60410cde.562a34"]]},{"id
":"60410cde.562a34","type":"function","z":"b01416d3.
f69f38","name":"","func":"msg.payload = msg.payload.temperature;\nreturn
msg;","outputs":1,"noerr":0,"x":390,"y":460,"wires":
[["e71c7a7d.e7c598","7f5cf345.63f56c"]]},{"id":"2b7a
c01b.fc984","type":"ui_group","z":"","name":"SENSORS
","tab":"99ab8dc5.f435c","disp":true,"width":"6","co
llapse":false},{"id":"99ab8dc5.f435c","type":"ui_tab
","z":"","name":"HTTP","icon":"dashboard","order":1,
"disabled":false,"hidden":false}]
View raw code
 HTTP GET ESP8266 NodeMCU Get Sensor Value Plain Text Status 200 OK

 HTTP GET ESP8266 NodeMCU Get Sensor JSON Data
European Wax Center
Copy the next sketch to your Arduino IDE (type your SSID and password):
 For debugging purposes, the requested information is also printed in the
Node-RED debug window.

 Copy the next sketch to your Arduino IDE (type your SSID and password):
 And in this example, those values are also sent to 3 Gauges and are
displayed in Node-RED Dashboard:
