Arduino and DS3231 Real Time Clock Tutorial
Photo of author
by Dejan
Arduino Tutorials
 In this Arduino Tutorial we will learn how to use the DS3231 Real Time Clock
Module. You can watch the following video or read the written tutorial below.
In this Arduino Tutorial we will learn how to use the DS3231 Real Time Clock
Module. You can watch the following video or read the written tutorial below.
Overview
The first question that comes here is why we actually need a separate RTC for
our Arduino Project when the Arduino itself has built-in timekeeper. Well the
point is that the RTC module runs on a battery and can keep track of the time
even if we reprogram the microcontroller or disconnect the main power.
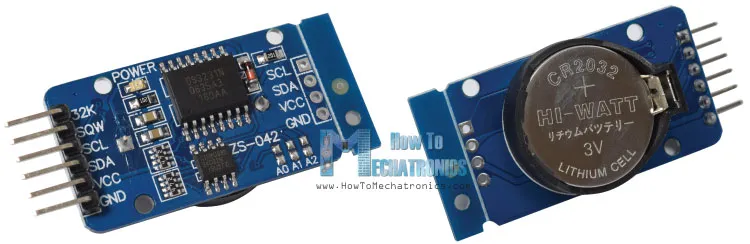 DS3231 Real Time Clock
DS3231 Real Time Clock
The DS3231 is a low-cost, highly accurate Real Time Clock which can maintain
hours, minutes and seconds, as well as, day, month and year information. Also,
it has automatic compensation for leap-years and for months with fewer than 31
days.
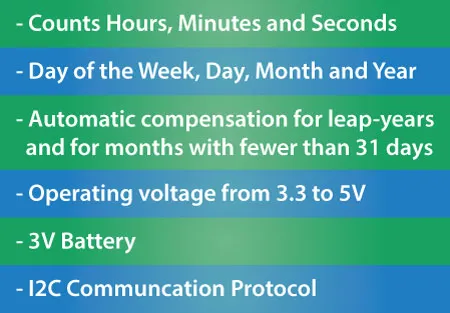 DS3231 Real Time Clock Specifications
The module can work on either 3.3 or 5 V which makes it suitable for many
development platforms or microcontrollers. The battery input is 3V and a typical
CR2032 3V battery can power the module and maintain the information for more
than a year.
The module uses the I2C Communication Protocol which makes the connection to the
Arduino Board very easy.
DS3231 Real Time Clock Specifications
The module can work on either 3.3 or 5 V which makes it suitable for many
development platforms or microcontrollers. The battery input is 3V and a typical
CR2032 3V battery can power the module and maintain the information for more
than a year.
The module uses the I2C Communication Protocol which makes the connection to the
Arduino Board very easy.
Here’s the circuit schematics:
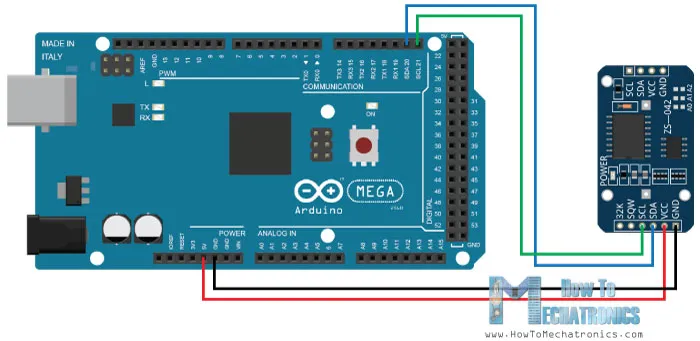 Arduino and DS3231 Real Time Clock Circuit Schematics
So all we need is 4 wires, the VCC and the GND pins for powering the module, and
the two I2C communication pins, SDA and SCL.
You can get the components needed for this Arduino Tutorial from the links below:
DS3231 Real Time Clock…………….. Amazon / Banggood / AliExpress
Arduino Board …………………………… Amazon / Banggood / AliExpress
Breadboard and Jump Wires ……… Amazon / Banggood / AliExpress
Disclosure: These are affiliate links. As an Amazon Associate I earn from
qualifying purchases.
Arduino and DS3231 Real Time Clock Circuit Schematics
So all we need is 4 wires, the VCC and the GND pins for powering the module, and
the two I2C communication pins, SDA and SCL.
You can get the components needed for this Arduino Tutorial from the links below:
DS3231 Real Time Clock…………….. Amazon / Banggood / AliExpress
Arduino Board …………………………… Amazon / Banggood / AliExpress
Breadboard and Jump Wires ……… Amazon / Banggood / AliExpress
Disclosure: These are affiliate links. As an Amazon Associate I earn from
qualifying purchases.
Programming
Once we connect the module we need to program the Arduino Board to work with the
Real Time Clock. However, when it comes to programing a communication between
Arduino and an I2C module the code isn’t that small and easy. Luckily, there are
already several libraries for the DS3231 RTC which can be found on the internet.
For this tutorial I chose to use the Library made by Henning Karlsen which can
be found and downloaded from his website, www.rinkydinkelectronics.com.
So once we download and install the library we can use its first demo example to
initially activate the clock of the RTC module. In the setup section of the
demo example code we can notice that there are three line that we need to
uncomment in order to initially set the day of the week, the time and the data.
/*F********************************************************************
* Code from the Demo Example of the DS3231 Library
**********************************************************************/
void
setup()
{
Serial.begin( 115200 ); // SETUP SERIAL CONNECTION
// UNCOMMENT NEXT LINE IF YOU ARE USING AN Arduino Leonardo
//while (!Serial) {}
// Initialize the rtc object
rtc.begin();
// FOLLOWING LINES CAN BE UNCOMMENTED TO SET DATE AND TIME
//rtc.setDOW(WEDNESDAY); // Set Day-of-Week to SUNDAY
//rtc.setTime(12, 0, 0); // Set the time to 12:00:00 (24hr format)
//rtc.setDate(1, 1, 2014); // Set the date to January 1st, 2014
}
Code language: Arduino (arduino)
The first line is for setting the day of the week, the second line is for
setting the time in hours, minutes and seconds, and the third line is for
setting the date in days, months and years.
Once we upload this code we need to comment back the three lines and re-upload
the code again.
/*F********************************************************************
* Code from Demo Example of DS3231 Library
**********************************************************************/
void
loop()
{
Serial.print( rtc.getDOWStr() ); // SEND DAY-OF-WEEK
Serial.print( " " );
Serial.print( rtc.getDateStr() ); // SEND DATE
Serial.print( " -- " );
Serial.println( rtc.getTimeStr() ); // SEND TIME
delay (1000); // WAIT ONE SECOND BEFORE REPEATING
}
Code language: Arduino (arduino)
If we take a look at the loop section of the code we can see that now using the
three custom functions we get the information from the RTC and print them in the
Serial Monitor. Here’s how they appear in the Serial Monitor.
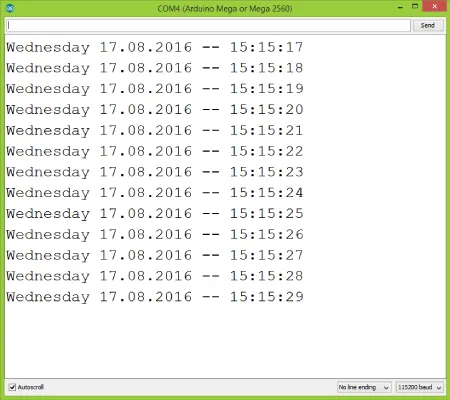 DS3231 RTC Serial Monitor Results
Now even if we disconnect the Arduino power and then reconnect it and run the
Serial Monitor again we can notice that the time keeps going without being
reset.
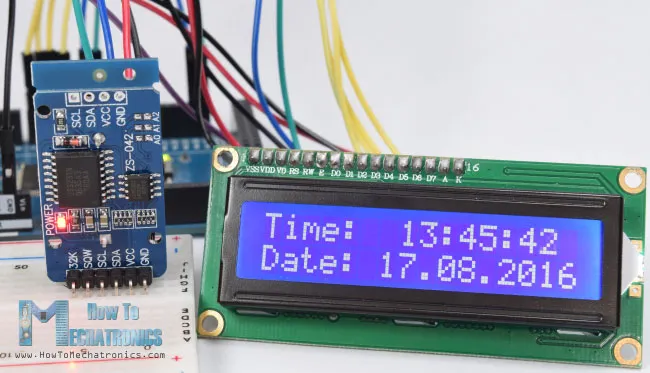
So now we have our Real Time Clock up and running and we can use in any Arduino
Project. As a second example I connected an LCD to the Arduino and printed the
time and the date on it.
Arduino DS3231 Real Time Clock and LCD Example
Here’s the source code of this example:
/*H*******************************************************
* Arduino DS3231 Real Time Clock Module Tutorial
* Crated by Dejan Nedelkovski, * www.HowToMechatronics.com
* DS3231 Library made by Henning Karlsen which can be found and downloaded
from his website, www.rinkydinkelectronics.com.
********************************************************/
#include <DS3231.h>
#include <LiquidCrystal.h> // INCLUDE LiquidCrystal LIB
//************************* DEFINES ************************************
//************************* PROTOTYPES ************************************
//************************* VARIABLES ************************************
DS3231 rtc( SDA, SCL);
LiquidCrystal lcd( 1, 2, 4, 5, 6, 7); // rs, enable, d4, d5, d6, d7
/*F********************************************************************
*
**********************************************************************/
void
setup()
{
rtc.begin(); // INITIALIZE RTC OBJECT
lcd.begin( 16, 2 ); // INIT LCD IFAC, DSPLY DIMS (WIDTH,HEIGHT)
}
/*F********************************************************************
*
**********************************************************************/
void
loop()
{
lcd.setCursor( 0, 0 );
lcd.print( "Time: " );
lcd.print( rtc.getTimeStr() );
lcd.setCursor( 0, 1 );
lcd.print( "Date: " );
lcd.print( rtc.getDateStr() );
delay( 1000 );
}
Code language: Arduino (arduino)
That’s all for this Arduino Tutorial, feel free to ask any question in the
comments section below.
DS3231 RTC Serial Monitor Results
Now even if we disconnect the Arduino power and then reconnect it and run the
Serial Monitor again we can notice that the time keeps going without being
reset.
So now we have our Real Time Clock up and running and we can use in any Arduino
Project. As a second example I connected an LCD to the Arduino and printed the
time and the date on it.
Arduino DS3231 Real Time Clock and LCD Example
Here’s the source code of this example:
/*H*******************************************************
* Arduino DS3231 Real Time Clock Module Tutorial
* Crated by Dejan Nedelkovski, * www.HowToMechatronics.com
* DS3231 Library made by Henning Karlsen which can be found and downloaded
from his website, www.rinkydinkelectronics.com.
********************************************************/
#include <DS3231.h>
#include <LiquidCrystal.h> // INCLUDE LiquidCrystal LIB
//************************* DEFINES ************************************
//************************* PROTOTYPES ************************************
//************************* VARIABLES ************************************
DS3231 rtc( SDA, SCL);
LiquidCrystal lcd( 1, 2, 4, 5, 6, 7); // rs, enable, d4, d5, d6, d7
/*F********************************************************************
*
**********************************************************************/
void
setup()
{
rtc.begin(); // INITIALIZE RTC OBJECT
lcd.begin( 16, 2 ); // INIT LCD IFAC, DSPLY DIMS (WIDTH,HEIGHT)
}
/*F********************************************************************
*
**********************************************************************/
void
loop()
{
lcd.setCursor( 0, 0 );
lcd.print( "Time: " );
lcd.print( rtc.getTimeStr() );
lcd.setCursor( 0, 1 );
lcd.print( "Date: " );
lcd.print( rtc.getDateStr() );
delay( 1000 );
}
Code language: Arduino (arduino)
That’s all for this Arduino Tutorial, feel free to ask any question in the
comments section below.