Getting Date and Time
| Intro | Overview | What Is NTP How Does It Work | Pkg From L2 to L3 Xlation |
| Required Materials | Get NTP Dat & Tim via ESP 8266 | Get NTP Dat & Tim Via ESP32 | Bldng OLED & EXP32 Clock |
|
ESP32 & ESP8266 NTP Client-Server:
Getting Date and Time |
|
 Package from Lvl2 to Lvl3 Translation
 Required Materials
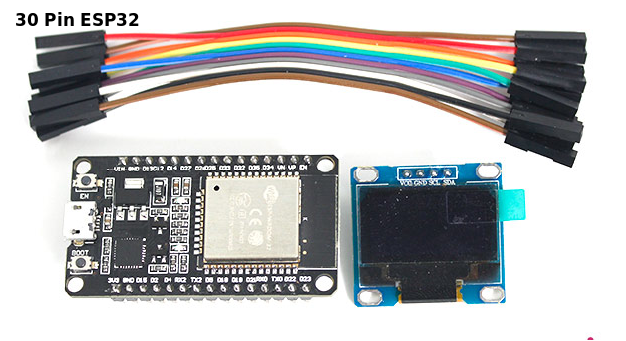
| NodeMCU ESP32S 2.4GHz WiFi + Bluetooth Development Board | × | 1 | |
| 0.96" I2C OLED Display Module | × | 1 | |
| NodeMCU ESP8266 ESP-12E Board | × | 1 | |
| Female to Female Jumper Wire | × | 1 |
 Now program the following code on your NodeMcu board and see the result in
Serial Monitor:
/*F*****************************************************
* NTP Clock with NodeMCU
modified on 18 DEC 2019 by Saeed Hosseini @ Electropeak
Home
*******************************************************/
#include <NTPClient.h>
#include <ESP8266WiFi.h>
#include <WiFiUdp.h>
//************************* DEFINES ************************************
#define BAUD 9600
const char *ssid = "YOUR SSID";
const char *password = "YOUR SSID PASSWORD";
const long utcOffsetInSeconds = 12600;
//************************* PROTOTYPES ************************************
//************************* VARIABLES ************************************
char daysOfTheWeek[7][12] = {"Sunday", "Monday", "Tuesday", "Wednesday"
, "Thursday", "Friday", "Saturday"};
// Define NTP Client to get time
WiFiUDP ntpUDP;
NTPClient timeClient(ntpUDP, "pool.ntp.org", utcOffsetInSeconds);
/*F*************************************************
**************************
*
****************************************************
************************/
void
setup()
{
Serial.begin( BAUD );
WiFi.begin( ssid, password );
while( WiFi.status() != WL_CONNECTED )
{
delay ( 500 );
Serial.print ( "." );
}
timeClient.begin();
}
/*F*************************************************
**************************
*
****************************************************
************************/
void
loop()
{
timeClient.update();
Serial.print( daysOfTheWeek[timeClient.getDay()] );
Serial.print( ", " );
Serial.print( timeClient.getHours() );
Serial.print( ":" );
Serial.print( timeClient.getMinutes() );
Serial.print( ":" );
Serial.println( timeClient.getSeconds() );
//Serial.println( timeClient.getFormattedTime());
delay( 1000 );
}
First we add the necessary libraries to the code, then we enter the name and
password of our WiFi router.
Modify the utcOffsetInSeconds variable according to your location, you can
find your country’s UTC coefficient here.
For example, the UTC coefficient for the United States is calculated as
follows: UTC = -11:00
utcOffsetInSeconds = -11*60*60 = -39600
Our server for receiving NTP is the pool.ntp.org server.
Then after connecting to the Internet with time client, we can get the date
and time.
Getting Date & Time From NTP Server Using ESP32
Now program the following code on your NodeMcu board and see the result in
Serial Monitor:
/*F*****************************************************
* NTP Clock with NodeMCU
modified on 18 DEC 2019 by Saeed Hosseini @ Electropeak
Home
*******************************************************/
#include <NTPClient.h>
#include <ESP8266WiFi.h>
#include <WiFiUdp.h>
//************************* DEFINES ************************************
#define BAUD 9600
const char *ssid = "YOUR SSID";
const char *password = "YOUR SSID PASSWORD";
const long utcOffsetInSeconds = 12600;
//************************* PROTOTYPES ************************************
//************************* VARIABLES ************************************
char daysOfTheWeek[7][12] = {"Sunday", "Monday", "Tuesday", "Wednesday"
, "Thursday", "Friday", "Saturday"};
// Define NTP Client to get time
WiFiUDP ntpUDP;
NTPClient timeClient(ntpUDP, "pool.ntp.org", utcOffsetInSeconds);
/*F*************************************************
**************************
*
****************************************************
************************/
void
setup()
{
Serial.begin( BAUD );
WiFi.begin( ssid, password );
while( WiFi.status() != WL_CONNECTED )
{
delay ( 500 );
Serial.print ( "." );
}
timeClient.begin();
}
/*F*************************************************
**************************
*
****************************************************
************************/
void
loop()
{
timeClient.update();
Serial.print( daysOfTheWeek[timeClient.getDay()] );
Serial.print( ", " );
Serial.print( timeClient.getHours() );
Serial.print( ":" );
Serial.print( timeClient.getMinutes() );
Serial.print( ":" );
Serial.println( timeClient.getSeconds() );
//Serial.println( timeClient.getFormattedTime());
delay( 1000 );
}
First we add the necessary libraries to the code, then we enter the name and
password of our WiFi router.
Modify the utcOffsetInSeconds variable according to your location, you can
find your country’s UTC coefficient here.
For example, the UTC coefficient for the United States is calculated as
follows: UTC = -11:00
utcOffsetInSeconds = -11*60*60 = -39600
Our server for receiving NTP is the pool.ntp.org server.
Then after connecting to the Internet with time client, we can get the date
and time.
Getting Date & Time From NTP Server Using ESP32
 Code
Upload the following code to your ESP32 and view the result on the screen.
logo.h
/*F************************************************
***************************
* NTP Clock with ESP32 and OLED
modified on 18 DEC 2019 by Saeed Hosseini @ Electropeak
Home
****************************************************
************************/
#include <Wire.h>
#include <Adafruit_GFX.h>
#include <Adafruit_SSD1306.h>
#include "logo.h"
#include <WiFi.h>
#include "time.h"
#define SCREEN_WIDTH 128
#define SCREEN_HEIGHT 64
#define OLED_RESET -1
//************************* DEFINES ************************************
#define BAUD 9600
const char* ssid = "CafeRobot Inc.";
const char* password = "caferobot.ir";
const char* ntpServer = "pool.ntp.org";
const long gmtOffset_sec = 12600;
const int daylightOffset_sec = 3600;
//************************* PROTOTYPES *********************
void diplay_logo( int x, int y, const uint8_t *bitmap, int w, int h);
void display_text( int sz, int x, int y, String str);
void display_number( int sz, int x, int y, double num;)
void system_setup();
void loading();
void printLocalTime();
//************************* VARIABLES **********************
Adafruit_SSD1306 display(SCREEN_WIDTH, SCREEN_HEIGHT, &Wire, OLED_RESET);
/*F****************************************************
*
*******************************************************/
void
setup()
{
system_setup();
WiFi.begin( ssid, password );
while( WiFi.status() != WL_CONNECTED )
{
loading();
}
display.clearDisplay();
diplay_logo( 0, 0, Wifi, 16, 16 );
display.display();
configTime( gmtOffset_sec, daylightOffset_sec, ntpServer );
printLocalTime();
// disconnect WiFi as it's no longer needed
WiFi.disconnect( true );
WiFi.mode( WIFI_OFF );
}
/*F*******************************************************
*
********************************************************/
void
loop()
{
printLocalTime();
delay( 10000 );
display.clearDisplay();
diplay_logo( 0, 0, Wifi, 16, 16 );
display.display();
}
/*F*******************************************************
*
********************************************************/
void
diplay_logo( int x, int y, const uint8_t *bitmap, int w, int h)
{
display.drawBitmap( x, y, bitmap, w, h, WHITE );
}
/*F*******************************************************
*
********************************************************/
void
display_text( int sz, int x, int y, String str)
{
display.setTextSize( sz );
display.setTextColor( WHITE );
display.setCursor( x, y );
display.println( str );
}
/*F*******************************************************
*
********************************************************/
void
display_number( int sz, int x, int y, double num)
{
display.setTextSize( sz );
display.setTextColor( WHITE );
display.setCursor( x, y );
display.println( num );
}
/*F*******************************************************
*
********************************************************/
void
system_setup()
{
Serial.begin( BAUD );
display.begin( SSD1306_SWITCHCAPVCC, 0x3C );
display.clearDisplay();
diplay_logo( 13, 20, Electropeak, 128, 32 );
display.display();
delay( 1000 );
display.clearDisplay();
// while( WiFi.status() != WL_CONNECTED)
// {
// loading();
// }
}
/*F*******************************************************
*
********************************************************/
void
loading()
{
display_text( 2, 0, 25, "Loading" );
display_text( 2, 85, 25, "." );
display.display();
delay( 500 );
display_text( 2, 95, 25, "." );
display.display();
delay( 500 );
display_text( 2, 105, 25, "." );
display.display();
delay( 500 );
display.fillRect( 85, 25, 40, 20, BLACK);
display.display();
delay( 500 );
}
/*F*******************************************************
*
********************************************************/
void
printLocalTime()
{
String s = "";
char h [80];
char m [80];
char p [80];
struct tm timeinfo;
if( !getLocalTime( &timeinfo ) )
{
Serial.println( "Failed to obtain time");
return;
}
Serial.println( &timeinfo, "%H:%M:%S");
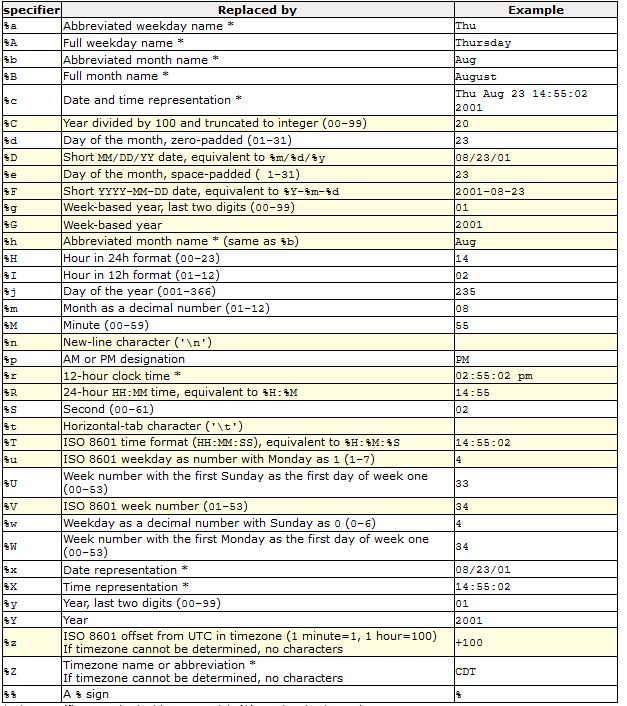
strftime( h, 80, "%I", &timeinfo );
strftime( m, 80, "%M", &timeinfo );
strftime( p, 80, "%p", &timeinfo );
display_text( 3, 15, 30, h );
display_text( 3, 50, 30, ":" );
display_text( 3, 65, 30, m );
display_text( 1, 108, 45, p );
display.display();
}
The only difference between this code and the previous code is that with the
strftime we separate the amount of hour, minute and AM / PM from timeinfo
and save them in a string and then display them in clock format on the
display.
What’s Next?
Code
Upload the following code to your ESP32 and view the result on the screen.
logo.h
/*F************************************************
***************************
* NTP Clock with ESP32 and OLED
modified on 18 DEC 2019 by Saeed Hosseini @ Electropeak
Home
****************************************************
************************/
#include <Wire.h>
#include <Adafruit_GFX.h>
#include <Adafruit_SSD1306.h>
#include "logo.h"
#include <WiFi.h>
#include "time.h"
#define SCREEN_WIDTH 128
#define SCREEN_HEIGHT 64
#define OLED_RESET -1
//************************* DEFINES ************************************
#define BAUD 9600
const char* ssid = "CafeRobot Inc.";
const char* password = "caferobot.ir";
const char* ntpServer = "pool.ntp.org";
const long gmtOffset_sec = 12600;
const int daylightOffset_sec = 3600;
//************************* PROTOTYPES *********************
void diplay_logo( int x, int y, const uint8_t *bitmap, int w, int h);
void display_text( int sz, int x, int y, String str);
void display_number( int sz, int x, int y, double num;)
void system_setup();
void loading();
void printLocalTime();
//************************* VARIABLES **********************
Adafruit_SSD1306 display(SCREEN_WIDTH, SCREEN_HEIGHT, &Wire, OLED_RESET);
/*F****************************************************
*
*******************************************************/
void
setup()
{
system_setup();
WiFi.begin( ssid, password );
while( WiFi.status() != WL_CONNECTED )
{
loading();
}
display.clearDisplay();
diplay_logo( 0, 0, Wifi, 16, 16 );
display.display();
configTime( gmtOffset_sec, daylightOffset_sec, ntpServer );
printLocalTime();
// disconnect WiFi as it's no longer needed
WiFi.disconnect( true );
WiFi.mode( WIFI_OFF );
}
/*F*******************************************************
*
********************************************************/
void
loop()
{
printLocalTime();
delay( 10000 );
display.clearDisplay();
diplay_logo( 0, 0, Wifi, 16, 16 );
display.display();
}
/*F*******************************************************
*
********************************************************/
void
diplay_logo( int x, int y, const uint8_t *bitmap, int w, int h)
{
display.drawBitmap( x, y, bitmap, w, h, WHITE );
}
/*F*******************************************************
*
********************************************************/
void
display_text( int sz, int x, int y, String str)
{
display.setTextSize( sz );
display.setTextColor( WHITE );
display.setCursor( x, y );
display.println( str );
}
/*F*******************************************************
*
********************************************************/
void
display_number( int sz, int x, int y, double num)
{
display.setTextSize( sz );
display.setTextColor( WHITE );
display.setCursor( x, y );
display.println( num );
}
/*F*******************************************************
*
********************************************************/
void
system_setup()
{
Serial.begin( BAUD );
display.begin( SSD1306_SWITCHCAPVCC, 0x3C );
display.clearDisplay();
diplay_logo( 13, 20, Electropeak, 128, 32 );
display.display();
delay( 1000 );
display.clearDisplay();
// while( WiFi.status() != WL_CONNECTED)
// {
// loading();
// }
}
/*F*******************************************************
*
********************************************************/
void
loading()
{
display_text( 2, 0, 25, "Loading" );
display_text( 2, 85, 25, "." );
display.display();
delay( 500 );
display_text( 2, 95, 25, "." );
display.display();
delay( 500 );
display_text( 2, 105, 25, "." );
display.display();
delay( 500 );
display.fillRect( 85, 25, 40, 20, BLACK);
display.display();
delay( 500 );
}
/*F*******************************************************
*
********************************************************/
void
printLocalTime()
{
String s = "";
char h [80];
char m [80];
char p [80];
struct tm timeinfo;
if( !getLocalTime( &timeinfo ) )
{
Serial.println( "Failed to obtain time");
return;
}
Serial.println( &timeinfo, "%H:%M:%S");
strftime( h, 80, "%I", &timeinfo );
strftime( m, 80, "%M", &timeinfo );
strftime( p, 80, "%p", &timeinfo );
display_text( 3, 15, 30, h );
display_text( 3, 50, 30, ":" );
display_text( 3, 65, 30, m );
display_text( 1, 108, 45, p );
display.display();
}
The only difference between this code and the previous code is that with the
strftime we separate the amount of hour, minute and AM / PM from timeinfo
and save them in a string and then display them in clock format on the
display.
What’s Next?