//************************* DEFINES ************************************
//************************* PROTOTYPES ************************************
//************************* VARIABLES ************************************
const char* ssid = "REPLACE_WITH_YOUR_SSID";
const char* password = "REPLACE_WITH_YOUR_PASSWORD";
//Your Domain name with URL path or IP address with path
String serverName = "http://192.168.1.106:1880/update-sensor";
// the following variables are unsigned longs because the time, measured in
// milliseconds, will quickly become a bigger number than can be stored in an int.
unsigned long lastTime = 0;
// Timer set to 10 minutes ( 600000 )
//unsigned long timerDelay = 600000;
// Set timer to 5 seconds ( 5000 )
unsigned long timerDelay = 5000;
/*F********************************************************************
*
**********************************************************************/
void
setup()
{
Serial.begin( BAUD );
WiFi.begin( ssid, password );
Serial.println( "Connecting" );
while( WiFi.status() != WL_CONNECTED )
{
delay( 500 );
Serial.print( "." );
}
Serial.println( "" );
Serial.print( "Connected to WiFi network with IP Address: " );
Serial.println( WiFi.localIP() );
Serial.println( "Timer set to 5 seconds (timerDelay variable)"
", it will take 5 seconds before publishing the first reading." );
}
/*F********************************************************************
*
**********************************************************************/
void
loop()
{
//Send an HTTP POST request every 10 minutes
if( ( millis() - lastTime ) > timerDelay )
{
//Check WiFi connection status
if( WiFi.status()== WL_CONNECTED )
{
HTTPClient http;
String serverPath = serverName + "?temperature=24.37";
// Your Domain name with URL path or IP address with path
http.begin( serverPath.c_str() );
// iF YOU NEED Node-RED/SERVER AUTHENTICATION
// , INSERT USER AND PASSWORD BELOW
// http.setAuthorization( "REPLACE_WITH_SERVER_USERNAME"
// , "REPLACE_WITH_SERVER_PASSWORD" );
// Send HTTP GET request
int httpResponseCode = http.GET();
if( httpResponseCode > 0 )
{
Serial.print( "HTTP Response code: " );
Serial.println( httpResponseCode );
String payload = http.getString();
Serial.println( payload );
}
else
{
Serial.print( "Error code: " );
Serial.println( httpResponseCode );
}
// Free resources
http.end();
}
else
{
Serial.println( "WiFi Disconnected" );
}
lastTime = millis();
}
}
Setting your network credentials
Modify the next lines with your network credentials: SSID and password. The code
is well commented on where you should make the changes.
// Replace with your network credentials
const char* ssid = "REPLACE_WITH_YOUR_SSID";
const char* password = "REPLACE_WITH_YOUR_PASSWORD";
Setting your serverName
You also need to type your domain name or Node-RED IP address, so the ESP
publishes the readings to your own server.
String serverName = "http://192.168.1.106:1880/update-sensor";
Now, upload the code to your board and it should work straight away.
Read the next section, if you want to learn how to make the HTTP GET request.
HTTP GET Request
In the loop() is where you actually make the HTTP GET request every 5 seconds
with sample data:
String serverPath = serverName + "?temperature=24.37";
// Your Domain name with URL path or IP address with path
http.begin( serverPath.c_str() );
// If your need Node-RED/server authentication, insert user and password below
//http.setAuthorization( "REPLACE_WITH_SERVER_USERNAME", "REPLACE_WITH_SERVER_PASSWORD" );
// Send HTTP GET request
int httpResponseCode = http.GET();
Note: if Node-RED requires authentication, uncomment the following line and insert the Node-RED username and password.
// If you need Node-RED/server authentication, insert user and password below
//http.setAuthorization( "REPLACE_WITH_SERVER_USERNAME", "REPLACE_WITH_SERVER_PASSWORD" );
The ESP32 makes a new request in the following URL to update the sensor field
with a new temperature.
http://192.168.1.106:1880/update-sensor?temperature=24.37
Then, the following lines of code save the HTTP response from the server.
if( httpResponseCode>0 ) {
Serial.print( "HTTP Response code: " );
Serial.println( httpResponseCode );
String payload = http.getString();
Serial.println( payload );
}
else {
Serial.print( "Error code: " );
Serial.println( httpResponseCode );
}
Demonstration
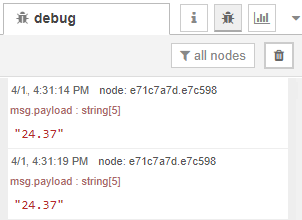
With your board running the new sketch, open the Node-RED debug window. You’ll
see that the sample values are being printed successfully ( 24.37 ).
2. ESP32 HTTP GET: JSON Data Object or Plain Text
This next example shows how to make an HTTP GET request to get a JSON object and
decode it with the ESP32. Many APIs return data in JSON format.
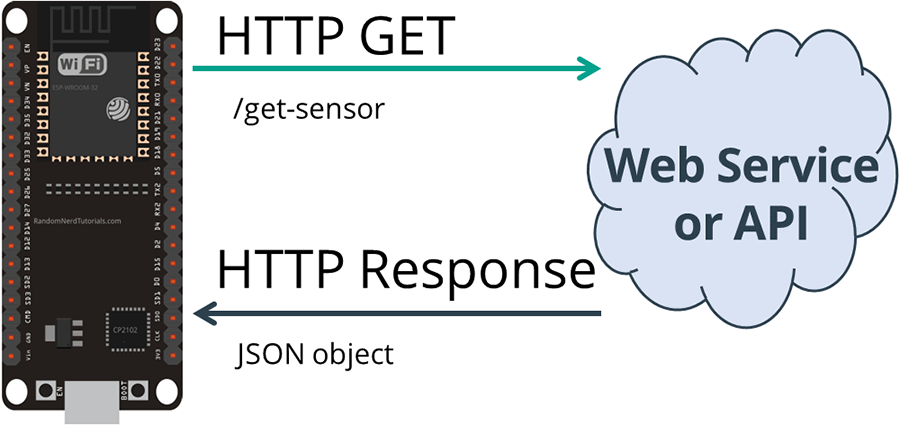 HTTP GET ESP32 Get Sensor JSON Data
Copy the next sketch to your Arduino IDE ( type your SSID and password ):
/*H*******************************************************
Rui Santos
Complete project details at Complete project details at
https://RandomNerdTutorials.com/esp32-http-get-post-arduino/
Permission is hereby granted, free of charge, to any person obtaining a copy
of this software and associated documentation files.
The above copyright notice and this permission notice shall be included in all
copies or substantial portions of the Software.
********************************************************/
#include
#include
#include
//************************* DEFINES ************************************
#define BAUD 9600
const char* ssid = "REPLACE_WITH_YOUR_SSID";
const char* password = "REPLACE_WITH_YOUR_PASSWORD";
//************************* PROTOTYPES ************************************
String httpGETRequest( const char *serverName );
//************************* VARIABLES ************************************
//Your Domain name with URL path or IP address with path
const char* serverName = "http://192.168.1.106:1880/get-sensor";
// following variables are unsigned longs because time, measured in
// Ms, will quickly become a bigger number than can be stored in an int.
unsigned long lastTime = 0;
//unsigned long timerDelay = 600000; // Timer set to 10 minutes ( 600000 )
unsigned long timerDelay = 5000; // Set timer to 5 seconds ( 5000 )
String sensorReadings;
float sensorReadingsArr[3];
/*F********************************************************************
*
**********************************************************************/
void
setup()
{
Serial.begin( BAUD );
WiFi.begin( ssid, password );
Serial.println( "Connecting" );
while( WiFi.status() != WL_CONNECTED )
{
delay( 500 );
Serial.print( "." );
}
Serial.println( "" );
Serial.print( "Connected to WiFi network with IP Address: " );
Serial.println( WiFi.localIP() );
Serial.println( "Timer set to 5 seconds ( timerDelay variable ), "
"it will take 5 seconds before publishing the first reading." );
}
/*F********************************************************************
*
**********************************************************************/
void
loop()
{
//Send an HTTP POST request every 10 minutes
if( ( millis() - lastTime ) > timerDelay )
{
//Check WiFi connection status
if( WiFi.status()== WL_CONNECTED )
{
sensorReadings = httpGETRequest( serverName );
Serial.println( sensorReadings );
JSONVar myObject = JSON.parse( sensorReadings );
// JSON.typeof( jsonVar ) can be used to get the type of the var
if( JSON.typeof( myObject ) == "undefined" )
{
Serial.println( "Parsing input failed!" );
return;
}
Serial.print( "JSON object = " );
Serial.println( myObject );
// myObject.keys() can be used to get an array of all the keys in the object
JSONVar keys = myObject.keys();
for ( int i = 0; i < keys.length(); i++ )
{
JSONVar value = myObject[keys[i]];
Serial.print( keys[i] );
Serial.print( " = " );
Serial.println( value );
sensorReadingsArr[i] = double( value );
}
Serial.print( "1 = " );
Serial.println( sensorReadingsArr[0] );
Serial.print( "2 = " );
Serial.println( sensorReadingsArr[1] );
Serial.print( "3 = " );
Serial.println( sensorReadingsArr[2] );
}
else
{
Serial.println( "WiFi Disconnected" );
}
lastTime = millis();
}
}
/*F********************************************************************
*
**********************************************************************/
String
httpGETRequest( const char *serverName )
{
WiFiClient client;
HTTPClient http;
// Your Domain name with URL path or IP address with path
http.begin( client, serverName );
// If you need Node-RED/server authentication, insert user and password below
//http.setAuthorization( "REPLACE_WITH_SERVER_USERNAME"
// , "REPLACE_WITH_SERVER_PASSWORD" );
// Send HTTP POST request
int httpResponseCode = http.GET();
String payload = "{}";
if( httpResponseCode > 0 )
{
Serial.print( "HTTP Response code: " );
Serial.println( httpResponseCode );
payload = http.getString();
}
else
{
Serial.print( "Error code: " );
Serial.println( httpResponseCode );
}
// Free resources
http.end();
return payload;
}
Setting your serverName
Enter your domain name or Node-RED IP address, so the ESP requests the sensor
readings that will be retrieved in a JSON object.
String serverName = "http://192.168.1.106:1880/get-sensor";
Now, upload the code to your board.
HTTP GET Request ( JSON Object )
In the loop(), call the httpGETRequest() function to make the HTTP GET request:
sensorReadings = httpGETRequest( serverName );
The httpGETRequest() function makes a request to Node-RED address
http://192.168.1.106:1880/get-sensor and it retrieves a string with a JSON
object.
/*F********************************************************************
*
**********************************************************************/
String
httpGETRequest( const char* serverName )
{
HTTPClient http;
// Your IP address with path or Domain name with URL path
http.begin( serverName );
// If you need Node-RED/server authentication, insert user and password
// below
// http.setAuthorization( "REPLACE_WITH_SERVER_USERNAME"
// , "REPLACE_WITH_SERVER_PASSWORD" );
// Send HTTP POST request
int httpResponseCode = http.GET();
String payload = "{}";
if( httpResponseCode > 0 )
{
Serial.print( "HTTP Response code: " );
Serial.println( httpResponseCode );
payload = http.getString();
}
else
{
Serial.print( "Error code: " );
Serial.println( httpResponseCode );
}
// Free resources
http.end();
return payload;
}
Note: if Node-RED requires authentication, uncomment the following line and
insert the Node-RED username and password.
// If you need Node-RED/server authentication, insert user and password below
// http.setAuthorization( "REPLACE_WITH_SERVER_USERNAME"
// , "REPLACE_WITH_SERVER_PASSWORD" );
Decoding JSON Object
To get access to the values, decode the JSON object and store all values in the
sensorReadingsArr array.
JSONVar myObject = JSON.parse( sensorReadings );
// JSON.typeof( jsonVar ) can be used to get the type of the var
if( JSON.typeof( myObject ) == "undefined" ) {
Serial.println( "Parsing input failed!" );
return;
}
Serial.print( "JSON object = " );
Serial.println( myObject );
// myObject.keys() can be used to get an array of all the keys in the object
JSONVar keys = myObject.keys();
for ( int i = 0; i < keys.length(); i++ ) {
JSONVar value = myObject[keys[i]];
Serial.print( keys[i] );
Serial.print( " = " );
Serial.println( value );
sensorReadingsArr[i] = double( value );
}
Serial.print( "1 = " );
Serial.println( sensorReadingsArr[0] );
Serial.print( "2 = " );
Serial.println( sensorReadingsArr[1] );
Serial.print( "3 = " );
Serial.println( sensorReadingsArr[2] );
HTTP GET Demonstration
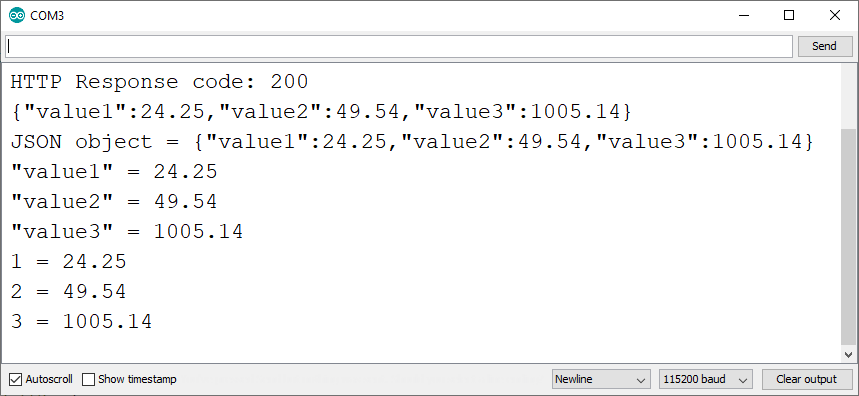
After uploading the code, open the Arduino IDE and you’ll see that it’s
receiving the following JSON data:
{"value1":24.25,"value2":49.54,"value3":1005.14}
Then, you print the decoded JSON object in the Arduino IDE Serial Monitor.
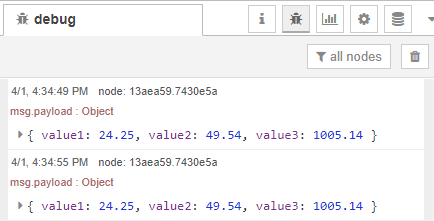
 For debugging purposes, the requested information is also printed in the
Node-RED debug window.
3. ESP32 HTTP POST: URL Encoded, JSON Data Object, Plain Text
Finally, you’ll learn how to make an HTTP POST request with an ESP32.
With this example, your ESP32 can make HTTP POST requests using three different
types of body requests: URL encoded, JSON object or plain text. These are the
most common methods and should integrate with most APIs or web services.
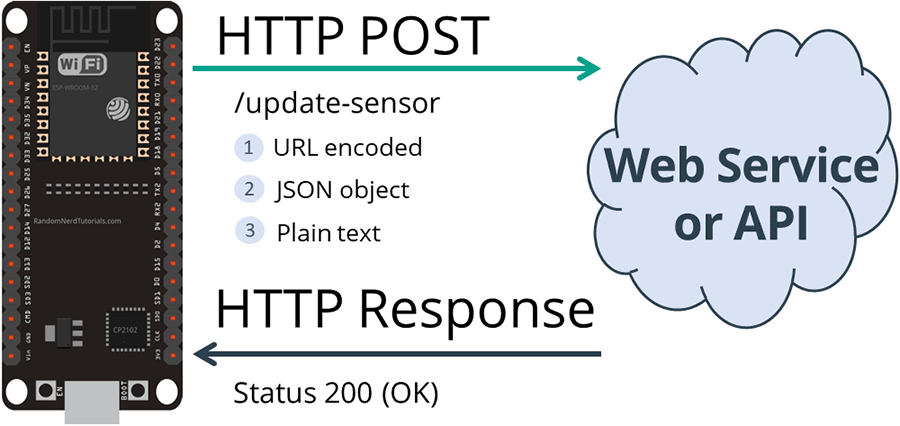 HTTP POST ESP32 URL Encoded JSON Object Data Plain Text
Copy the next sketch to your Arduino IDE ( type your SSID and password ):
/*H*******************************************************
Rui Santos
Complete project details at Complete project details at https://RandomNerdTutorials.com/esp32-http-get-post-arduino/
Permission is hereby granted, free of charge, to any person obtaining a copy
of this software and associated documentation files.
The above copyright notice and this permission notice shall be included in all
copies or substantial portions of the Software.
********************************************************/
#include
#include
//************************* DEFINES ************************************
//************************* PROTOTYPES ************************************
//************************* VARIABLES ************************************
const char* ssid = "REPLACE_WITH_YOUR_SSID";
const char* password = "REPLACE_WITH_YOUR_PASSWORD";
//Your Domain name with URL path or IP address with path
const char* serverName = "http://192.168.1.106:1880/update-sensor";
// the following variables are unsigned longs because the time, measured in
// milliseconds, will quickly become a bigger number than can be stored in an int.
unsigned long lastTime = 0;
// Timer set to 10 minutes ( 600000 )
//unsigned long timerDelay = 600000;
// Set timer to 5 seconds ( 5000 )
unsigned long timerDelay = 5000;
/*F********************************************************************
*
**********************************************************************/
void
setup()
{
Serial.begin( 115200 );
WiFi.begin( ssid, password );
Serial.println( "Connecting" );
while( WiFi.status() != WL_CONNECTED )
{
delay( 500 );
Serial.print( "." );
}
Serial.println( "" );
Serial.print( "Connected to WiFi network with IP Address: " );
Serial.println( WiFi.localIP() );
Serial.println( "Timer set to 5 seconds ( timerDelay variable ), it "
"will take 5 seconds before publishing the first reading." );
}
/*F********************************************************************
*
**********************************************************************/
void
loop()
{
// Send an HTTP POST request every 10 minutes
if( ( millis() - lastTime ) > timerDelay )
{
//Check WiFi connection status
if( WiFi.status()== WL_CONNECTED )
{
WiFiClient client;
HTTPClient http;
// Your Domain name with URL path or IP address with path
http.begin( client, serverName );
// If you need Node-RED/server authentication, insert user and
//password below
//http.setAuthorization( "REPLACE_WITH_SERVER_USERNAME"
//, "REPLACE_WITH_SERVER_PASSWORD" );
// Specify content-type header
http.addHeader( "Content-Type", "application/x-www-form-urlencoded" );
// Data to send with HTTP POST
String httpRequestData = "api_key=tPmAT5Ab3j7F9&sensor=BME280&value1=24.25&value2=49.54&value3=1005.14";
// Send HTTP POST request
int httpResponseCode = http.POST( httpRequestData );
// If you need an HTTP request with a content type: application/json, use the following:
//http.addHeader( "Content-Type", "application/json" );
//int httpResponseCode = http.POST( "{\"api_key\":\"tPmAT5Ab3j7F9\",\"sensor\":\"BME280\",\"value1\":\"24.25\",\"value2\":\"49.54\",\"value3\":\"1005.14\"}" );
// If you need an HTTP request with a content type: text/plain
//http.addHeader( "Content-Type", "text/plain" );
//int httpResponseCode = http.POST( "Hello, World!" );
Serial.print( "HTTP Response code: " );
Serial.println( httpResponseCode );
// Free resources
http.end();
}
else
{
Serial.println( "WiFi Disconnected" );
}
lastTime = millis();
}
}
Setting your serverName
Enter your domain name or Node-RED IP address, so the ESP posts sample sensor
readings.
String serverName = "http://192.168.1.106:1880/update-sensor";
Now, upload the code to your board.
HTTP POST URL Encoded
To make an HTTP POST request of type URL encoded, like this
POST /update-sensor HTTP/1.1
Host: 192.168.1.106:1880
api_key=tPmAT5Ab3j7F9&sensor=BME280&value1=24.25&value2=49.54&value3=1005.14
Content-Type: application/x-www-form-urlencoded
You need to run the following in your Arduino code:
// Your Domain name with URL path or IP address with path
http.begin( serverName );
// If you need Node-RED/server authentication, insert user and password below
//http.setAuthorization( "REPLACE_WITH_SERVER_USERNAME", "REPLACE_WITH_SERVER_PASSWORD" );
// Specify content-type header
http.addHeader( "Content-Type", "application/x-www-form-urlencoded" );
// Data to send with HTTP POST
String httpRequestData = "api_key=tPmAT5Ab3j7F9&sensor=BME280&value1=24.25&value2=49.54&value3=1005.14";
// Send HTTP POST request
int httpResponseCode = http.POST( httpRequestData );
Note: if Node-RED requires authentication, uncomment the following line and
insert the Node-RED username and password.
// If you need Node-RED/server authentication, insert user and password below
//http.setAuthorization( "REPLACE_WITH_SERVER_USERNAME", "REPLACE_WITH_SERVER_PASSWORD" );
HTTP POST JSON Object
Or if you prefer to make an HTTP POST request with a JSON object:
POST /update-sensor HTTP/1.1
Host: example.com
{api_key: "tPmAT5Ab3j7F9", sensor_name: "BME280", temperature: 24.25; humidity: 49.54; pressure: 1005.14}
Content-Type: application/json
Use the next snippet:
http.addHeader( "Content-Type", "application/json" );
int httpResponseCode = http.POST( "{\"api_key\":\"tPmAT5Ab3j7F9\",\"sensor\":\"BME280\",\"value1\":\"24.25\",\"value2\":\"49.54\",\"value3\":\"1005.14\"}" );
HTTP Plain Text
If you want to send plain text or a value, use the following:
http.addHeader( "Content-Type", "text/plain" );
int httpResponseCode = http.POST( "Hello, World!" );
Note: the Node-RED flow we’re using ( web service ) is not setup to receive
plain text, but if the API that you plan to integrate only accepts plain text
or a value, you can use the previous snippet.
HTTP POST Demonstration
In the Node-RED debug window, you can view that your ESP is making an HTTP POST
request every 5 seconds.
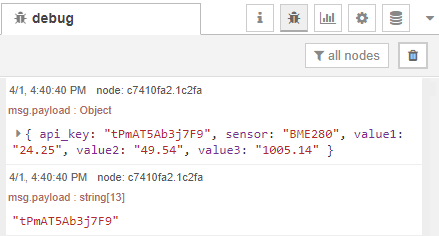 And in this example, those values are also sent to 3 Gauges and are displayed in
Node-RED Dashboard:
http://raspberry-pi-ip-address:1880/ui
Wrapping Up
In this tutorial you’ve learned how to integrate your ESP32 with online services
using HTTP GET and HTTP POST requests.
HTTP GET and HTTP POST are commonly used in most web services and APIs. These
can be useful in your projects to: publish your sensor readings to a web service
like IFTTT, ThingSpeak; to an ESP32 or Raspberry Pi web server or to your own
server; to request data from the internet or from your database, and much more.
If you’re using an ESP8266 board, read: Guide for ESP8266 NodeMCU HTTP GET and
HTTP Post Requests.
 ESP32 HTTP GET and HTTP POST with Arduino IDE ( JSON, URL Encoded, Text )
Recommended: ESP8266 NodeMCU HTTP GET and HTTP POST with Arduino IDE ( JSON, URL Encoded, Text )
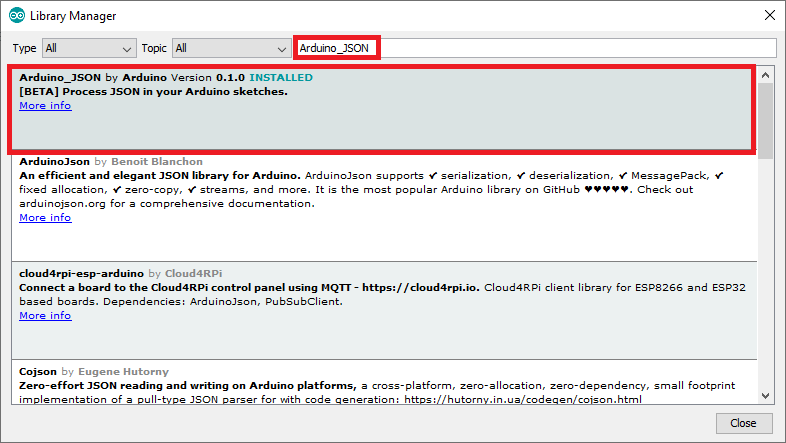 Install Arduino JSON library Arduino IDE
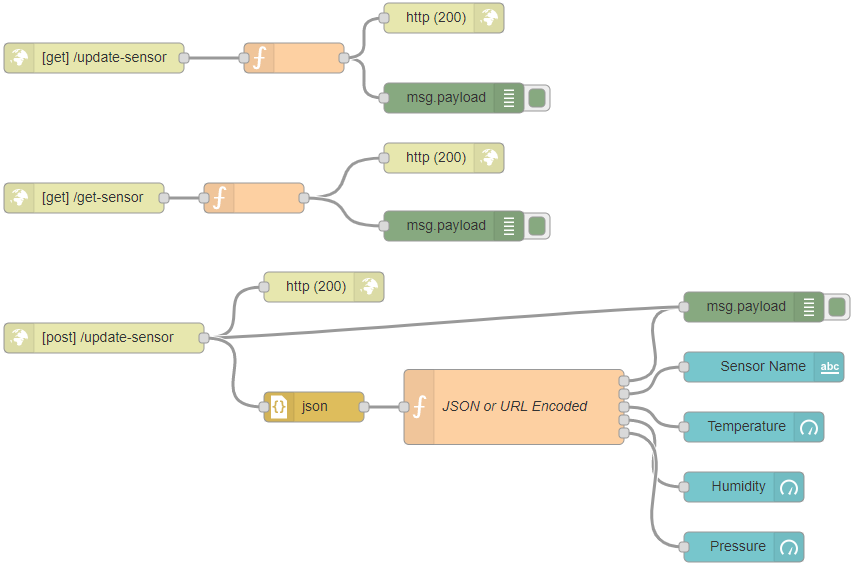 Node-RED-Flow-HTTP-GET-POST-Request-Methods-ESP32-ESP8266-Arduino
Go to Menu > Import and copy the following to your Clipboard to create your
Node-RED flow.
[{"id":"599740b7.efde9","type":"http response","z":"b01416d3.f69f38","name":""
,"statusCode":"200","headers":{},"x":420,"y":689,"wires":[]}
,{"id":"1618a829.76f638","type":"json","z":"b01416d3.f69f38","name":""
,"property":"payload","action":"obj","pretty":true,"x":410,"y":809
,"wires":[["d0089cc7.d25ac"]]},{"id":"c7410fa2.1c2fa","type":"debug"
,"z":"b01416d3.f69f38","name":"","active":true,"tosidebar":true,"console":false
,"tostatus":false,"complete":"false","x":850,"y":709,"wires":[]}
,{"id":"75a22f74.f1aba","type":"ui_text","z":"b01416d3.f69f38"
,"group":"2b7ac01b.fc984","order":1,"width":0,"height":0
,"name":"","label":"Sensor Name","format":"{{msg.payload}}"
,"layout":"row-spread","x":860,"y":769,"wires":[]},{"id":"1c8f9093.8bc2bf"
,"type":"ui_gauge","z":"b01416d3.f69f38","name":"","group":"2b7ac01b.fc984"
,"order":2,"width":0,"height":0,"gtype":"gage","title":"Temperature"
,"label":"ºC","format":"{{value}}","min":0,"max":"38","colors":["#00b500"
,"#e6e600","#ca3838"],"seg1":"","seg2":"","x":850,"y":829,"wires":[]}
,{"id":"a5bd2706.54e108","type":"ui_gauge","z":"b01416d3.f69f38","name":""
,"group":"2b7ac01b.fc984","order":3,"width":0,"height":0,"gtype":"gage"
,"title":"Humidity","label":"%","format":"{{value}}","min":0,"max":"100"
,"colors":["#0080ff","#0062c4","#002f5e"],"seg1":"","seg2":"","x":840,"y":889
,"wires":[]},{"id":"105ac2cc.7b3cfd","type":"ui_gauge","z":"b01416d3.f69f38"
,"name":"","group":"2b7ac01b.fc984","order":4,"width":0,"height":0
,"gtype":"gage","title":"Pressure","label":"hPa","format":"{{value}}"
,"min":0,"max":"1200","colors":["#b366ff","#8000ff","#440088"],"seg1":""
,"seg2":"","x":840,"y":949,"wires":[]},{"id":"d0089cc7.d25ac","type":"function"
,"z":"b01416d3.f69f38","name":"JSON or URL Encoded"
,"func":"var msg0 = { payload: msg.payload.api_key };\nvar msg1 =
{ payload: msg.payload.sensor };\nvar msg2 = { payload: msg.payload.value1 };
\nvar msg3 = { payload: msg.payload.value2 };
\nvar msg4 = { payload: msg.payload.value3 };\n\nreturn [msg0, msg1, msg2, msg3
, msg4];","outputs":5,"noerr":0,"x":610,"y":809,"wires":[["c7410fa2.1c2fa"]
,["75a22f74.f1aba"],["1c8f9093.8bc2bf"],["a5bd2706.54e108"]
,["105ac2cc.7b3cfd"]]},{"id":"5d9ab0d2.66b92","type":"http in","z":"b01416d3
.f69f38","name":"","url":"update-sensor","method":"post","upload":false
,"swaggerDoc":"","x":200,"y":740,"wires":[["599740b7.efde9","c7410fa2.1c2fa"
,"1618a829.76f638"]]},{"id":"7f5cf345.63f56c","type":"http response"
,"z":"b01416d3.f69f38","name":"","statusCode":"200","headers":{}
,"x":540,"y":420,"wires":[]},{"id":"6530621.95b429c","type":"http in"
,"z":"b01416d3.f69f38","name":"","url":"/get-sensor","method":"get"
,"upload":false,"swaggerDoc":"","x":180,"y":600,"wires":[["9471d1a0.68588"]]}
,{"id":"5ddc9f47.4b555","type":"http response","z":"b01416d3.f69f38","name":""
,"statusCode":"200","headers":{},"x":540,"y":560,"wires":[]}
,{"id":"9471d1a0.68588","type":"function","z":"b01416d3.f69f38","name":""
,"func":"msg.payload = {\"value1\":24.25, \"value2\":49.54
, \"value3\":1005.14};\nreturn msg;","outputs":1,"noerr":0,"x":350,"y":600
,"wires":[["5ddc9f47.4b555","13aea59.7430e5a"]]},{"id":"13aea59.7430e5a"
,"type":"debug","z":"b01416d3.f69f38","name":""
,"active":true,"tosidebar":true,"console":false,"tostatus":false
,"complete":"false","x":550,"y":628,"wires":[]},{"id":"e71c7a7d.e7c598"
,"type":"debug","z":"b01416d3.f69f38","name":"","active":true
,"tosidebar":true,"console":false,"tostatus":false,"complete":"false"
,"x":550,"y":500,"wires":[]},{"id":"c7807102.3f433","type":"http in"
,"z":"b01416d3.f69f38","name":"","url":"/update-sensor","method":"get
","upload":false,"swaggerDoc":"","x":190,"y":460,"wires":[["60410cde.562a34"]]}
,{"id":"60410cde.562a34","type":"function","z":"b01416d3.f69f38","name":""
,"func":"msg.payload = msg.payload.temperature;\nreturn msg;","outputs":1
,"noerr":0,"x":390,"y":460,"wires":[["e71c7a7d.e7c598","7f5cf345.63f56c"]]}
,{"id":"2b7ac01b.fc984","type":"ui_group","z":"","name":"SENSORS"
,"tab":"99ab8dc5.f435c","disp":true,"width":"6","collapse":false}
,{"id":"99ab8dc5.f435c","type":"ui_tab","z":"","name":"HTTP","icon":"dashboard"
,"order":1,"disabled":false,"hidden":false}]
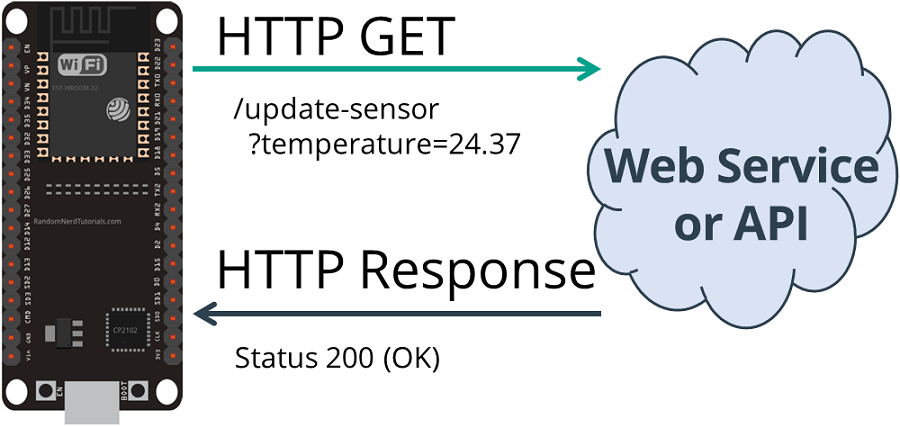 HTTP GET ESP32 Get Sensor Value Plain Text Status 200 OK

 HTTP GET ESP32 Get Sensor JSON Data
Copy the next sketch to your Arduino IDE ( type your SSID and password ):
 For debugging purposes, the requested information is also printed in the
Node-RED debug window.

 HTTP POST ESP32 URL Encoded JSON Object Data Plain Text
Copy the next sketch to your Arduino IDE ( type your SSID and password ):
/*H*******************************************************
Rui Santos
Complete project details at Complete project details at https://RandomNerdTutorials.com/esp32-http-get-post-arduino/
Permission is hereby granted, free of charge, to any person obtaining a copy
of this software and associated documentation files.
The above copyright notice and this permission notice shall be included in all
copies or substantial portions of the Software.
********************************************************/
#include
  And in this example, those values are also sent to 3 Gauges and are displayed in
Node-RED Dashboard: