ESP32 HTTPS
#include <>
From:https://randomnerdtutorials.com/esp32-https-requests/
ESP32 HTTPS Requests ( Arduino IDE )
In this guide, you’ll learn how to make HTTPS requests with the ESP32. We’ll
introduce you to some HTTPS fundamental concepts and provide several examples
( with and without certificates ) using two different libraries: HttpClient and
WiFiClientSecure.
 ESP32 HTTPS Requests Arduino IDE
Throughout this article, we’ll cover the following subjects:
What is HTTPS?
Why do you need HTTPS with the ESP32?
SSL/TLS Certificates
Certificate Chain
Certificates Expiration Date
Getting a Server’s Certificate using Google Chrome
HTTPS Requests with the ESP32 ( WiFiClientSecure )
ESP32 HTTPS Requests with Certificate
ESP32 HTTPS Requests without Certificate
HTTPS Requests with the ESP32 ( HTTPClient )
ESP32 HTTPS Requests with Certificate
ESP32 HTTPS Requests without Certificate
ESP32 HTTPS Requests Arduino IDE
Throughout this article, we’ll cover the following subjects:
What is HTTPS?
Why do you need HTTPS with the ESP32?
SSL/TLS Certificates
Certificate Chain
Certificates Expiration Date
Getting a Server’s Certificate using Google Chrome
HTTPS Requests with the ESP32 ( WiFiClientSecure )
ESP32 HTTPS Requests with Certificate
ESP32 HTTPS Requests without Certificate
HTTPS Requests with the ESP32 ( HTTPClient )
ESP32 HTTPS Requests with Certificate
ESP32 HTTPS Requests without Certificate
Introduction
To understand how to make HTTPS requests with the ESP32, it’s better to be
familiar with some fundamental concepts that we’ll explain next. We also
recommend taking a look at the following article:
ESP32/ESP8266 with HTTPS and SSL/TLS Encryption: Basic Concepts
What is HTTPS?
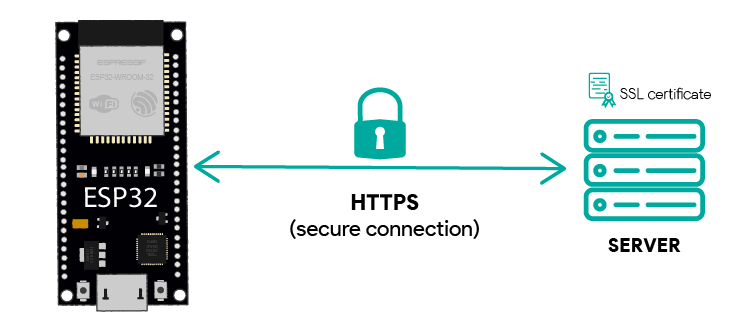
HTTPS is the secure version of the HTTP protocol, hence the “S”, which stands
for secure.
HTTP is a protocol to transfer data over the internet. When that data is
encrypted with SSL/TLS, it’s called HTTPS.
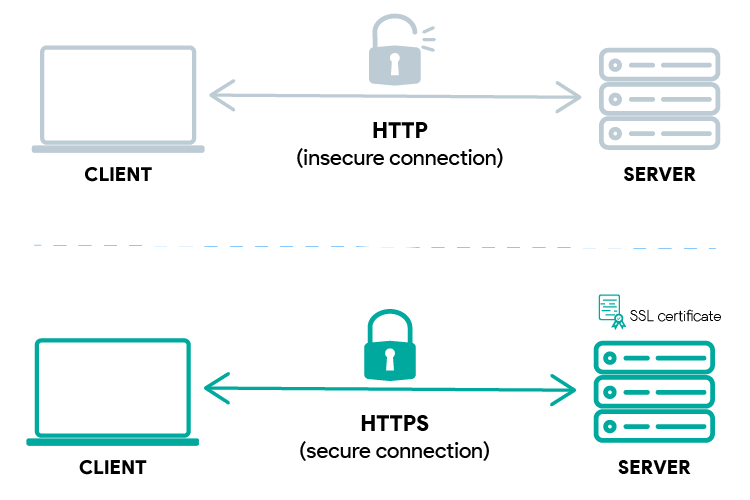 HTTP vs HTTPS
To simplify, HTTPS is just the HTTP protocol but with encrypted data using
SSL/TLS.
HTTP vs HTTPS
To simplify, HTTPS is just the HTTP protocol but with encrypted data using
SSL/TLS.
Why do you need HTTPS with the ESP32?
Using HTTPS ensures the following:
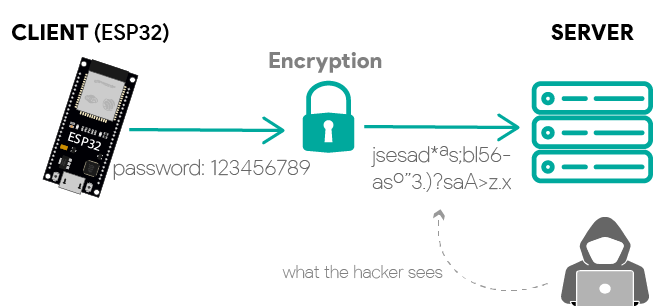
1 ) Encryption: all traffic between the ESP32 and a server will be encrypted—no
one can spy on your requests and passwords, they will only see gibberish.
 ESP32 HTTPS requests encrypted
When using the ESP32 libraries to make HTTPS requests, they take care of
encryption and decryption of the messages.
2 ) Server trust ( identification ): when using HTTPS, via TLS/SSL certificates,
you ensure you are connected to the server you would expect—this means, you
always know to who you are connected to.
ESP32 HTTPS requests encrypted
When using the ESP32 libraries to make HTTPS requests, they take care of
encryption and decryption of the messages.
2 ) Server trust ( identification ): when using HTTPS, via TLS/SSL certificates,
you ensure you are connected to the server you would expect—this means, you
always know to who you are connected to.
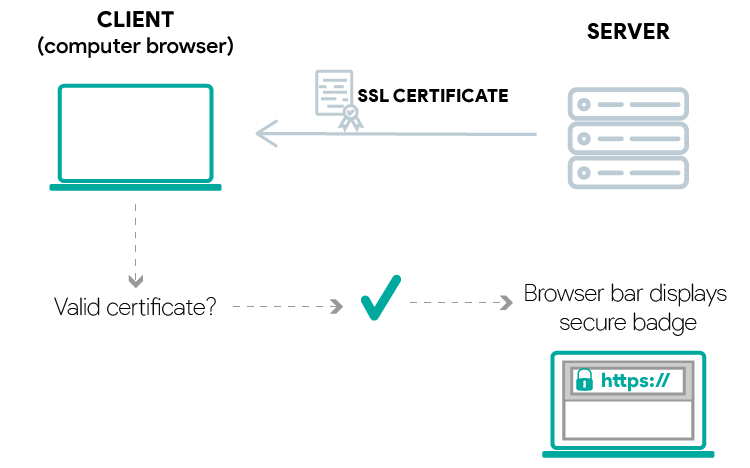
 SSL/TLS Certificate valid
To make sure we are connected to the right server, we need to check the server
certificate on the ESP32. This means we need to download the server certificate
and hard code it on our sketch so that we can check if we’re actually connected
to the server we are expecting.
SSL/TLS Certificate valid
To make sure we are connected to the right server, we need to check the server
certificate on the ESP32. This means we need to download the server certificate
and hard code it on our sketch so that we can check if we’re actually connected
to the server we are expecting.
TLS/SSL Certificates
SSL certificates are issued by legitimate Certificate Authorities. One of the
most known is LetsEncrypt. Certificate Authorities confirm the identity of the
certificate owner and provide proof that the certificate is valid. The
certificate also contains the server’s public key for asymmetrically encrypted
communication with a client.
 TLS SSL Certificate Public Key
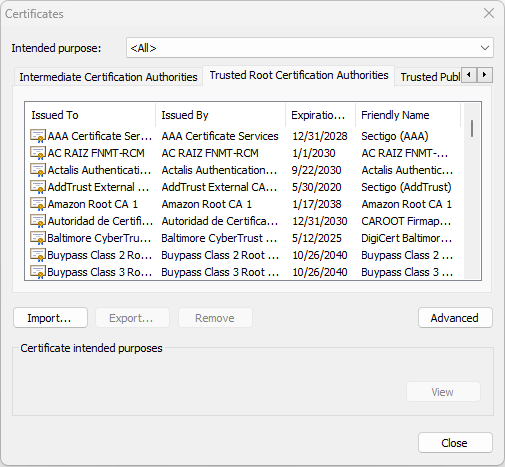
When a Certificate Authority issues a certificate, it signs the certificate with
its root certificate. This root certificate should be on the database of trusted
certificates called a root store. Your browser and the operating system contain
a database of root certificates that they can trust ( root store ). The following
screenshot shows some of the trusted root certificates.
TLS SSL Certificate Public Key
When a Certificate Authority issues a certificate, it signs the certificate with
its root certificate. This root certificate should be on the database of trusted
certificates called a root store. Your browser and the operating system contain
a database of root certificates that they can trust ( root store ). The following
screenshot shows some of the trusted root certificates.
 trusted root certificates chrome
So, when you connect to a website using your browser, it checks if its
certificate was signed by a root certificate that belongs to its root store. New
root certificates are added or deleted to the root store with each browser
update.
trusted root certificates chrome
So, when you connect to a website using your browser, it checks if its
certificate was signed by a root certificate that belongs to its root store. New
root certificates are added or deleted to the root store with each browser
update.
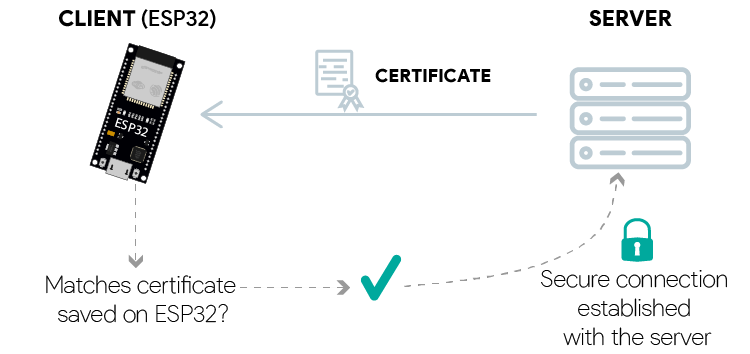
 HTTPS client server interaction with valid certificate
When you’re using an ESP32, you need to upload the certificates that you trust
to your board. Usually, you’ll add only the certificate for the server you’ll
want to connect to.
HTTPS client server interaction with valid certificate
When you’re using an ESP32, you need to upload the certificates that you trust
to your board. Usually, you’ll add only the certificate for the server you’ll
want to connect to.
 ESP32 Check server certificate for secure connection
But, it’s also possible to upload a root store to your board to have more
options, and don’t have to worry about searching for a specific website’s
certificate.
ESP32 Check server certificate for secure connection
But, it’s also possible to upload a root store to your board to have more
options, and don’t have to worry about searching for a specific website’s
certificate.
Certificate Chain
An SSL certificate is part of an SSL certificate chain. What is a certificate
chain?
A certificate chain includes the following:
- root certificate ( from a Certificate Authority );
- one or more intermediate certificates;
- the server certificate.
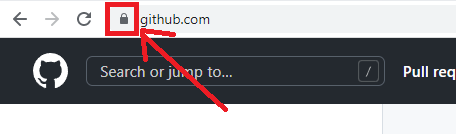
The server certificate is what makes your browser show a secure padlock icon
when you visit a website. It means the server has a valid SSL/TLS certificate
and all the connections with the website are encrypted. A valid SSL/TLS
certificate is a certificate trusted by your browser. What makes it trustable?
As we’ve mentioned previously, SSL/TLS certificates are issued by Certificate
Authorities. However, these authorities don’t issue certificates directly to
websites. They use intermediates that will issue the server certificate
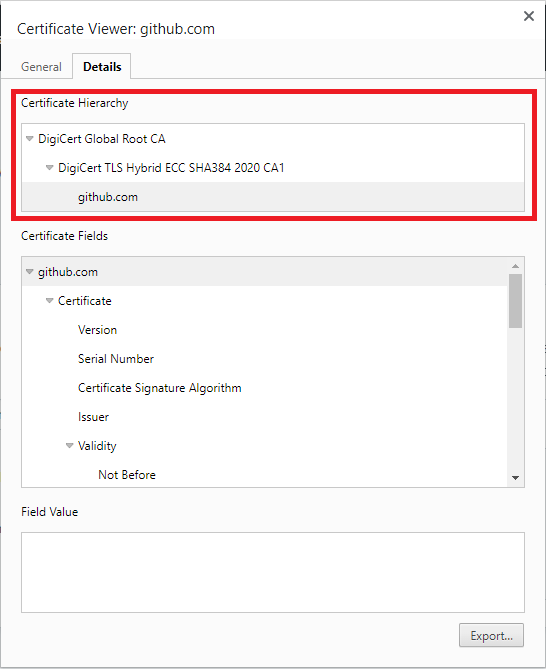
( Certificate Authority > Intermediate certificate > server certificate ). The
following screenshot shows an example for the Github website. You can see the
certificate hierarchy highlighted with a red rectangle.
 Certificate Chain SSL
Your browser checks this certificate chain until it finds the root certificate.
If that certificate is in the browser’s root store, then it considers the
certificate to be valid. In this case, the DigiCert Global Root CA is in the
browser’s root store. So, it will display the “secure” icon on the browser bar.
Certificate Chain SSL
Your browser checks this certificate chain until it finds the root certificate.
If that certificate is in the browser’s root store, then it considers the
certificate to be valid. In this case, the DigiCert Global Root CA is in the
browser’s root store. So, it will display the “secure” icon on the browser bar.
 github secure icon
The following diagram shows a high-level overview of how it works.
github secure icon
The following diagram shows a high-level overview of how it works.
 certificate chain example
In summary:
root certificate: it’s a self-signed certificate issued by a Certificate
Authority. The private key of this certificate is used to sign the next
certificate in the hierarchy of certificates. Root certificates are loaded in
the trust stores of browsers and operating systems.
intermediate certificate: it’s signed by the private key of the root
certificate. The private key of the intermediate certificate is the one that
signs the server certificate. There can be more than one intermediate
certificate.
server certificate: this certificate is issued to a specific domain name on
a server. It’s signed by the intermediate certificate private key. If it is
valid ( trustable certificate chain ), the browser displays a secure padlock
badge on the search bar next to the website domain.
With the ESP32, to check the validity of a server, you can load any of those
certificates: root, intermediate, or server certificate.
Certificates Expiration Date
SSL/TLS certificates have an expiry date. You can check on a browser the expiry
date of the certificate for a particular server. The server’s certificate
usually has a short-term validity.
So, if you want to use it in your ESP32 projects, you’ll need to update your
code quite frequently. If you want your code to run for years without worrying,
you can use the website’s root certificate, which usually has a validity of
five to ten years or more.
Getting a Server’s Certificate
There are different ways to get the server’s certificate. One of the easiest
ways is to download the certificate directly from your browser. You can also use
OpenSSL and get all the certificate information you need using the command line
( we won’t cover this method in this tutorial ).
In this section, you’ll learn how to get the server’s certificate. We’ll
generally use the root certificate, but you can use any of the other
certificates on the certificate chain—you just need to be aware of the
certificate expiry date.
Getting a Server’s Certificate using Google Chrome
In this section, we’ll show you how to get the certificate for a server using
Google Chrome ( that’s the web browser we use more often ). Instructions for other
web browsers should be similar.
One of the examples we’ll use later is to make an HTTPS request to the
howmyssl.com website. So, for demonstration purposes, we’ll show you how to get
its root certificate. It is similar for other websites.
How to Get Websites’s Certificate using Google Chrome?
- Go to the website that you want to get the certificate for.
- Click on the padlock icon and then click on Show connection details.
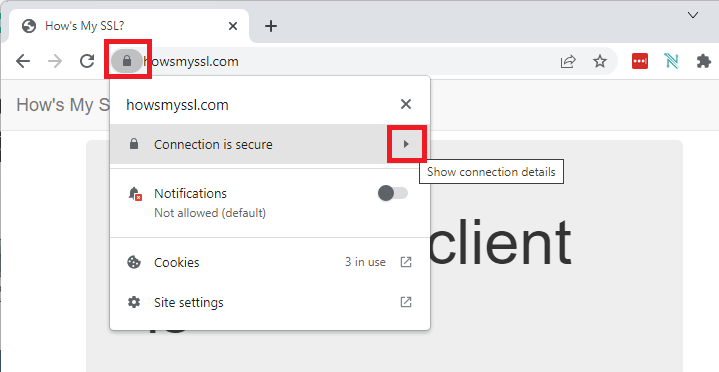 get website ssl certificate
- Then, click on Show certificate.
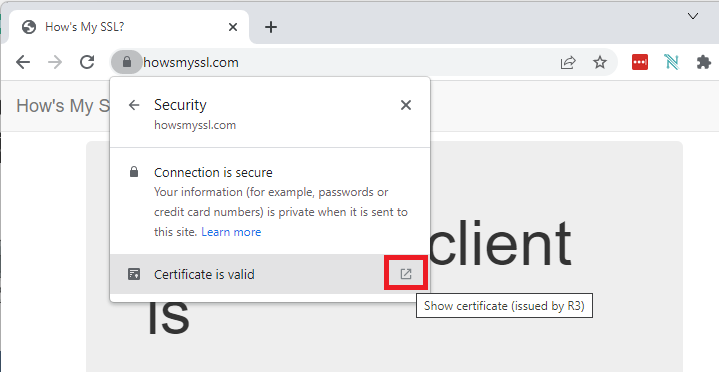 show certificate google chrome
- A new window will open the all the information about the website’s
certificate. Click on the Details tab, make sure you select the root certificate
( that’s what we’re looking for in this example ), then click on Export…
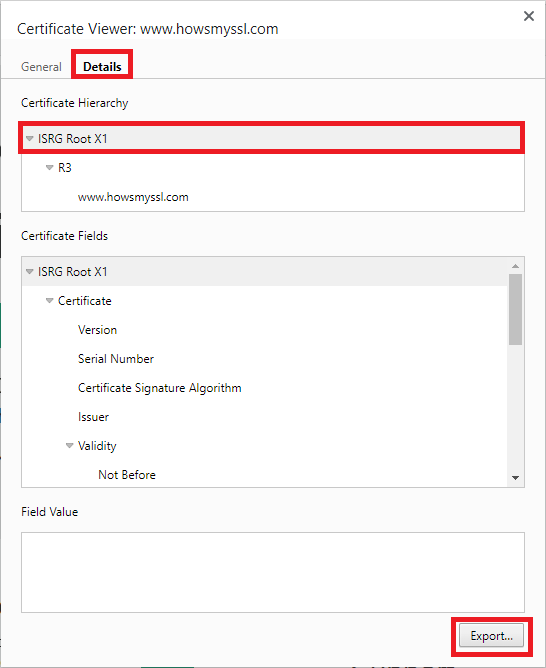 ssl certificate details
- Select a place on your computer to save the certificate. Save it on the
default format: Base64-encoded ASCII, single certificate ( *.pem, .crt ).
And that ’s it.
You can double-click on the certificate to check it’s details, including the
expiration date.
 all the ssl certificate information
Open the certificate using Notepad or other similar software. You should get
something similar as shown below.
all the ssl certificate information
Open the certificate using Notepad or other similar software. You should get
something similar as shown below.
 certificate notepad
We need to convert this to Arduino multi-line string, so that we can use it in
our sketch. Basically, you need to add a “ at the beginning of each line and a
\n” \ at the end of each line, except the last line that you should add \n”. So,
you’ll get something as shown below:
certificate multi line string
certificate notepad
We need to convert this to Arduino multi-line string, so that we can use it in
our sketch. Basically, you need to add a “ at the beginning of each line and a
\n” \ at the end of each line, except the last line that you should add \n”. So,
you’ll get something as shown below:
certificate multi line string
HTTPS Requests with the ESP32
Now that you know all the major important aspects of certificates and how to get
a server’s certificate, let’s finally take a look at how to make HTTPS requests
on the ESP32 using the Arduino core. We’ll cover different methods using two
different libraries: WiFiClientSecure and HTTPClient.
 HTTPS Requests with the ESP32
ESP32 HTTPS Requests using WiFiClientSecure Library
You can find a simple example showing how to make HTTPS requests with the
WiFiClientSecure library on your Arduino IDE.
ESP32 HTTPS Requests with Certificate
Make sure you have an ESP32 board selected in Tools > Board. Then, go to
File > Examples > WiFiClientSecure > WiFiClientSecure.
You can modify the following code with the certificate we got from the previous
steps, which is valid until 2035.
/H********************************************************
Complete project details: https://RandomNerdTutorials.com/
Wifi secure connection example for ESP32 - Running on TLS 1.2 using mbedTLS
Suporting the following chipersuites:
"TLS_ECDHE_ECDSA_WITH_AES_256_GCM_SHA384","TLS_ECDHE_RSA_WITH_AES_256_GCM_SHA384"
,"TLS_DHE_RSA_WITH_AES_256_GCM_SHA384","TLS_ECDHE_ECDSA_WITH_AES_256_CCM"
,"TLS_DHE_RSA_WITH_AES_256_CCM","TLS_ECDHE_ECDSA_WITH_AES_256_CBC_SHA384"
,"TLS_ECDHE_RSA_WITH_AES_256_CBC_SHA384","TLS_DHE_RSA_WITH_AES_256_CBC_SHA256"
,"TLS_ECDHE_ECDSA_WITH_AES_256_CBC_SHA","TLS_ECDHE_RSA_WITH_AES_256_CBC_SHA"
,"TLS_DHE_RSA_WITH_AES_256_CBC_SHA","TLS_ECDHE_ECDSA_WITH_AES_256_CCM_8"
,"TLS_DHE_RSA_WITH_AES_256_CCM_8","TLS_ECDHE_ECDSA_WITH_CAMELLIA_256_GCM_SHA384"
,"TLS_ECDHE_RSA_WITH_CAMELLIA_256_GCM_SHA384","TLS_DHE_RSA_WITH_CAMELLIA_256_GCM_SHA384"
,"TLS_ECDHE_ECDSA_WITH_CAMELLIA_256_CBC_SHA384"
,"TLS_ECDHE_RSA_WITH_CAMELLIA_256_CBC_SHA384"
,"TLS_DHE_RSA_WITH_CAMELLIA_256_CBC_SHA256"
,"TLS_DHE_RSA_WITH_CAMELLIA_256_CBC_SHA"
,"TLS_ECDHE_ECDSA_WITH_AES_128_GCM_SHA256"
,"TLS_ECDHE_RSA_WITH_AES_128_GCM_SHA256","TLS_DHE_RSA_WITH_AES_128_GCM_SHA256"
,"TLS_ECDHE_ECDSA_WITH_AES_128_CCM","TLS_DHE_RSA_WITH_AES_128_CCM"
,"TLS_ECDHE_ECDSA_WITH_AES_128_CBC_SHA256","TLS_ECDHE_RSA_WITH_AES_128_CBC_SHA256"
,"TLS_DHE_RSA_WITH_AES_128_CBC_SHA256","TLS_ECDHE_ECDSA_WITH_AES_128_CBC_SHA"
,"TLS_ECDHE_RSA_WITH_AES_128_CBC_SHA","TLS_DHE_RSA_WITH_AES_128_CBC_SHA"
,"TLS_ECDHE_ECDSA_WITH_AES_128_CCM_8","TLS_DHE_RSA_WITH_AES_128_CCM_8"
,"TLS_ECDHE_ECDSA_WITH_CAMELLIA_128_GCM_SHA256"
,"TLS_ECDHE_RSA_WITH_CAMELLIA_128_GCM_SHA256"
,"TLS_DHE_RSA_WITH_CAMELLIA_128_GCM_SHA256"
,"TLS_ECDHE_ECDSA_WITH_CAMELLIA_128_CBC_SHA256"
,"TLS_ECDHE_RSA_WITH_CAMELLIA_128_CBC_SHA256"
,"TLS_DHE_RSA_WITH_CAMELLIA_128_CBC_SHA256","TLS_DHE_RSA_WITH_CAMELLIA_128_CBC_SHA"
,"TLS_ECDHE_ECDSA_WITH_3DES_EDE_CBC_SHA","TLS_ECDHE_RSA_WITH_3DES_EDE_CBC_SHA"
,"TLS_DHE_RSA_WITH_3DES_EDE_CBC_SHA","TLS_DHE_PSK_WITH_AES_256_GCM_SHA384"
,"TLS_DHE_PSK_WITH_AES_256_CCM","TLS_ECDHE_PSK_WITH_AES_256_CBC_SHA384"
,"TLS_DHE_PSK_WITH_AES_256_CBC_SHA384","TLS_ECDHE_PSK_WITH_AES_256_CBC_SHA"
,"TLS_DHE_PSK_WITH_AES_256_CBC_SHA","TLS_DHE_PSK_WITH_CAMELLIA_256_GCM_SHA384"
,"TLS_ECDHE_PSK_WITH_CAMELLIA_256_CBC_SHA384"
,"TLS_DHE_PSK_WITH_CAMELLIA_256_CBC_SHA384","TLS_PSK_DHE_WITH_AES_256_CCM_8"
,"TLS_DHE_PSK_WITH_AES_128_GCM_SHA256","TLS_DHE_PSK_WITH_AES_128_CCM"
,"TLS_ECDHE_PSK_WITH_AES_128_CBC_SHA256","TLS_DHE_PSK_WITH_AES_128_CBC_SHA256"
,"TLS_ECDHE_PSK_WITH_AES_128_CBC_SHA","TLS_DHE_PSK_WITH_AES_128_CBC_SHA"
,"TLS_DHE_PSK_WITH_CAMELLIA_128_GCM_SHA256"
,"TLS_DHE_PSK_WITH_CAMELLIA_128_CBC_SHA256"
,"TLS_ECDHE_PSK_WITH_CAMELLIA_128_CBC_SHA256","TLS_PSK_DHE_WITH_AES_128_CCM_8"
,"TLS_ECDHE_PSK_WITH_3DES_EDE_CBC_SHA","TLS_DHE_PSK_WITH_3DES_EDE_CBC_SHA"
,"TLS_RSA_WITH_AES_256_GCM_SHA384","TLS_RSA_WITH_AES_256_CCM"
,"TLS_RSA_WITH_AES_256_CBC_SHA256","TLS_RSA_WITH_AES_256_CBC_SHA"
,"TLS_ECDH_RSA_WITH_AES_256_GCM_SHA384","TLS_ECDH_RSA_WITH_AES_256_CBC_SHA384"
,"TLS_ECDH_RSA_WITH_AES_256_CBC_SHA","TLS_ECDH_ECDSA_WITH_AES_256_GCM_SHA384"
,"TLS_ECDH_ECDSA_WITH_AES_256_CBC_SHA384","TLS_ECDH_ECDSA_WITH_AES_256_CBC_SHA"
,"TLS_RSA_WITH_AES_256_CCM_8","TLS_RSA_WITH_CAMELLIA_256_GCM_SHA384"
,"TLS_RSA_WITH_CAMELLIA_256_CBC_SHA256","TLS_RSA_WITH_CAMELLIA_256_CBC_SHA"
,"TLS_ECDH_RSA_WITH_CAMELLIA_256_GCM_SHA384"
,"TLS_ECDH_RSA_WITH_CAMELLIA_256_CBC_SHA384"
,"TLS_ECDH_ECDSA_WITH_CAMELLIA_256_GCM_SHA384"
,"TLS_ECDH_ECDSA_WITH_CAMELLIA_256_CBC_SHA384"
,"TLS_RSA_WITH_AES_128_GCM_SHA256","TLS_RSA_WITH_AES_128_CCM"
,"TLS_RSA_WITH_AES_128_CBC_SHA256","TLS_RSA_WITH_AES_128_CBC_SHA"
,"TLS_ECDH_RSA_WITH_AES_128_GCM_SHA256","TLS_ECDH_RSA_WITH_AES_128_CBC_SHA256"
,"TLS_ECDH_RSA_WITH_AES_128_CBC_SHA","TLS_ECDH_ECDSA_WITH_AES_128_GCM_SHA256"
,"TLS_ECDH_ECDSA_WITH_AES_128_CBC_SHA256","TLS_ECDH_ECDSA_WITH_AES_128_CBC_SHA"
,"TLS_RSA_WITH_AES_128_CCM_8","TLS_RSA_WITH_CAMELLIA_128_GCM_SHA256"
,"TLS_RSA_WITH_CAMELLIA_128_CBC_SHA256","TLS_RSA_WITH_CAMELLIA_128_CBC_SHA"
,"TLS_ECDH_RSA_WITH_CAMELLIA_128_GCM_SHA256"
,"TLS_ECDH_RSA_WITH_CAMELLIA_128_CBC_SHA256"
,"TLS_ECDH_ECDSA_WITH_CAMELLIA_128_GCM_SHA256"
,"TLS_ECDH_ECDSA_WITH_CAMELLIA_128_CBC_SHA256","TLS_RSA_WITH_3DES_EDE_CBC_SHA"
,"TLS_ECDH_RSA_WITH_3DES_EDE_CBC_SHA","TLS_ECDH_ECDSA_WITH_3DES_EDE_CBC_SHA"
,"TLS_RSA_PSK_WITH_AES_256_GCM_SHA384","TLS_RSA_PSK_WITH_AES_256_CBC_SHA384"
,"TLS_RSA_PSK_WITH_AES_256_CBC_SHA","TLS_RSA_PSK_WITH_CAMELLIA_256_GCM_SHA384"
,"TLS_RSA_PSK_WITH_CAMELLIA_256_CBC_SHA384"
,"TLS_RSA_PSK_WITH_AES_128_GCM_SHA256","TLS_RSA_PSK_WITH_AES_128_CBC_SHA256"
,"TLS_RSA_PSK_WITH_AES_128_CBC_SHA","TLS_RSA_PSK_WITH_CAMELLIA_128_GCM_SHA256"
,"TLS_RSA_PSK_WITH_CAMELLIA_128_CBC_SHA256","TLS_RSA_PSK_WITH_3DES_EDE_CBC_SHA"
,"TLS_PSK_WITH_AES_256_GCM_SHA384","TLS_PSK_WITH_AES_256_CCM"
,"TLS_PSK_WITH_AES_256_CBC_SHA384","TLS_PSK_WITH_AES_256_CBC_SHA"
,"TLS_PSK_WITH_CAMELLIA_256_GCM_SHA384","TLS_PSK_WITH_CAMELLIA_256_CBC_SHA384"
,"TLS_PSK_WITH_AES_256_CCM_8","TLS_PSK_WITH_AES_128_GCM_SHA256"
,"TLS_PSK_WITH_AES_128_CCM","TLS_PSK_WITH_AES_128_CBC_SHA256"
,"TLS_PSK_WITH_AES_128_CBC_SHA","TLS_PSK_WITH_CAMELLIA_128_GCM_SHA256"
,"TLS_PSK_WITH_CAMELLIA_128_CBC_SHA256","TLS_PSK_WITH_AES_128_CCM_8"
,"TLS_PSK_WITH_3DES_EDE_CBC_SHA","TLS_EMPTY_RENEGOTIATION_INFO_SCSV"]
2017 - Evandro Copercini - Apache 2.0 License.
********************************************************/
#include <WiFiClientSecure.h>
//************************* DEFINES ************************************
//************************* PROTOTYPES ************************************
//************************* VARIABLES ************************************
/*F********************************************************************
*
**********************************************************************/
const char* ssid = "REPLACE_WITH_YOUR_SSID";
const char* password = "REPLACE_WITH_YOUR_PASSWORD";
const char* server = "www.howsmyssl.com"; // Server URL
// www.howsmyssl.com root certificate authority, to verify the server
// change it to your server root CA
// SHA1 fingerprint is broken now!
const char* test_root_ca= \
"-----BEGIN CERTIFICATE-----\n" \
"MIIFazCCA1OgAwIBAgIRAIIQz7DSQONZRGPgu2OCiwAwDQYJKoZIhvcNAQELBQAw\n" \
"TzELMAkGA1UEBhMCVVMxKTAnBgNVBAoTIEludGVybmV0IFNlY3VyaXR5IFJlc2Vh\n" \
"cmNoIEdyb3VwMRUwEwYDVQQDEwxJU1JHIFJvb3QgWDEwHhcNMTUwNjA0MTEwNDM4\n" \
"WhcNMzUwNjA0MTEwNDM4WjBPMQswCQYDVQQGEwJVUzEpMCcGA1UEChMgSW50ZXJu\n" \
"ZXQgU2VjdXJpdHkgUmVzZWFyY2ggR3JvdXAxFTATBgNVBAMTDElTUkcgUm9vdCBY\n" \
"MTCCAiIwDQYJKoZIhvcNAQEBBQADggIPADCCAgoCggIBAK3oJHP0FDfzm54rVygc\n" \
"h77ct984kIxuPOZXoHj3dcKi/vVqbvYATyjb3miGbESTtrFj/RQSa78f0uoxmyF+\n" \
"0TM8ukj13Xnfs7j/EvEhmkvBioZxaUpmZmyPfjxwv60pIgbz5MDmgK7iS4+3mX6U\n" \
"A5/TR5d8mUgjU+g4rk8Kb4Mu0UlXjIB0ttov0DiNewNwIRt18jA8+o+u3dpjq+sW\n" \
"T8KOEUt+zwvo/7V3LvSye0rgTBIlDHCNAymg4VMk7BPZ7hm/ELNKjD+Jo2FR3qyH\n" \
"B5T0Y3HsLuJvW5iB4YlcNHlsdu87kGJ55tukmi8mxdAQ4Q7e2RCOFvu396j3x+UC\n" \
"B5iPNgiV5+I3lg02dZ77DnKxHZu8A/lJBdiB3QW0KtZB6awBdpUKD9jf1b0SHzUv\n" \
"KBds0pjBqAlkd25HN7rOrFleaJ1/ctaJxQZBKT5ZPt0m9STJEadao0xAH0ahmbWn\n" \
"OlFuhjuefXKnEgV4We0+UXgVCwOPjdAvBbI+e0ocS3MFEvzG6uBQE3xDk3SzynTn\n" \
"jh8BCNAw1FtxNrQHusEwMFxIt4I7mKZ9YIqioymCzLq9gwQbooMDQaHWBfEbwrbw\n" \
"qHyGO0aoSCqI3Haadr8faqU9GY/rOPNk3sgrDQoo//fb4hVC1CLQJ13hef4Y53CI\n" \
"rU7m2Ys6xt0nUW7/vGT1M0NPAgMBAAGjQjBAMA4GA1UdDwEB/wQEAwIBBjAPBgNV\n" \
"HRMBAf8EBTADAQH/MB0GA1UdDgQWBBR5tFnme7bl5AFzgAiIyBpY9umbbjANBgkq\n" \
"hkiG9w0BAQsFAAOCAgEAVR9YqbyyqFDQDLHYGmkgJykIrGF1XIpu+ILlaS/V9lZL\n" \
"ubhzEFnTIZd+50xx+7LSYK05qAvqFyFWhfFQDlnrzuBZ6brJFe+GnY+EgPbk6ZGQ\n" \
"3BebYhtF8GaV0nxvwuo77x/Py9auJ/GpsMiu/X1+mvoiBOv/2X/qkSsisRcOj/KK\n" \
"NFtY2PwByVS5uCbMiogziUwthDyC3+6WVwW6LLv3xLfHTjuCvjHIInNzktHCgKQ5\n" \
"ORAzI4JMPJ+GslWYHb4phowim57iaztXOoJwTdwJx4nLCgdNbOhdjsnvzqvHu7Ur\n" \
"TkXWStAmzOVyyghqpZXjFaH3pO3JLF+l+/+sKAIuvtd7u+Nxe5AW0wdeRlN8NwdC\n" \
"jNPElpzVmbUq4JUagEiuTDkHzsxHpFKVK7q4+63SM1N95R1NbdWhscdCb+ZAJzVc\n" \
"oyi3B43njTOQ5yOf+1CceWxG1bQVs5ZufpsMljq4Ui0/1lvh+wjChP4kqKOJ2qxq\n" \
"4RgqsahDYVvTH9w7jXbyLeiNdd8XM2w9U/t7y0Ff/9yi0GE44Za4rF2LN9d11TPA\n" \
"mRGunUHBcnWEvgJBQl9nJEiU0Zsnvgc/ubhPgXRR4Xq37Z0j4r7g1SgEEzwxA57d\n" \
"emyPxgcYxn/eR44/KJ4EBs+lVDR3veyJm+kXQ99b21/+jh5Xos1AnX5iItreGCc=\n" \
"-----END CERTIFICATE-----\n";
// You can use x.509 client certificates if you want
//const char* test_client_key = ""; //to verify the client
//const char* test_client_cert = ""; //to verify the client
WiFiClientSecure client;
/*F********************************************************************
*
**********************************************************************/
void
setup()
{
Serial.begin( BAUD ); // INITIALIZE SERIAL AND WAIT FOR PORT TO OPEN
delay( 100 );
Serial.print( "Attempting to connect to SSID: " );
Serial.println( ssid );
WiFi.begin( ssid, password );
while( WiFi.status() != WL_CONNECTED ) // ATTEMPT TO CONNECT TO Wifi NET
{
Serial.print( "." );
// wait 1 second for re-trying
delay( 1000 );
}
Serial.print( "Connected to " );
Serial.println( ssid );
client.setCACert( test_root_ca );
// client.setCertificate( test_client_cert ); // for client verification
// client.setPrivateKey( test_client_key ); // for client verification
Serial.println( "\nStarting connection to server..." );
if( !client.connect( server, 443 ) )
Serial.println( "Connection failed!" );
else
{
Serial.println( "Connected to server!" );
// Make a HTTP request:
client.println( "GET https://www.howsmyssl.com/a/check HTTP/1.0" );
client.println( "Host: www.howsmyssl.com" );
client.println( "Connection: close" );
client.println();
while( client.connected() )
{
String line = client.readStringUntil( '\n' );
if( line == "\r" )
{
Serial.println( "headers received" );
break;
}
}
// IF THERE ARE INCOMING BYTES AVAILABLE FROM SERVER, READ AND PRINT THEM
while( client.available() )
{
char c = client.read();
Serial.write( c );
}
client.stop();
}
}
/*F********************************************************************
*
**********************************************************************/
void
loop()
{
// do nothing
}
This example establishes a secure connection with the www.howsmyssl.com website
and checks its certificate to ensure we’re connected to the server that we
expect.
If you’re used to making HTTP requests with the ESP32 using the WiFiClient
library, this example is not much different.
How does the Code Work?
You need to include the WiFiClientSecure library.
#include <WiFiClientSecure.h>
Insert your network credentials in the following lines.
const char* ssid = "REPLACE_WITH_YOUR_SSID"; // your network SSID ( name of wifi network )
const char* password = "REPLACE_WITH_YOUR_PASSWORD"; // your network password
Insert the server URL. In this case, we’ll make a request to www.howsmyssl.com.
This website will return how good the SSL of the client is ( in this case, the
ESP32 ).
const char* server = "www.howsmyssl.com"; // Server URL
Then, you need to insert the server certificate. We’re using the root
certificate.
const char* test_root_ca= \
"-----BEGIN CERTIFICATE-----\n" \
"MIIFazCCA1OgAwIBAgIRAIIQz7DSQONZRGPgu2OCiwAwDQYJKoZIhvcNAQELBQAw\n" \
"TzELMAkGA1UEBhMCVVMxKTAnBgNVBAoTIEludGVybmV0IFNlY3VyaXR5IFJlc2Vh\n" \
"cmNoIEdyb3VwMRUwEwYDVQQDEwxJU1JHIFJvb3QgWDEwHhcNMTUwNjA0MTEwNDM4\n" \
"WhcNMzUwNjA0MTEwNDM4WjBPMQswCQYDVQQGEwJVUzEpMCcGA1UEChMgSW50ZXJu\n" \
"ZXQgU2VjdXJpdHkgUmVzZWFyY2ggR3JvdXAxFTATBgNVBAMTDElTUkcgUm9vdCBY\n" \
"MTCCAiIwDQYJKoZIhvcNAQEBBQADggIPADCCAgoCggIBAK3oJHP0FDfzm54rVygc\n" \
"h77ct984kIxuPOZXoHj3dcKi/vVqbvYATyjb3miGbESTtrFj/RQSa78f0uoxmyF+\n" \
"0TM8ukj13Xnfs7j/EvEhmkvBioZxaUpmZmyPfjxwv60pIgbz5MDmgK7iS4+3mX6U\n" \
"A5/TR5d8mUgjU+g4rk8Kb4Mu0UlXjIB0ttov0DiNewNwIRt18jA8+o+u3dpjq+sW\n" \
"T8KOEUt+zwvo/7V3LvSye0rgTBIlDHCNAymg4VMk7BPZ7hm/ELNKjD+Jo2FR3qyH\n" \
"B5T0Y3HsLuJvW5iB4YlcNHlsdu87kGJ55tukmi8mxdAQ4Q7e2RCOFvu396j3x+UC\n" \
"B5iPNgiV5+I3lg02dZ77DnKxHZu8A/lJBdiB3QW0KtZB6awBdpUKD9jf1b0SHzUv\n" \
"KBds0pjBqAlkd25HN7rOrFleaJ1/ctaJxQZBKT5ZPt0m9STJEadao0xAH0ahmbWn\n" \
"OlFuhjuefXKnEgV4We0+UXgVCwOPjdAvBbI+e0ocS3MFEvzG6uBQE3xDk3SzynTn\n" \
"jh8BCNAw1FtxNrQHusEwMFxIt4I7mKZ9YIqioymCzLq9gwQbooMDQaHWBfEbwrbw\n" \
"qHyGO0aoSCqI3Haadr8faqU9GY/rOPNk3sgrDQoo//fb4hVC1CLQJ13hef4Y53CI\n" \
"rU7m2Ys6xt0nUW7/vGT1M0NPAgMBAAGjQjBAMA4GA1UdDwEB/wQEAwIBBjAPBgNV\n" \
"HRMBAf8EBTADAQH/MB0GA1UdDgQWBBR5tFnme7bl5AFzgAiIyBpY9umbbjANBgkq\n" \
"hkiG9w0BAQsFAAOCAgEAVR9YqbyyqFDQDLHYGmkgJykIrGF1XIpu+ILlaS/V9lZL\n" \
"ubhzEFnTIZd+50xx+7LSYK05qAvqFyFWhfFQDlnrzuBZ6brJFe+GnY+EgPbk6ZGQ\n" \
"3BebYhtF8GaV0nxvwuo77x/Py9auJ/GpsMiu/X1+mvoiBOv/2X/qkSsisRcOj/KK\n" \
"NFtY2PwByVS5uCbMiogziUwthDyC3+6WVwW6LLv3xLfHTjuCvjHIInNzktHCgKQ5\n" \
"ORAzI4JMPJ+GslWYHb4phowim57iaztXOoJwTdwJx4nLCgdNbOhdjsnvzqvHu7Ur\n" \
"TkXWStAmzOVyyghqpZXjFaH3pO3JLF+l+/+sKAIuvtd7u+Nxe5AW0wdeRlN8NwdC\n" \
"jNPElpzVmbUq4JUagEiuTDkHzsxHpFKVK7q4+63SM1N95R1NbdWhscdCb+ZAJzVc\n" \
"oyi3B43njTOQ5yOf+1CceWxG1bQVs5ZufpsMljq4Ui0/1lvh+wjChP4kqKOJ2qxq\n" \
"4RgqsahDYVvTH9w7jXbyLeiNdd8XM2w9U/t7y0Ff/9yi0GE44Za4rF2LN9d11TPA\n" \
"mRGunUHBcnWEvgJBQl9nJEiU0Zsnvgc/ubhPgXRR4Xq37Z0j4r7g1SgEEzwxA57d\n" \
"emyPxgcYxn/eR44/KJ4EBs+lVDR3veyJm+kXQ99b21/+jh5Xos1AnX5iItreGCc=\n" \
"-----END CERTIFICATE-----\n";
Create a new client called client using WiFiClient secure.
WiFiClientSecure client;
In the setup(), initialize the Serial Monitor and connect to your network.
/*H********************************************************************
* Initialize serial and wait for port to open:
**********************************************************************/
Serial.begin( BAUD );
delay( 100 );
Serial.print( "Attempting to connect to SSID: " );
Serial.println( ssid );
WiFi.begin( ssid, password );
// attempt to connect to Wifi network:
while( WiFi.status() != WL_CONNECTED )
{
Serial.print( "." );
// wait 1 second for re-trying
delay( 1000 );
}
Serial.print( "Connected to " );
Serial.println( ssid );
The following line set the client certificate using the setCACert() method on
the client.
client.setCACert( test_root_ca );
Then, the client connects to the server. For HTTPS, you need to use port 443.
if( !client.connect( server, 443 ) )
Serial.println( "Connection failed!" );
If the connection is successful, we can make the HTTP request. In this case,
we’re making a GET request. Note that you need to use the https:// before the
URL you’ll make a request to.
else
{
Serial.println( "Connected to server!" );
// Make a HTTP request:
client.println( "GET https://www.howsmyssl.com/a/check HTTP/1.0" );
client.println( "Host: www.howsmyssl.com" );
client.println( "Connection: close" );
client.println();
Finally, we get and print the response from the server:
while( client.connected() )
{
String line = client.readStringUntil( '\n' );
if( line == "\r" )
{
Serial.println( "headers received" );
break;
}
}
// IF THERE ARE INCOMING BYTES AVAILABLE FROM SERVER, READ AND PRINT THEM
while( client.available() )
{
char c = client.read();
Serial.write( c );
}
In the end, we close the connection with the client.
client.stop();
In this example, we make the request once in the setup(). The loop() is empty,
but you can add any other tasks that you need in your project. Or, depending on
the application, you can make the request on the loop().
/*F********************************************************************
*
**********************************************************************/
void
loop()
{
// do nothing
}
In summary, to make HTTPS requests:
- Include the WiFiClientSecure library;
- Create a WiFiClientSecure client;
- Use port 443;
- Use the setCACert() function to set the client certificate.
- Use https on the URL when making the HTTPS request.
Demonstration
Upload the code to your board.
Open the Serial Monitor at a baud rate of 115200 and press the onboard RST
button.
You should get something as shown in the following screenshot.
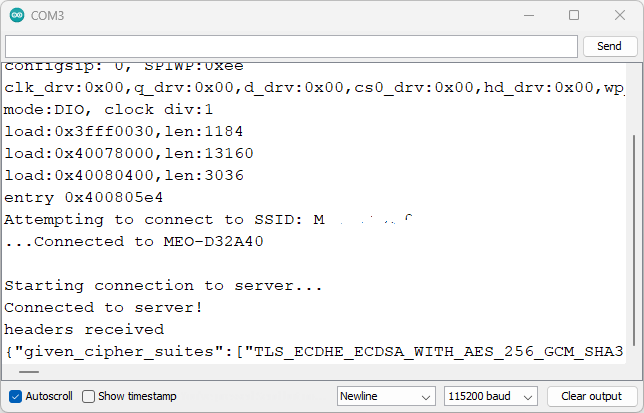 ESP32 WiFiClientSecure example Serial Monitor
If you scroll to the right, you’ll get the result of how secure the connection
is. You should get a “Probably Okay”.
ESP32 WiFiClientSecure example Serial Monitor
If you scroll to the right, you’ll get the result of how secure the connection
is. You should get a “Probably Okay”.
 ESP32 WiFiClientSecure example Serial Monitor
ESP32 HTTPS Requests without Certificate
If you want to skip the SSL server certificate verification, but you still want
to have encrypted communication, you can remove the following line:
client.setCACert( test_root_ca );
And add the following line before connecting with the client:
client.setInsecure();
The complete example can be found below.
/*H*******************************************************
Complete project details: https://RandomNerdTutorials.com/
Based on the WiFiClientSecure example HTTPS Requests without Certificate
Wifi secure connection example for ESP32
Running on TLS 1.2 using mbedTLS
Suporting the following chipersuites:
"TLS_ECDHE_ECDSA_WITH_AES_256_GCM_SHA384","TLS_ECDHE_RSA_WITH_AES_256_GCM_SHA384"
,"TLS_DHE_RSA_WITH_AES_256_GCM_SHA384","TLS_ECDHE_ECDSA_WITH_AES_256_CCM"
,"TLS_DHE_RSA_WITH_AES_256_CCM","TLS_ECDHE_ECDSA_WITH_AES_256_CBC_SHA384"
,"TLS_ECDHE_RSA_WITH_AES_256_CBC_SHA384","TLS_DHE_RSA_WITH_AES_256_CBC_SHA256"
,"TLS_ECDHE_ECDSA_WITH_AES_256_CBC_SHA","TLS_ECDHE_RSA_WITH_AES_256_CBC_SHA"
,"TLS_DHE_RSA_WITH_AES_256_CBC_SHA","TLS_ECDHE_ECDSA_WITH_AES_256_CCM_8"
,"TLS_DHE_RSA_WITH_AES_256_CCM_8","TLS_ECDHE_ECDSA_WITH_CAMELLIA_256_GCM_SHA384"
,"TLS_ECDHE_RSA_WITH_CAMELLIA_256_GCM_SHA384"
,"TLS_DHE_RSA_WITH_CAMELLIA_256_GCM_SHA384"
,"TLS_ECDHE_ECDSA_WITH_CAMELLIA_256_CBC_SHA384"
,"TLS_ECDHE_RSA_WITH_CAMELLIA_256_CBC_SHA384"
,"TLS_DHE_RSA_WITH_CAMELLIA_256_CBC_SHA256"
,"TLS_DHE_RSA_WITH_CAMELLIA_256_CBC_SHA"
,"TLS_ECDHE_ECDSA_WITH_AES_128_GCM_SHA256"
,"TLS_ECDHE_RSA_WITH_AES_128_GCM_SHA256","TLS_DHE_RSA_WITH_AES_128_GCM_SHA256"
,"TLS_ECDHE_ECDSA_WITH_AES_128_CCM","TLS_DHE_RSA_WITH_AES_128_CCM"
,"TLS_ECDHE_ECDSA_WITH_AES_128_CBC_SHA256","TLS_ECDHE_RSA_WITH_AES_128_CBC_SHA256"
,"TLS_DHE_RSA_WITH_AES_128_CBC_SHA256","TLS_ECDHE_ECDSA_WITH_AES_128_CBC_SHA"
,"TLS_ECDHE_RSA_WITH_AES_128_CBC_SHA","TLS_DHE_RSA_WITH_AES_128_CBC_SHA"
,"TLS_ECDHE_ECDSA_WITH_AES_128_CCM_8","TLS_DHE_RSA_WITH_AES_128_CCM_8"
,"TLS_ECDHE_ECDSA_WITH_CAMELLIA_128_GCM_SHA256"
,"TLS_ECDHE_RSA_WITH_CAMELLIA_128_GCM_SHA256"
,"TLS_DHE_RSA_WITH_CAMELLIA_128_GCM_SHA256"
,"TLS_ECDHE_ECDSA_WITH_CAMELLIA_128_CBC_SHA256"
,"TLS_ECDHE_RSA_WITH_CAMELLIA_128_CBC_SHA256"
,"TLS_DHE_RSA_WITH_CAMELLIA_128_CBC_SHA256","TLS_DHE_RSA_WITH_CAMELLIA_128_CBC_SHA"
,"TLS_ECDHE_ECDSA_WITH_3DES_EDE_CBC_SHA","TLS_ECDHE_RSA_WITH_3DES_EDE_CBC_SHA"
,"TLS_DHE_RSA_WITH_3DES_EDE_CBC_SHA","TLS_DHE_PSK_WITH_AES_256_GCM_SHA384"
,"TLS_DHE_PSK_WITH_AES_256_CCM","TLS_ECDHE_PSK_WITH_AES_256_CBC_SHA384"
,"TLS_DHE_PSK_WITH_AES_256_CBC_SHA384","TLS_ECDHE_PSK_WITH_AES_256_CBC_SHA"
,"TLS_DHE_PSK_WITH_AES_256_CBC_SHA","TLS_DHE_PSK_WITH_CAMELLIA_256_GCM_SHA384"
,"TLS_ECDHE_PSK_WITH_CAMELLIA_256_CBC_SHA384"
,"TLS_DHE_PSK_WITH_CAMELLIA_256_CBC_SHA384","TLS_PSK_DHE_WITH_AES_256_CCM_8"
,"TLS_DHE_PSK_WITH_AES_128_GCM_SHA256","TLS_DHE_PSK_WITH_AES_128_CCM"
,"TLS_ECDHE_PSK_WITH_AES_128_CBC_SHA256","TLS_DHE_PSK_WITH_AES_128_CBC_SHA256"
,"TLS_ECDHE_PSK_WITH_AES_128_CBC_SHA","TLS_DHE_PSK_WITH_AES_128_CBC_SHA"
,"TLS_DHE_PSK_WITH_CAMELLIA_128_GCM_SHA256","TLS_DHE_PSK_WITH_CAMELLIA_128_CBC_SHA256"
,"TLS_ECDHE_PSK_WITH_CAMELLIA_128_CBC_SHA256","TLS_PSK_DHE_WITH_AES_128_CCM_8"
,"TLS_ECDHE_PSK_WITH_3DES_EDE_CBC_SHA","TLS_DHE_PSK_WITH_3DES_EDE_CBC_SHA"
,"TLS_RSA_WITH_AES_256_GCM_SHA384","TLS_RSA_WITH_AES_256_CCM"
,"TLS_RSA_WITH_AES_256_CBC_SHA256","TLS_RSA_WITH_AES_256_CBC_SHA"
,"TLS_ECDH_RSA_WITH_AES_256_GCM_SHA384","TLS_ECDH_RSA_WITH_AES_256_CBC_SHA384"
,"TLS_ECDH_RSA_WITH_AES_256_CBC_SHA","TLS_ECDH_ECDSA_WITH_AES_256_GCM_SHA384"
,"TLS_ECDH_ECDSA_WITH_AES_256_CBC_SHA384","TLS_ECDH_ECDSA_WITH_AES_256_CBC_SHA"
,"TLS_RSA_WITH_AES_256_CCM_8","TLS_RSA_WITH_CAMELLIA_256_GCM_SHA384"
,"TLS_RSA_WITH_CAMELLIA_256_CBC_SHA256","TLS_RSA_WITH_CAMELLIA_256_CBC_SHA"
,"TLS_ECDH_RSA_WITH_CAMELLIA_256_GCM_SHA384"
,"TLS_ECDH_RSA_WITH_CAMELLIA_256_CBC_SHA384"
,"TLS_ECDH_ECDSA_WITH_CAMELLIA_256_GCM_SHA384"
,"TLS_ECDH_ECDSA_WITH_CAMELLIA_256_CBC_SHA384","TLS_RSA_WITH_AES_128_GCM_SHA256"
,
"TLS_RSA_WITH_AES_128_CCM","TLS_RSA_WITH_AES_128_CBC_SHA256"
,"TLS_RSA_WITH_AES_128_CBC_SHA","TLS_ECDH_RSA_WITH_AES_128_GCM_SHA256"
,"TLS_ECDH_RSA_WITH_AES_128_CBC_SHA256","TLS_ECDH_RSA_WITH_AES_128_CBC_SHA"
,"TLS_ECDH_ECDSA_WITH_AES_128_GCM_SHA256"
,"TLS_ECDH_ECDSA_WITH_AES_128_CBC_SHA256","TLS_ECDH_ECDSA_WITH_AES_128_CBC_SHA"
,"TLS_RSA_WITH_AES_128_CCM_8","TLS_RSA_WITH_CAMELLIA_128_GCM_SHA256"
,"TLS_RSA_WITH_CAMELLIA_128_CBC_SHA256","TLS_RSA_WITH_CAMELLIA_128_CBC_SHA"
,"TLS_ECDH_RSA_WITH_CAMELLIA_128_GCM_SHA256"
,"TLS_ECDH_RSA_WITH_CAMELLIA_128_CBC_SHA256"
,"TLS_ECDH_ECDSA_WITH_CAMELLIA_128_GCM_SHA256"
,"TLS_ECDH_ECDSA_WITH_CAMELLIA_128_CBC_SHA256","TLS_RSA_WITH_3DES_EDE_CBC_SHA"
,"TLS_ECDH_RSA_WITH_3DES_EDE_CBC_SHA","TLS_ECDH_ECDSA_WITH_3DES_EDE_CBC_SHA"
,"TLS_RSA_PSK_WITH_AES_256_GCM_SHA384","TLS_RSA_PSK_WITH_AES_256_CBC_SHA384"
,"TLS_RSA_PSK_WITH_AES_256_CBC_SHA","TLS_RSA_PSK_WITH_CAMELLIA_256_GCM_SHA384"
,"TLS_RSA_PSK_WITH_CAMELLIA_256_CBC_SHA384"
,"TLS_RSA_PSK_WITH_AES_128_GCM_SHA256","TLS_RSA_PSK_WITH_AES_128_CBC_SHA256"
,"TLS_RSA_PSK_WITH_AES_128_CBC_SHA","TLS_RSA_PSK_WITH_CAMELLIA_128_GCM_SHA256"
,"TLS_RSA_PSK_WITH_CAMELLIA_128_CBC_SHA256","TLS_RSA_PSK_WITH_3DES_EDE_CBC_SHA"
,"TLS_PSK_WITH_AES_256_GCM_SHA384","TLS_PSK_WITH_AES_256_CCM"
,"TLS_PSK_WITH_AES_256_CBC_SHA384","TLS_PSK_WITH_AES_256_CBC_SHA"
,"TLS_PSK_WITH_CAMELLIA_256_GCM_SHA384","TLS_PSK_WITH_CAMELLIA_256_CBC_SHA384"
,"TLS_PSK_WITH_AES_256_CCM_8","TLS_PSK_WITH_AES_128_GCM_SHA256"
,"TLS_PSK_WITH_AES_128_CCM","TLS_PSK_WITH_AES_128_CBC_SHA256"
,"TLS_PSK_WITH_AES_128_CBC_SHA","TLS_PSK_WITH_CAMELLIA_128_GCM_SHA256"
,"TLS_PSK_WITH_CAMELLIA_128_CBC_SHA256","TLS_PSK_WITH_AES_128_CCM_8"
,"TLS_PSK_WITH_3DES_EDE_CBC_SHA","TLS_EMPTY_RENEGOTIATION_INFO_SCSV"]
2017 - Evandro Copercini - Apache 2.0 License.
********************************************************/
#include <WiFiClientSecure.h>
//************************* DEFINES ************************************
#define BAUD 9600
const char* ssid = "REPLACE_WITH_YOUR_SSID";
const char* password = "REPLACE_WITH_YOUR_PASSWORD";
const char* server = "www.howsmyssl.com"; // Server URL
//************************* PROTOTYPES ************************************
//************************* VARIABLES ************************************
WiFiClientSecure client;
/*F********************************************************************
*
**********************************************************************/
void
setup()
{
Serial.begin( BAUD ); // INIT SERIAL AND WAIT FOR PORT TO OPEN
delay( 100 );
Serial.print( "Attempting to connect to SSID: " );
Serial.println( ssid );
WiFi.begin( ssid, password );
// ATTEMPT TO CONNECT TO Wifi NETWORK
while( WiFi.status() != WL_CONNECTED )
{
Serial.print( "." );
// wait 1 second for re-trying
delay( 1000 );
}
Serial.print( "Connected to " );
Serial.println( ssid );
client.setInsecure();
Serial.println( "\nStarting connection to server..." );
if( !client.connect( server, 443 ) )
Serial.println( "Connection failed!" );
else
{
Serial.println( "Connected to server!" );
// Make a HTTP request:
client.println( "GET https://www.howsmyssl.com/a/check HTTP/1.0" );
client.println( "Host: www.howsmyssl.com" );
client.println( "Connection: close" );
client.println();
while( client.connected() )
{
String line = client.readStringUntil( '\n' );
if( line == "\r" )
{
Serial.println( "headers received" );
break;
}
}
// IF INCOMING BYTES AVAILABLE FROM SERVER, READ AND PRINT THEM
while( client.available() )
{
char c = client.read();
Serial.write( c );
}
client.stop();
}
}
/*F********************************************************************
*
**********************************************************************/
void
loop()
{
// do nothing
}
With this example, your connection is still encrypted, but you won’t be sure if
you’re talking to the right server. This scenario is useful for testing
purposes.
ESP32 HTTPS Requests with Certificate Bundle
Instead of just using one certificate, you can use a certificate bundle: a
collection of trusted certificates that you can load into your board. Then, you
don’t have to worry about getting the certificate for a specific server.
The WiFiClient library provides some information about how to use a certificate
bundle on the following link:
- https://github.com/espressif/arduino-esp32/blob/master/libraries/WiFiClientSecure
/README.md#using-a-bundle-of-root-certificate-authority-certificates
I followed all the instructions provided, and got the following issue:
[ 1799][E][ssl_client.cpp:37] _handle_error(): [start_ssl_client():276]: ( -12288 ) X509 - A fatal error occurred, eg the chain is too long or the vrfy callback failed
If anyone knows how to fix this issue, please share in the comments below.
ESP32 HTTP Requests using HTTPClient Library
The HTTPClient library provides a simple example showing how to make HTTPS
requests with the ESP32. You can find the example in your Arduino IDE. First,
make sure you have an ESP32 board selected in Tools > Board. Then, go to
File > Examples > HTTPClient > BasicHttpsClient. We created new sketches based
on that example. See the code below.
ESP32 HTTPS Requests with Certificate
The following sketch makes a request to howsmyssl.com like the previous examples
but uses the HTTPClient library. It checks the server certificate. We’ll use the
root certificate we’ve gotten in previous steps.
/*H*******************************************************
Complete project details: https://RandomNerdTutorials.com/
Based on the BasicHTTPSClient.ino example found at Examples > BasicHttpsClient
********************************************************/
#include <Arduino.h>
#include <WiFi.h>
#include <WiFiClientSecure.h>
#include <HTTPClient.h>
//************************* DEFINES ************************************
const char* ssid = "REPLACE_WITH_YOUR_SSID";
const char* password = "REPLACE_WITH_YOUR_PASSWORD";
//************************* PROTOTYPES ************************************
//************************* VARIABLES ************************************
// www.howsmyssl.com root certificate authority, to verify the server
// change it to your server root CA
const char* rootCACertificate = \
"-----BEGIN CERTIFICATE-----\n" \
"MIIFazCCA1OgAwIBAgIRAIIQz7DSQONZRGPgu2OCiwAwDQYJKoZIhvcNAQELBQAw\n" \
"TzELMAkGA1UEBhMCVVMxKTAnBgNVBAoTIEludGVybmV0IFNlY3VyaXR5IFJlc2Vh\n" \
"cmNoIEdyb3VwMRUwEwYDVQQDEwxJU1JHIFJvb3QgWDEwHhcNMTUwNjA0MTEwNDM4\n" \
"WhcNMzUwNjA0MTEwNDM4WjBPMQswCQYDVQQGEwJVUzEpMCcGA1UEChMgSW50ZXJu\n" \
"ZXQgU2VjdXJpdHkgUmVzZWFyY2ggR3JvdXAxFTATBgNVBAMTDElTUkcgUm9vdCBY\n" \
"MTCCAiIwDQYJKoZIhvcNAQEBBQADggIPADCCAgoCggIBAK3oJHP0FDfzm54rVygc\n" \
"h77ct984kIxuPOZXoHj3dcKi/vVqbvYATyjb3miGbESTtrFj/RQSa78f0uoxmyF+\n" \
"0TM8ukj13Xnfs7j/EvEhmkvBioZxaUpmZmyPfjxwv60pIgbz5MDmgK7iS4+3mX6U\n" \
"A5/TR5d8mUgjU+g4rk8Kb4Mu0UlXjIB0ttov0DiNewNwIRt18jA8+o+u3dpjq+sW\n" \
"T8KOEUt+zwvo/7V3LvSye0rgTBIlDHCNAymg4VMk7BPZ7hm/ELNKjD+Jo2FR3qyH\n" \
"B5T0Y3HsLuJvW5iB4YlcNHlsdu87kGJ55tukmi8mxdAQ4Q7e2RCOFvu396j3x+UC\n" \
"B5iPNgiV5+I3lg02dZ77DnKxHZu8A/lJBdiB3QW0KtZB6awBdpUKD9jf1b0SHzUv\n" \
"KBds0pjBqAlkd25HN7rOrFleaJ1/ctaJxQZBKT5ZPt0m9STJEadao0xAH0ahmbWn\n" \
"OlFuhjuefXKnEgV4We0+UXgVCwOPjdAvBbI+e0ocS3MFEvzG6uBQE3xDk3SzynTn\n" \
"jh8BCNAw1FtxNrQHusEwMFxIt4I7mKZ9YIqioymCzLq9gwQbooMDQaHWBfEbwrbw\n" \
"qHyGO0aoSCqI3Haadr8faqU9GY/rOPNk3sgrDQoo//fb4hVC1CLQJ13hef4Y53CI\n" \
"rU7m2Ys6xt0nUW7/vGT1M0NPAgMBAAGjQjBAMA4GA1UdDwEB/wQEAwIBBjAPBgNV\n" \
"HRMBAf8EBTADAQH/MB0GA1UdDgQWBBR5tFnme7bl5AFzgAiIyBpY9umbbjANBgkq\n" \
"hkiG9w0BAQsFAAOCAgEAVR9YqbyyqFDQDLHYGmkgJykIrGF1XIpu+ILlaS/V9lZL\n" \
"ubhzEFnTIZd+50xx+7LSYK05qAvqFyFWhfFQDlnrzuBZ6brJFe+GnY+EgPbk6ZGQ\n" \
"3BebYhtF8GaV0nxvwuo77x/Py9auJ/GpsMiu/X1+mvoiBOv/2X/qkSsisRcOj/KK\n" \
"NFtY2PwByVS5uCbMiogziUwthDyC3+6WVwW6LLv3xLfHTjuCvjHIInNzktHCgKQ5\n" \
"ORAzI4JMPJ+GslWYHb4phowim57iaztXOoJwTdwJx4nLCgdNbOhdjsnvzqvHu7Ur\n" \
"TkXWStAmzOVyyghqpZXjFaH3pO3JLF+l+/+sKAIuvtd7u+Nxe5AW0wdeRlN8NwdC\n" \
"jNPElpzVmbUq4JUagEiuTDkHzsxHpFKVK7q4+63SM1N95R1NbdWhscdCb+ZAJzVc\n" \
"oyi3B43njTOQ5yOf+1CceWxG1bQVs5ZufpsMljq4Ui0/1lvh+wjChP4kqKOJ2qxq\n" \
"4RgqsahDYVvTH9w7jXbyLeiNdd8XM2w9U/t7y0Ff/9yi0GE44Za4rF2LN9d11TPA\n" \
"mRGunUHBcnWEvgJBQl9nJEiU0Zsnvgc/ubhPgXRR4Xq37Z0j4r7g1SgEEzwxA57d\n" \
"emyPxgcYxn/eR44/KJ4EBs+lVDR3veyJm+kXQ99b21/+jh5Xos1AnX5iItreGCc=\n" \
"-----END CERTIFICATE-----\n";
/*F********************************************************************
*
**********************************************************************/
void
setup()
{
Serial.begin( BAUD );
Serial.println();
WiFi.mode( WIFI_STA ); // Init Wi-Fi
WiFi.begin( ssid, password );
Serial.print( "Connecting to WiFi .." );
while( WiFi.status() != WL_CONNECTED )
{
Serial.print( '.' );
delay( 1000 );
}
Serial.println( WiFi.localIP() );
}
/*F********************************************************************
*
**********************************************************************/
void
loop()
{
WiFiClientSecure *client = new WiFiClientSecure;
if( client )
{
// SET SECURE CLIENT WITH CERTIFICATE
client->setCACert( rootCACertificate );
// CREATE AN HTTPClient INSTANCE
HTTPClient https;
// INITIALIZING AN HTTPS COMMUNICATION USING THE SECURE CLIENT
Serial.print( "[HTTPS] begin...\n" );
if( https.begin( *client, "https://www.howsmyssl.com/a/check" ) )
{ // HTTPS
Serial.print( "[HTTPS] GET...\n" );
// start connection and send HTTP header
int httpCode = https.GET();
// httpCode will be negative on error
if( httpCode > 0 )
{ // HTTP header has been send and Server response header has
// been handled
Serial.printf( "[HTTPS] GET... code: %d\n", httpCode );
// file found at server
if( httpCode == HTTP_CODE_OK
|| httpCode == HTTP_CODE_MOVED_PERMANENTLY )
{
// print server response payload
String payload = https.getString();
Serial.println( payload );
}
}
else
{
Serial.printf( "[HTTPS] GET... failed, error: %s\n"
, https.errorToString( httpCode ).c_str() );
}
https.end();
}
}
else
{
Serial.printf( "[HTTPS] Unable to connect\n" );
}
Serial.println();
Serial.println( "Waiting 2min before the next round..." );
delay( 120000 );
}
How does the Code Work?
Start by including the required libraries: WiFi.h, WiFiClientSecure.h, and
HTTPClient.h.
/*F********************************************************************
*
**********************************************************************/
#include <Arduino.h>
#include <WiFi.h>
#include <WiFiClientSecure.h>
#include <HTTPClient.h>
Insert your network credentials in the following lines:
// Replace with your network credentials
const char* ssid = "REPLACE_WITH_YOUR_SSID";
const char* password = "REPLACE_WITH_YOUR_PASSWORD";
Next, you need to add the server certificate. We’re using the root certificate
for howsmyssl.com ( see previous steps ).
const char* rootCACertificate = \
"-----BEGIN CERTIFICATE-----\n" \
"MIIFazCCA1OgAwIBAgIRAIIQz7DSQONZRGPgu2OCiwAwDQYJKoZIhvcNAQELBQAw\n" \
"TzELMAkGA1UEBhMCVVMxKTAnBgNVBAoTIEludGVybmV0IFNlY3VyaXR5IFJlc2Vh\n" \
"cmNoIEdyb3VwMRUwEwYDVQQDEwxJU1JHIFJvb3QgWDEwHhcNMTUwNjA0MTEwNDM4\n" \
"WhcNMzUwNjA0MTEwNDM4WjBPMQswCQYDVQQGEwJVUzEpMCcGA1UEChMgSW50ZXJu\n" \
"ZXQgU2VjdXJpdHkgUmVzZWFyY2ggR3JvdXAxFTATBgNVBAMTDElTUkcgUm9vdCBY\n" \
"MTCCAiIwDQYJKoZIhvcNAQEBBQADggIPADCCAgoCggIBAK3oJHP0FDfzm54rVygc\n" \
"h77ct984kIxuPOZXoHj3dcKi/vVqbvYATyjb3miGbESTtrFj/RQSa78f0uoxmyF+\n" \
"0TM8ukj13Xnfs7j/EvEhmkvBioZxaUpmZmyPfjxwv60pIgbz5MDmgK7iS4+3mX6U\n" \
"A5/TR5d8mUgjU+g4rk8Kb4Mu0UlXjIB0ttov0DiNewNwIRt18jA8+o+u3dpjq+sW\n" \
"T8KOEUt+zwvo/7V3LvSye0rgTBIlDHCNAymg4VMk7BPZ7hm/ELNKjD+Jo2FR3qyH\n" \
"B5T0Y3HsLuJvW5iB4YlcNHlsdu87kGJ55tukmi8mxdAQ4Q7e2RCOFvu396j3x+UC\n" \
"B5iPNgiV5+I3lg02dZ77DnKxHZu8A/lJBdiB3QW0KtZB6awBdpUKD9jf1b0SHzUv\n" \
"KBds0pjBqAlkd25HN7rOrFleaJ1/ctaJxQZBKT5ZPt0m9STJEadao0xAH0ahmbWn\n" \
"OlFuhjuefXKnEgV4We0+UXgVCwOPjdAvBbI+e0ocS3MFEvzG6uBQE3xDk3SzynTn\n" \
"jh8BCNAw1FtxNrQHusEwMFxIt4I7mKZ9YIqioymCzLq9gwQbooMDQaHWBfEbwrbw\n" \
"qHyGO0aoSCqI3Haadr8faqU9GY/rOPNk3sgrDQoo//fb4hVC1CLQJ13hef4Y53CI\n" \
"rU7m2Ys6xt0nUW7/vGT1M0NPAgMBAAGjQjBAMA4GA1UdDwEB/wQEAwIBBjAPBgNV\n" \
"HRMBAf8EBTADAQH/MB0GA1UdDgQWBBR5tFnme7bl5AFzgAiIyBpY9umbbjANBgkq\n" \
"hkiG9w0BAQsFAAOCAgEAVR9YqbyyqFDQDLHYGmkgJykIrGF1XIpu+ILlaS/V9lZL\n" \
"ubhzEFnTIZd+50xx+7LSYK05qAvqFyFWhfFQDlnrzuBZ6brJFe+GnY+EgPbk6ZGQ\n" \
"3BebYhtF8GaV0nxvwuo77x/Py9auJ/GpsMiu/X1+mvoiBOv/2X/qkSsisRcOj/KK\n" \
"NFtY2PwByVS5uCbMiogziUwthDyC3+6WVwW6LLv3xLfHTjuCvjHIInNzktHCgKQ5\n" \
"ORAzI4JMPJ+GslWYHb4phowim57iaztXOoJwTdwJx4nLCgdNbOhdjsnvzqvHu7Ur\n" \
"TkXWStAmzOVyyghqpZXjFaH3pO3JLF+l+/+sKAIuvtd7u+Nxe5AW0wdeRlN8NwdC\n" \
"jNPElpzVmbUq4JUagEiuTDkHzsxHpFKVK7q4+63SM1N95R1NbdWhscdCb+ZAJzVc\n" \
"oyi3B43njTOQ5yOf+1CceWxG1bQVs5ZufpsMljq4Ui0/1lvh+wjChP4kqKOJ2qxq\n" \
"4RgqsahDYVvTH9w7jXbyLeiNdd8XM2w9U/t7y0Ff/9yi0GE44Za4rF2LN9d11TPA\n" \
"mRGunUHBcnWEvgJBQl9nJEiU0Zsnvgc/ubhPgXRR4Xq37Z0j4r7g1SgEEzwxA57d\n" \
"emyPxgcYxn/eR44/KJ4EBs+lVDR3veyJm+kXQ99b21/+jh5Xos1AnX5iItreGCc=\n" \
"-----END CERTIFICATE-----\n";
In the setup () initialize the Serial Monitor and connect to Wi-Fi.
/*F********************************************************************
*
**********************************************************************/
void
setup()
{
Serial.begin( BAUD );
Serial.println();
// Initialize Wi-Fi
WiFi.mode( WIFI_STA );
WiFi.begin( ssid, password );
Serial.print( "Connecting to WiFi .." );
while( WiFi.status() != WL_CONNECTED )
{
Serial.print( '.' );
delay( 1000 );
}
Serial.println( WiFi.localIP() );
}
In the loop(), create a pointer to WiFiClientSecure called client.
WiFiClientSecure *client = new WiFiClientSecure;
Set a secure client with the certificate using the setCACert() method:
client->setCACert( rootCACertificate );
Then, create an HTTPClient instance called https.
//create an HTTPClient instance
HTTPClient https;
Initialize the https client on the host specified using the begin() method. In
this case, we’re making a request on the following URL:
https://www.howsmyssl.com/a/check.
if( https.begin( *client, "https://www.howsmyssl.com/a/check" ) ) { // HTTPS
Get the server response code.
int httpCode = https.GET();
If the response code is a positive number, it means the connection was established
successfully, so we can read the response payload using the getString() method
on the https object. Then, we can print the payload in the Serial Monitor. In a
practical application, you can do whatever task you need with the ESP32 epending on the received payload.
if( https.begin( client, "https://www.howsmyssl.com/a/check" ) )
{ // HTTPS
Serial.print( "[HTTPS] GET...\n" );
// start connection and send HTTP header
int httpCode = https.GET();
// httpCode will be negative on error
if( httpCode > 0 )
{
// HTTP header has been send and Server response header has been handled
Serial.printf( "[HTTPS] GET... code: %d\n", httpCode );
// file found at server
if( httpCode == HTTP_CODE_OK
|| httpCode == HTTP_CODE_MOVED_PERMANENTLY )
{ // print server response payload
String payload = https.getString();
Serial.println( payload );
}
}
If the response code is a negative number, it means we have an error. We’ll
print the error code.
else
{
Serial.printf( "[HTTPS] GET... failed, error: %s\n"
, https.errorToString( httpCode ).c_str() );
}
Finally, close the HTTPS connection using the end() method:
https.end();
This specific example makes a request every two minutes. You can change it
depending on your project requirements.
Serial.println( "Waiting 2min before the next round..." );
delay( 120000 );
Demonstration
You can change the debug level to get more information about what’s going on in
the process. Go to Tools > Core Debug Level > Debug. Then, you can upload the
code to the ESP32.
After uploading the code, open the Serial Monitor at a baud rate of 115200.
Press the on-board RST board to start running the newly uploaded code.
You should get something similar as shown in the picture below.
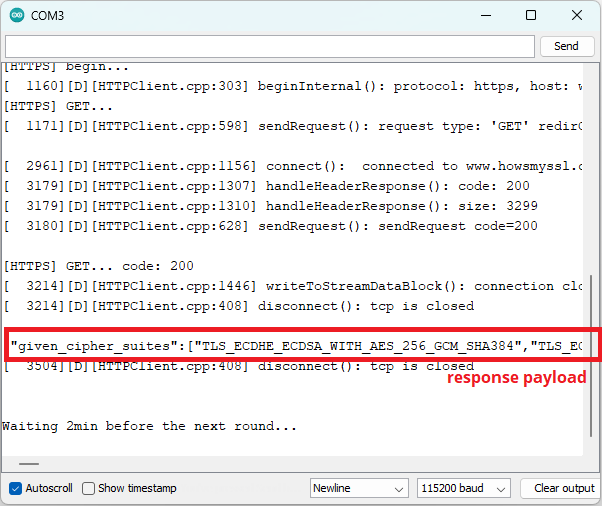 Demonstration HTTPs request ESP32 with response payload
If you scroll to the right, you’ll get the result of how secure the connection
is. You should get a “Probably Okay”.
Demonstration HTTPs request ESP32 with response payload
If you scroll to the right, you’ll get the result of how secure the connection
is. You should get a “Probably Okay”.
ESP32 HTTPS Requests without Certificate
If you want to skip the SSL server certificate verification, but you still want
to have encrypted communication, you can remove the following line:
client.setCACert( test_root_ca );
And add the following line before starting the HTTP client:
client.setInsecure();
The complete example can be found below.
/*H*******************************************************
Complete project details: https://RandomNerdTutorials.com/
Based on the BasicHTTPSClient.ino example found at Examples > BasicHttpsClient
********************************************************/
#include <Arduino.h>
#include <WiFi.h>
#include <WiFiClientSecure.h>
#include <HTTPClient.h>
//************************* DEFINES ************************************
#define BAUD 9600
const char* ssid = "REPLACE_WITH_YOUR_SSID";
const char* password = "REPLACE_WITH_YOUR_PASSWORD";
//************************* PROTOTYPES ************************************
//************************* VARIABLES ************************************
/*F********************************************************************
*
**********************************************************************/
void
setup()
{
Serial.begin( BAUD );
Serial.println();
// Init Wi-Fi
WiFi.mode( WIFI_STA );
WiFi.begin( ssid, password );
Serial.print( "Connecting to WiFi .." );
while( WiFi.status() != WL_CONNECTED )
{
Serial.print( '.' );
delay( 1000 );
}
Serial.println( WiFi.localIP() );
}
/*F********************************************************************
*
**********************************************************************/
void
loop()
{
WiFiClientSecure *client = new WiFiClientSecure;
if( client )
{
client->setInsecure(); // SET SECURE CLIENT WITH CERTIFICATE
HTTPClient https; //CREATE AN HTTPClient INSTANCE
// INIT AN HTTPS COMMUNICATION USING SECURE CLIENT
Serial.print( "[HTTPS] begin...\n" );
if( https.begin( *client, "https://www.howsmyssl.com/a/check" ) )
{ // HTTPS
Serial.print( "[HTTPS] GET...\n" );
// START CONNECTION AND SEND HTTP HEADER
int httpCode = https.GET();
if( httpCode > 0 ) // HttpCode WILL BE NEGATIVE ON ERROR
{
// HTTP HEADER HAS BEEN SEND AND SERVER RESPONSE HEADER HAS BEEN HANDLED
Serial.printf( "[HTTPS] GET... code: %d\n", httpCode );
// FILE FOUND AT SERVER
if( httpCode == HTTP_CODE_OK
|| httpCode == HTTP_CODE_MOVED_PERMANENTLY )
{
String payload = https.getString();
// PRINT SERVER RESPONSE PAYLOAD
Serial.println( payload );
}
}
else
{
Serial.printf( "[HTTPS] GET... failed, error: %s\n"
, https.errorToString( httpCode ).c_str() );
}
https.end();
}
}
else
{
Serial.printf( "[HTTPS] Unable to connect\n" );
}
Serial.println();
Serial.println( "Waiting 2min before the next round..." );
delay( 120000 );
}
With this example, your connection is still encrypted, but you won’t be sure if
you’re talking to the right server. This scenario is useful for testing
purposes.
After uploading this example, here’s what you should get:
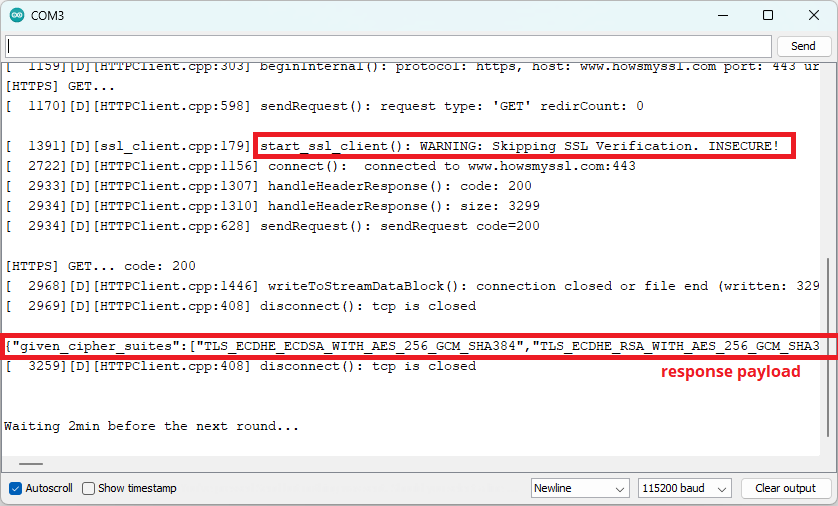
Demonstration HTTPs request ESP32
Your connection is still encrypted, but it will skip SSL verification.
Wrapping Up
In this tutorial, you learned how to make HTTPS requests with the ESP32. You
also learned about the basic concepts of HTTPS protocol and about SSL/TLS
certificates.
We’ve taken a look at examples with the WiFiClientSecure and HTTPClient
libraries. The examples presented are as simple as possible so that you can
modify them and apply them to your own projects. You learned how to make HTTPS
requests with and without verification of the SSL/TLS certificate.
We hope you found this tutorial useful. We intend to create more tutorials about
HTTPS and secure communication. Let us know in the comments below what you
think.
Learn more about the ESP32 with our resources:
Learn ESP32 with Arduino IDE
Build Web Servers with ESP32 and ESP8266
Firebase Web App with ESP32 and ESP8266
Free ESP32 Projects and Tutorials