Demo 11: How to use SmartConfig on Arduino ESP32
1. Introduction
In previous demos, we use WiFi class to connect to a WiFi network
"WiFi.begin(ssid, password)". Here we use "hard-coded" ssid and password. It is
really inconvenient when we bring our ESP32 to another WiFi network, we have to
modify ssid and password according to new network, recompile and flash new code.
So there is a technique to overcome this called "SmartConfig" which was
invented by TI. You can refer it here:
https://community.particle.io/t/smart-config-the-missing-manual-now-available/442
Now this technique was also applied for ESP32. In order to do SmartConfig, you
need a smartphone or tablet (Android or iOS) that connected to WiFi network
(which you want ESP32 to connect to) and installed a special application. On
this application, you just supply the ssid and password of WiFi network so that
the application can use, encode them and then broadcast (via UDP) encoded ssid
and password (under packet format) over the air. At this moment, ESP32 with a
special software in it will capture these packets, decode back ssid and password
and use them to connect to Wifi network. After connecting to WiFi ESP32 will use
mDNS to multicast a message to the application to notify that it connected to
WiFi.
The source code of special application is supplied by Espressif. You can
download at:
https://github.com/EspressifApp/EsptouchForAndroid
https://github.com/EspressifApp/EsptouchForIOS
This application is also available on App Store. You can use it to test
SmartConfig feature.
- For Android, this application is available under name "IOT_Espressif" or
another application "ESP8266 SmartConfig" (this is for ESP8266 but you can
use it for ESP32):
https://play.google.com/store/apps/details?id=com.cmmakerclub.iot.esptouch
https://play.google.com/store/apps/details?id=com.espressif.iot
- For iOS, this application is available under name "Espressif Esptouch":
https://itunes.apple.com/us/app/espressif-esptouch/id1071176700?mt=8
2. Hardware
You do not need any extra hardware
3. Software
Some functions that are related to SmartConfig feature, also in WiFi class:
- WiFi.mode(WIFI_AP_STA): set ESP32 to Station mode (To run SmartConfig it must
be set to Station mode)
- WiFi.beginSmartConfig(): start SmartConfig
- WiFi.smartConfigDone(): check whether SmartConfig is done or not
- Let 's make a simple demo for this feature. We use an Android smart phone
which installed "ESP8266 SmartConfig" and an ESP32 with SmartConfig code.
From smartphone (connected to WiFi) do:
Open the application -> fill ssid and password and then press Confirm button.
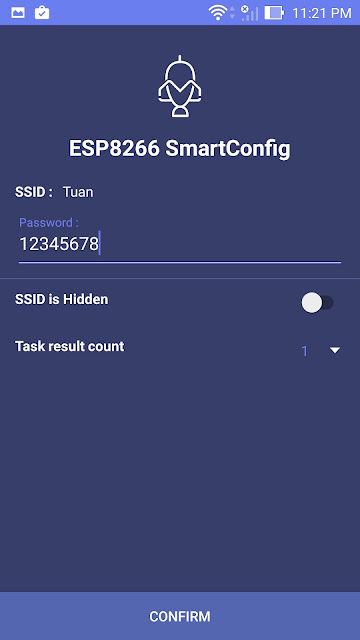 Figure: ESP8266 SmartConfig app with Menu
Code
Create an Arduino project, save as esp32smartconfig with code:
/*F********************************************************************
*
**********************************************************************/
#include "WiFi.h"
/*F********************************************************************
*
**********************************************************************/
void
setup()
{
Serial.begin( BAUD );
WiFi.mode( WIFI_AP_STA ); // Set ESP32 to WiFi Station mode
WiFi.beginSmartConfig(); // start SmartConfig
// Wait for SmartConfig packet from mobile
Serial.println("Waiting for SmartConfig.");
while( !WiFi.smartConfigDone() )
{
delay(500);
Serial.print(".");
}
Serial.println( "");
Serial.println( "SmartConfig done.");
// Wait for WiFi to connect to AP
Serial.println( "Waiting for WiFi" );
while( WiFi.status() != WL_CONNECTED)
{
delay( 500 );
Serial.print( "." );
}
Serial.println( "WiFi Connected." );
Serial.print( "IP Address: " );
Serial.println( WiFi.localIP() );
}
/*F********************************************************************
*
**********************************************************************/
void
loop()
{
}
4. Result
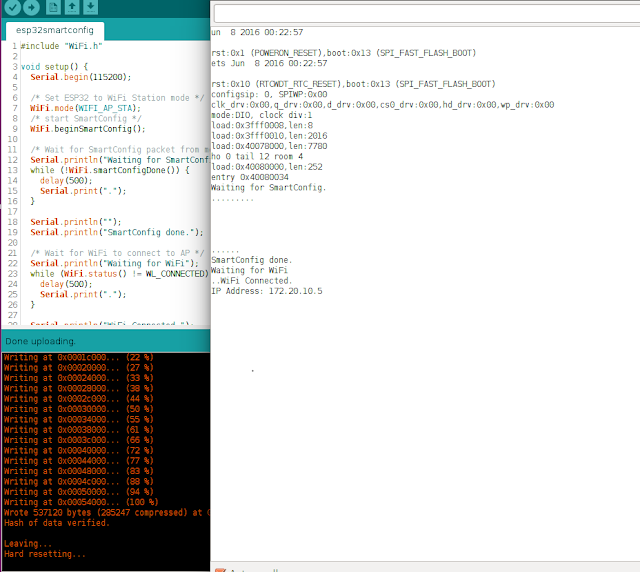 Figure: From Terminal SmartConfig done, ESP32 join WIFi network with IP address
 Figure: From smart phone, ESP connected to WiFi network.